Last Updated on December 26, 2022 by Mat Diekhake
For years now you’ve been able to change the file attributes from the Command Prompt in Windows by using the “Attrib” command. You can now change the file attributes directly from File Explorer and getting access to the file’s Properties dialog.
File attributes are bits of metadata associated with the files your PC that get stored to instruct the software you use on what attributes the files are to be treated with. For example, if you were to set a file to be “read-only” it would be the file attributes that save that metadata for the other programs that interact with that file to see.
While attributes are considered part of a file’s metadata, they are thought of as different than the other metadata that files have such as the date, file type, and permissions.
Windows 10 comes with a few ways for you to change the file attributes. You can still use the command line if you become a pro at doing it that way, and you might find some registry tweaks to do things like add file attributes to the context menus. Probably the most natural way to do it though is directly from File Explorer now, where you get access to the file directly, along with its Properties dialog with a simple right-click.
Here’s what you need to change the file attributes to a file when you’re using a version of the Windows 10 operating system.
How to Change File Attributes in Windows 10
1. You can change the file attributes in Windows 10 directly from File Explorer.
2. Open the File Explorer by heading to the Start menu > clicking on the Documents icon.
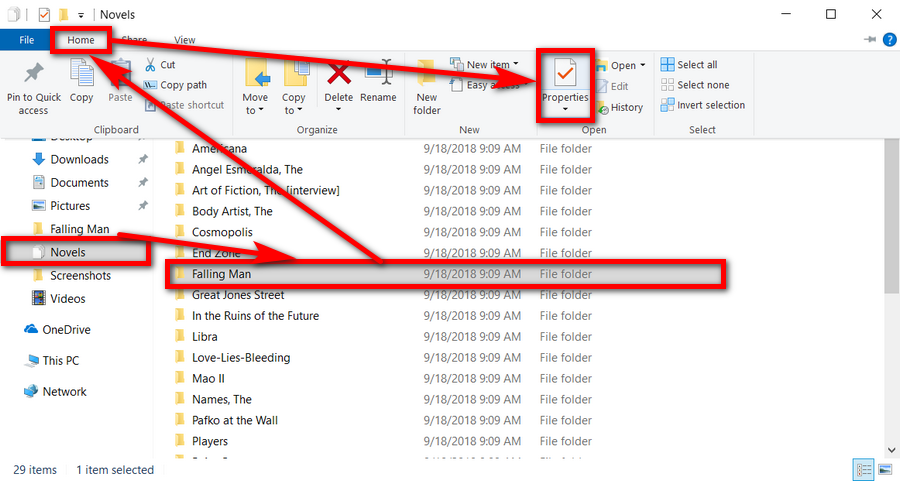
3. Use File Explorer’s navigation pane to locate the file that you want to change the attributes of.
4. Once you’ve single-clicked on the file, click on the Properties button located on the Home tab of the ribbon.
5. From the top of the Properties dialog, select the “General” tab and then you can set or remove the attributes for “Read-only” and “Hidden.”
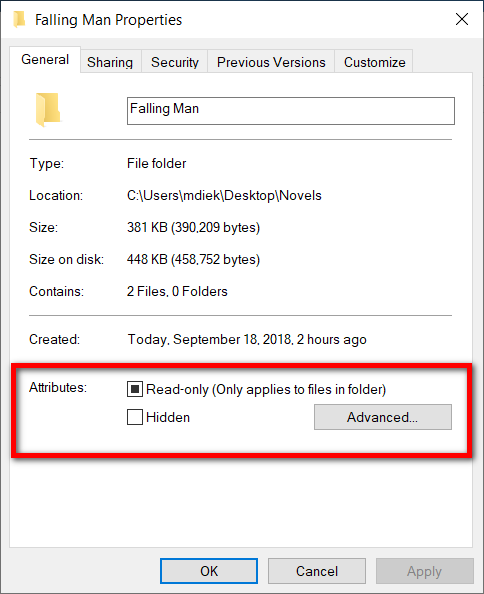
6. Next to it, you’ll also find the “Advanced” button to click on where you can then choose additional file attributes and compress or encrypt attributes.
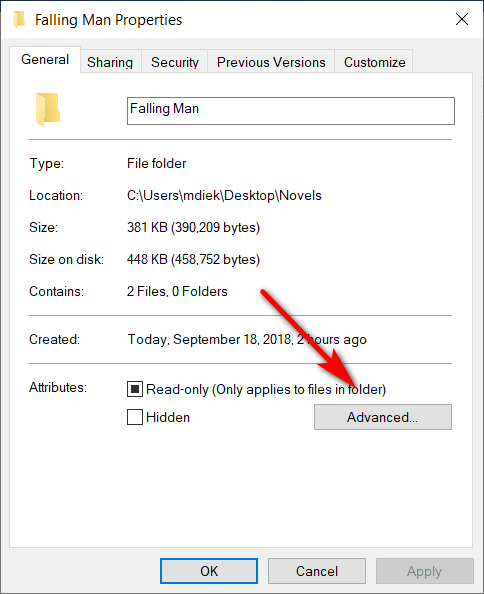
7. You can click on the “Apply” button after you’ve made your changes for them to take effect immediately or you can click on the “OK” button, and the changes will still be saved, but the Advanced settings dialog will close.
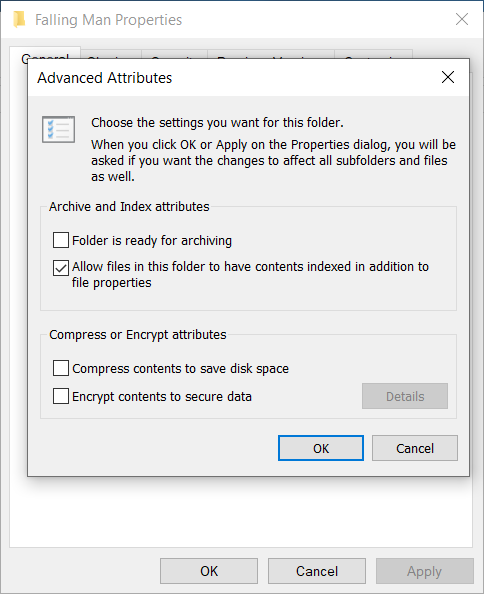
8. The default settings for the advanced attributes are for the “Allow files in this folder to have contents indexed in addition to file properties” to be enabled and all others disabled.
That’s it.
You can also open the Properties dialog by right-clicking on the file of your choice from File Explorer and clicking on the “Properties” link from the context menu. That would technically be the simpler and quicker way, but the guide above is a somewhat more official way that File Explorer offers. As with most cases in Windows, it doesn’t matter how you get there, the settings are exactly the same. In addition, for those who enjoy hotkeys, you can also get to the Properties dialog by pressing the Alt key and double-clicking on the file.
Related Tutorials
- How to Share Files and Folders Over a Network in Windows 10
- How to Remove Details Tab from File Properties in Windows 10
- How to Zip and Unzip Files in Windows 10
- How to Fix “You’ve been signed in with a temporary profile” Error in Windows 10
- How to Determine File System of Drive in Windows 10
- How to Remove Security Tab from Drives, Files, Folders Properties in Windows 10
- How to Turn On/Off OneDrive Files On-Demand in Windows 10
- How to Delete a Wireless Network Profile in Windows 10
- How to Encrypt Single Files and Folders in Windows 10
- How to Get Help with File Explorer in Windows 10
- How to Choose What Files Window Search Indexes in Windows 10
- How to Configure Windows 10 to Create Dump Files on Blue Screen of Death (BSOD)