Last Updated on October 3, 2024 by Mat Diekhake
Encryption is a feature that has gotten more familiar with Windows users as time has gone on. There are two types of encryption that a computer can have: full drive encryption and single file or folder encryption.
As the name suggests, the full disk encryption is going to encrypt everything that’s on your disk (or drive as it’s also commonly referred to as). For most people, that will be the C: drive as it is the default location where all of your files end up: everything from pictures, to downloads and music, is all stored in libraries or folders—directories to be more vague—that come from the C: drive. When you encrypt everything on the disk, it means all folders have the encryption.
There are numerous ways you can have full drive encryption: a computer that runs on Windows 10 Pro or Enterprise always comes with BitLocker encryption and some computers that run on Windows 10 Home come with Windows Device Encryption. It’s also possible to install a third-party tool to get full drive encryption on any Windows edition, such as what VeraCrypt offers.
On the other hand, you could also choose not to have full disk encryption and just go down the route of having encryption on single files and folders instead. When you do it this way, only the file or folder you want to be encrypted gets the encryption, and all else on the disk remains unencrypted. There is also no limit as to how many single files or folders you can encrypt, all it means is you’ll have to go around and do each of them individually because you can only do one of them at a time. The way you would encrypt a single file or folder is with the EFS encryption that Microsoft has offered since Windows XP. The EFS encryption is only available for Windows 10 Professional, Enterprise, and Education editions, though, so the Windows 10 Home users—yet again—miss out.
EFS encryption is always the type of encryption that you find in Windows if you get the chance to encrypt a single file or folder. When you use EFS, only the person who originally encrypted the file will be able to decrypt it. It is possible for other people to see your encrypted file if you are using a shared computer, though those users aren’t able to get access to them.
Full Drive Encryption vs. Single Files
As you may already know, some Windows 10 editions come with BitLocker full drive encryption. You might even be running it without even knowing it. But even if you did end up with the more expensive version of Windows that comes with this type of encryption running, you might wish you hadn’t: there are loads of technology experts out there who don’t run it themselves and suggest you shouldn’t either.
If your operating system develops a problem to the point where it’s unusable, or you lose the recovery key data, you have then lost all that information that you encrypted because there’s no way to recover it. If you find yourself in one of those situations, then the very security that you thought was protecting you has now become a huge thorn in your side and will be the reason for you losing the data. Therefore, some people out there only suggest encrypting the stuff that you truly need encrypted.
Not all computers that run Windows 10 Pro do come with the BitLocker turned on by default, but many of them do. It’s another one of those times when Microsoft just has its own way of trialing things out, and there’s no way of knowing until you take a look for yourself (which is quite easily done by looking for the BitLocker icon from your drive icon in File Explorer). But if you do have a computer that runs on the Windows 10 Pro operating system and BitLocker is turned on, that means everything on the drive is getting encrypted for you, and a lot of the stuff you might not even care if other people see it or not. In those times you might want to think about turning BitLocker off and just encrypting the single files—the stuff that you definitely want to have encrypted because it’s your private information—behind encryption.
As for the encryption itself, not many people really care if they have their data locked behind BitLocker encryption or EFS encryption . . . the only thing they really care about is if it is encrypted or not. On a technical level, the BitLocker encryption that offers the full disk encryption is more secure, and if you were to have really sensitive information, that’s the one you should be using. But if it’s just stuff like your tax file number and social security then either EFS or BitLocker will do the job just fine so long as you put a password on your single file or folder encryption, which is something we’ll run through during the guide below.
How to Encrypt Single Files and Folders in Windows 10
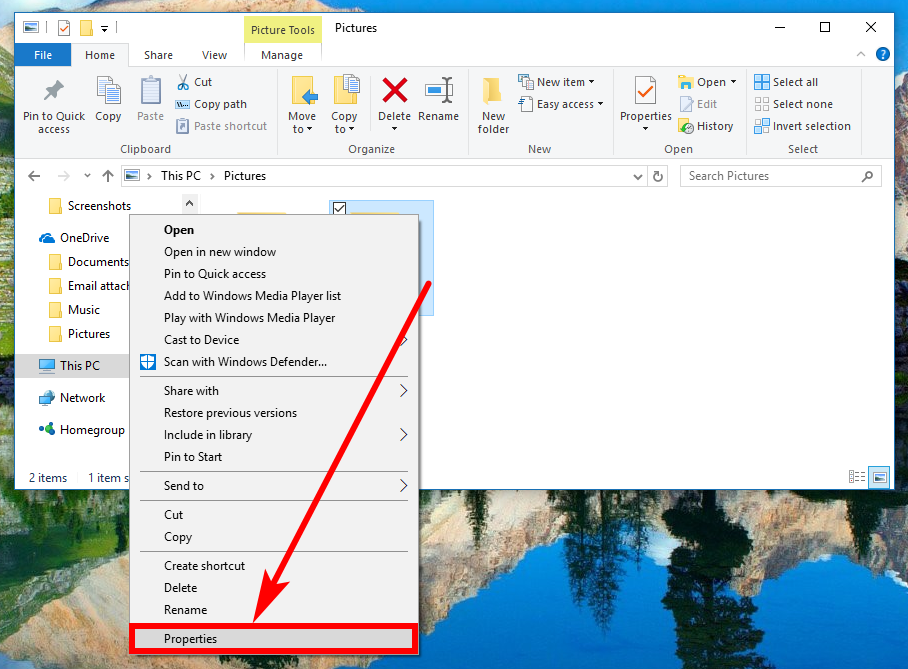
1. You can encrypt a single file or folder in Windows 10 by using the Properties dialog box for that particular file or folder. To get started, open the File Explorer and locate the file or folder that you want to encrypt. Once you’ve found it, right-click on it and then click on the Properties link from the context menu.
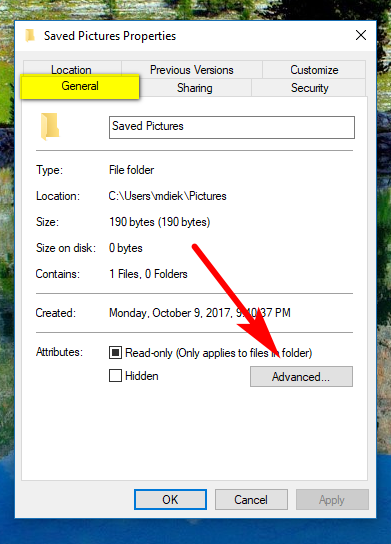
2. It opens up on the General tab by default. Keep it there and then click on the Advanced button next to the Attributes heading.
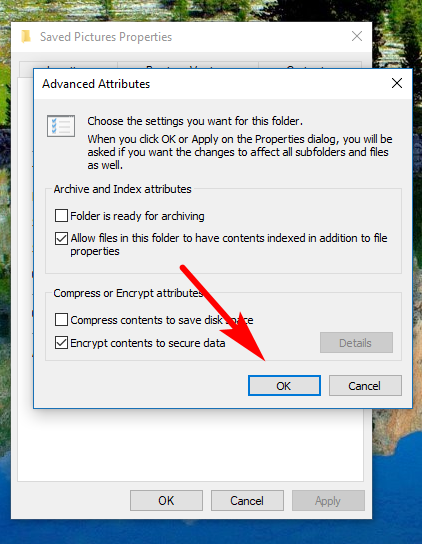
3. Click on the checkbox where it says Encrypt contents to secure data to apply a checkmark for that option.

4. And then click on the OK button at the bottom of the Advanced Attributes window to close it.
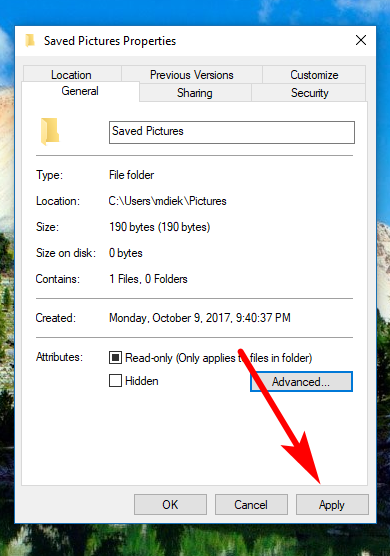
5. And then click on the Apply button at the bottom of the Properties dialog box to apply the changes that you’ve made.
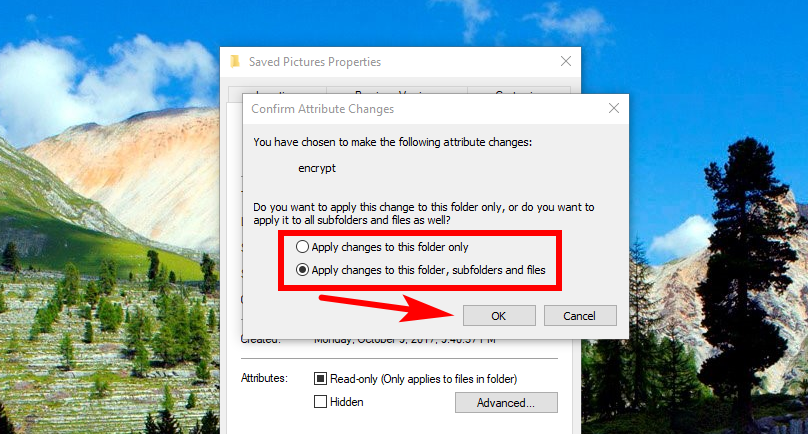
6. Before it applies them though, it brings up another window, the Confirm Attribute Changes window, and makes you choose between either applying the changes to the file or folder only or applying the changes to the folder or file, plus any subfolders and files that there may be associated with it. There is no right or wrong answer this one: just choose the option that best suits your needs.
If you’re only interested in applying the changes to the exact file or folder of your choice, then just choose the top option. If, however, you think that you might do other stuff in the future that related to your file or folder, then you might want to choose the second option, so everything that you add and is associated with that file or folders gets encrypted as well.
7. Once that is done you get a little notification in the bottom right corner of your computer’s display, suggesting that you should, perhaps, back up your file encryption key as well. And Microsoft is right here: you should.
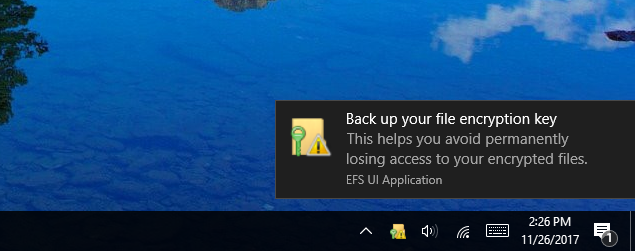
8. If you don’t catch it in time, since it only stays up on the screen for a little while, you can also find it sitting there in the extra icons associated with the system tray, which can be found by clicking on the little arrow to the left of all currently exposed icons.
![]()
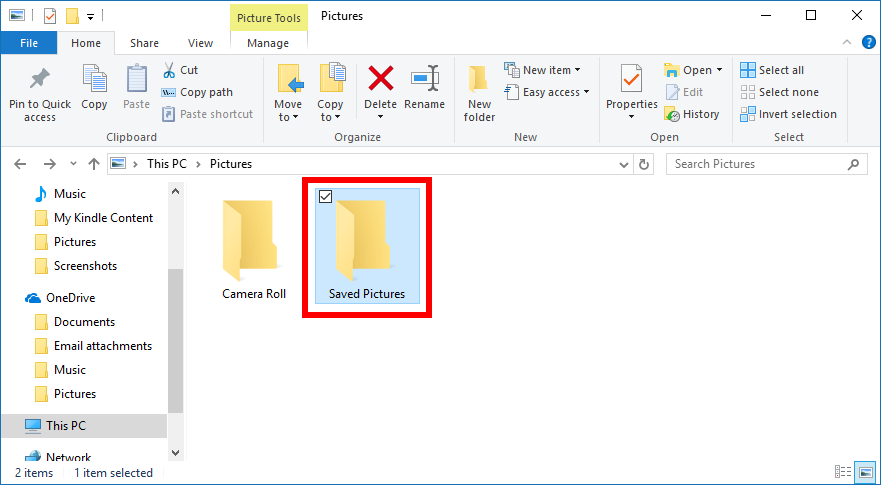
9. If you were to open the File Explorer and check out the folder or file that you encrypted, you’d notice that there is nothing signifying the changes; that is it looks just the way it did before you did the encryption—different from if you were to use BitLocker which distinctly gives the picture of a padlock, so you know that it is working.
How to Backup File Encryption Key with Certificate Manager Tool
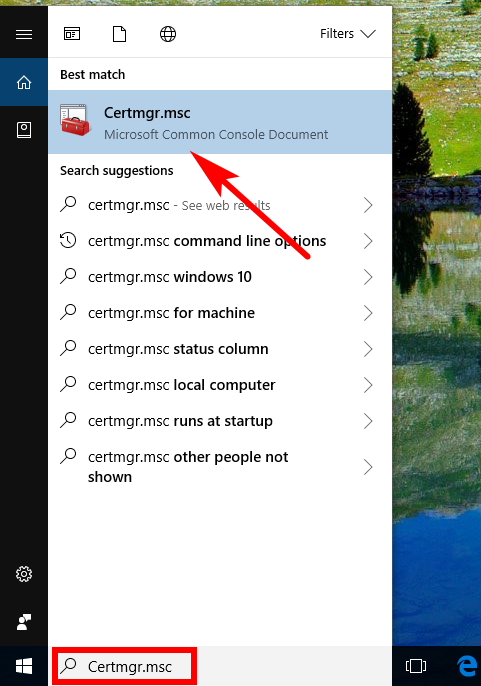
1. Though the number of software updates for Windows 10 has tapered off some since the date it spawned, that doesn’t mean your data collecting would necessarily have dropped off as well: internet browsing for webpages filled with invaluable knowledge, images, creating of spreadsheets and other work-related documents could still be coming thick and fast, aplenty. The message that you get after finishing encrypting the single file or folder to back up the file encryption key is not something you should overlook. You can do it immediately by following the steps you get on the computer’s display—or, if you wanted, you could also do the same thing by heading to the Certificate Manager that Windows 10 has on offer as well. To open it up, type certmgr.msc into the Cortana search and then click on the Certmgr.msc Microsoft Common Console Document in the results that comes up under the Best match section.
2. The Certificate Manager is one of the few programs found in Windows 10 that doesn’t always pop up on your screen when you open it, so you’ll need to click on its icon that is located in the taskbar instead.
![]()
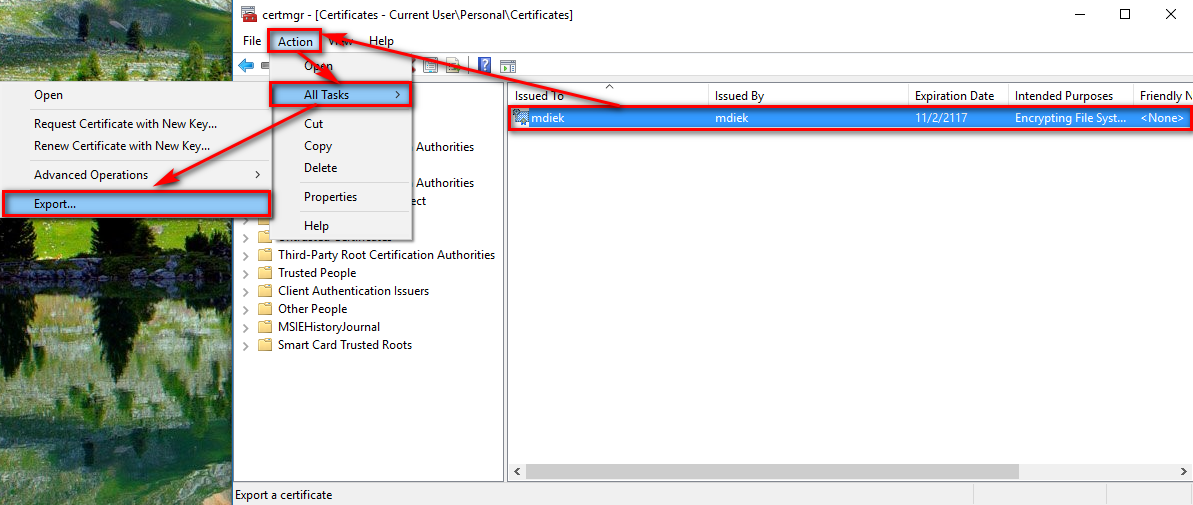
3. With it open, using the left side pane, head to the Personal > Certificates folders and then highlight the certificate that you can see in the right side pane. Now click on Action > All Tasks and Export from the secondary menu.
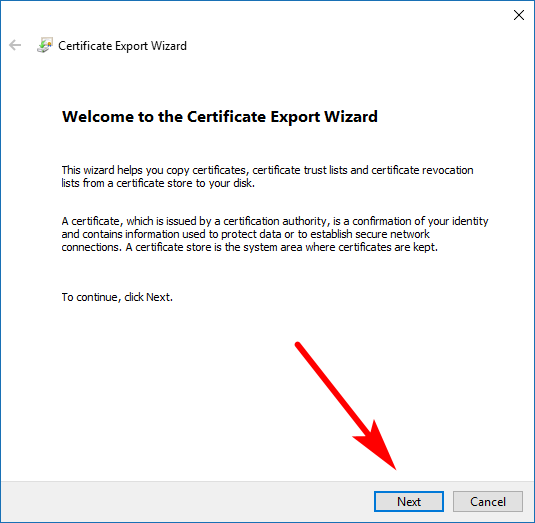
4. You then automatically get shown what is the beginning of the Certificate Export Wizard. To get going, click on the Next button at the bottom of the window.
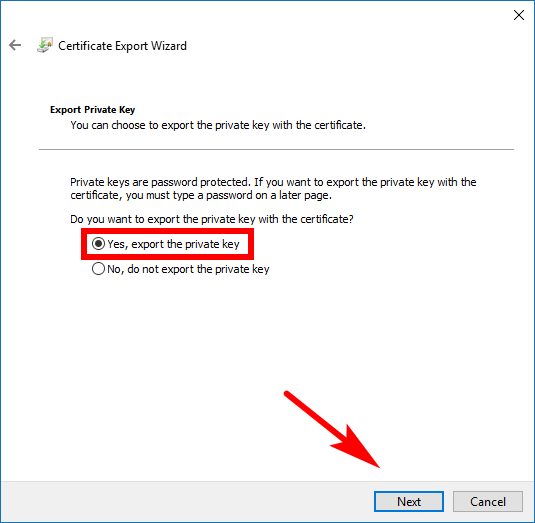
5. Switch it over to the Yes, export the private key and then click on the Next button at the bottom of the window.
6. You then need to choose the file format that you want your file to have. Windows does a pretty good job at this for most people by default, so you should get away with leaving it on the default settings in most cases. However, it’s best to have a read through the list of options just in case. When you’re ready, click on the Next button at the bottom of the window.

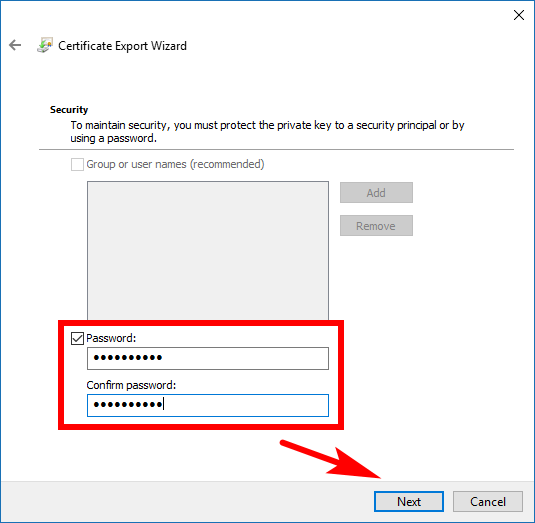
7. You need to either add a password or add groups and usernames to keep the private key secure. It says that it recommends the group or username, and there is certainly nothing wrong with that option, but this is one of the few times where we personally would go against the default recommendation and suggest just using a password: it’s less confusing, as long as you choose a password that you are familiar with (like the same password as your Microsoft account, for instance), and you don’t need to rely on groups or any sort.
8. You then need to pick the file that you want to export (backup). You need to either type the exact name or click on the Browse button to find out the exact name. Anything other than the exact name is not going to work. Consequently, this is commonly one of the steps that people get wrong if things were to ever go askew for them.
You’ll see in our example above that the folder that we clicked on to encrypt was called Saved Pictures, as shown in the step where we clicked on its Properties to then bring up its advanced options. As such, that is the name we typed in for your file to export. Do the same thing but using your own folder or file name instead.

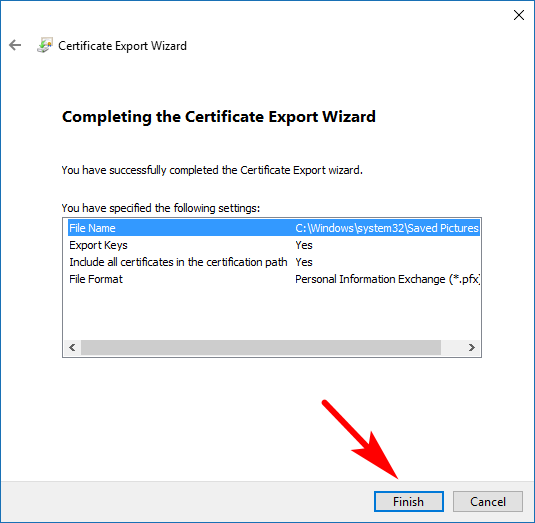
9. Upon seeing the completion message for the Export Wizard, it shows you what you have chosen to do in the box. Store that information if you like and then click on the Finish button when you’re done.
Some technology experts are struggling to come up with reasons why the EFS encryption even exists anymore now that BitLocker is out and doing a better job, but the answer is still as straightforward as ever: while it is possible to have both EFS and BitLocker encryption running at the same time, you need to use the EFS variety if you only want to encrypt some but not all, files that you have on your drive. BitLocker is full disk encryption, which means that it will be encrypting everything on your drive. It’s assumed that those technology experts realize this and just don’t think there’s anything wrong with encrypting the full drive, and you might, comfortably, get ten years of computer use without running into problems, but we also know of plenty of people who do hesitate to use full disk encryption for the double-edged sword that it provides: if something goes wrong with the operating system, or you lose the recovery key, your data is gone. Without meaning to sway you one way or the other, it’s just information that everyone should know before jumping into making the decision on what to do.
This article was last updated on May 31, 2019.
That’s all.
Related Tutorials