Last Updated on February 25, 2024 by Mat Diekhake
Windows 10 comes with two different file encryption options for its users: BitLocker and EFS. Neither of them is available to Windows 10 Home users; what separates them is BitLocker is typically used to encrypt an entire disk while EFS is handier for single files and folders.
BitLocker and EFS encryption can be used at the same time: if you have Windows 10 Pro and know that BitLocker is helping protect your files, you can still add the additional layer of EFS encryption over the top. Doing so results in the files becoming more secure than using just one method. EFS is the notably lighter of the two encryption methods which might have something to do with why it’s the one available on all versions.
Additionally, some users have reported BitLocker locking computers and not allowing the operating systems to boot on them without the codes from their Microsoft accounts. In Microsoft’s defense, those passwords are easily accessible, but the operating systems locking down for now apparent reason is what has left some people displeased with BitLocker for the time being.
You can easily tell whether your computer is encrypted with BitLocker or EFS just by observing the lock icons. You will also see the option to turn “BitLocker” on or off listed in the context menu if you right-click on the encrypted file if it is encrypted with BitLocker. EFS encryption is available for NTFS file systems. When you encrypt a file with EFS in Windows 10, the icon will have a golden lock, indicating that it is locked, and an open folder when it’s not encrypted. You can also customize the EFS icon if you prefer.
The following tutorial demonstrates how to change or remove the lock icon on encrypted files when you’re using a version of the Windows 10 operating system.
How to Change or Remove Lock Icon on Encrypted Files in Windows 10
You can change or remove the EFS lock icon on encrypted files from the Registry Editor app in Windows 10. The encryption icon is removed automatically when you decrypt the file, but you can also continue encrypting the file and remove the icon if you prefer. The same area of the Registry Editor is where you can change the look of the icon instead of removing it entirely as well. Here is how to do any of those things:
1. Open the Run dialog by pressing Win+R keys on your keyboard, and then open the Registry Editor by typing Regedit and clicking on the OK button.
If your keyboard isn’t allowing Run to open, you can type Regedit into the search field in the taskbar and then click on the Regedit Run command link when it appears in the list of results.
2. If you’re prompted by User Account Control (UAC), click on the Yes button.
3. Using the Registry Editor’s left pane, navigate through to the following registry keys:
HKEY_LOCAL_MACHINE\SOFTWARE\Microsoft\Windows\CurrentVersion\Explorer\Shell Icons
Note: if you don’t have the Shell Icons key, you can right-click on the Explorer key and click on New > Key, and name it “Shell Icons.”
![]()
To Change or Remove EFS Lock Icon
You can decrypt the file and the EFS lock will be removed. Alternatively, you can continue encrypting the file and remove the icon, or just change the icon if you prefer. Here’s how you can do that:
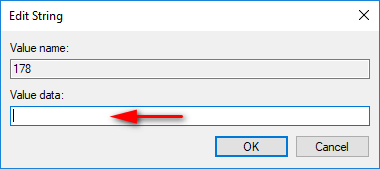
1. In the right side pane of Shell Icons, click on the 178 string value.
Note: If you do not see the 178 string value, you need to create it. You can create it by right-clicking the white background, and then selecting New > String Value and naming it “178.”
To Restore Default EFS Lock Icon
If you want to remove the changes you’ve made some time in the future, you can restore the EFS encryption lock icon to look like its default icon once again. Here’s how you can achieve that:
1. From the right side pane of the Shell icon key, remove the 178 string value.
2. Click on the Yes button when Windows asks if you’re sure that you want to delete this value permanently.
That’s all.
Related Tutorials