Last Updated on December 26, 2022 by Mat Diekhake
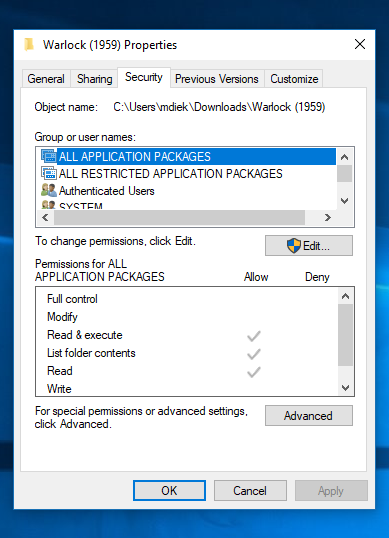
When you right-click the pointer on a drive, file or folder and select the Properties from the menu, one of the things you’ll find inside is the Security tab. In here you can click on an Edit button to change the permissions for the drive, file or folder and beneath that is the option to click and Advanced button to get access to special permissions or advanced settings.
There might come a time when an administrator wants to no longer allow other users to get access to this Security tab which would prevent other people from changing the ownership and permissions of a drive or file. You can achieve that by adjusting the Group Policy if you like.
This is what you need to remove the Security tab from the Properties dialog box that is associated with a drive, file or folder coming from the File Explorer when using the Windows 10 operating system.
Note: You would need to be signed in to an account that has the administrative permissions assigned to it before you could use the Local Group Policy Editor to make changes to a Group Policy. In addition, you must have the Windows 10 Pro to be able to use the Local Group Policy Editor; it’s not a feature that comes with Windows 10 Home.
How to Remove Security Tab from Drives, Files, Folders Properties in Windows 10
Here is how you can remove the Security tab from drives, files and folder Properties in Windows 10:
1. You can remove the Security tab from the Properties dialog box by using the Local Group Policy Editor. To get started, open the Local Group Policy Editor by pressing the Windows logo key + R on your keyboard to bring up the Run dialog and then type gpedit.msc and hit the OK button.
The Local Group Policy Editor window doesn’t usually open which would have then been viewable on your computer’s display above your web browser, so you’ll need to click its icon that is in the taskbar to bring it up.
![]()
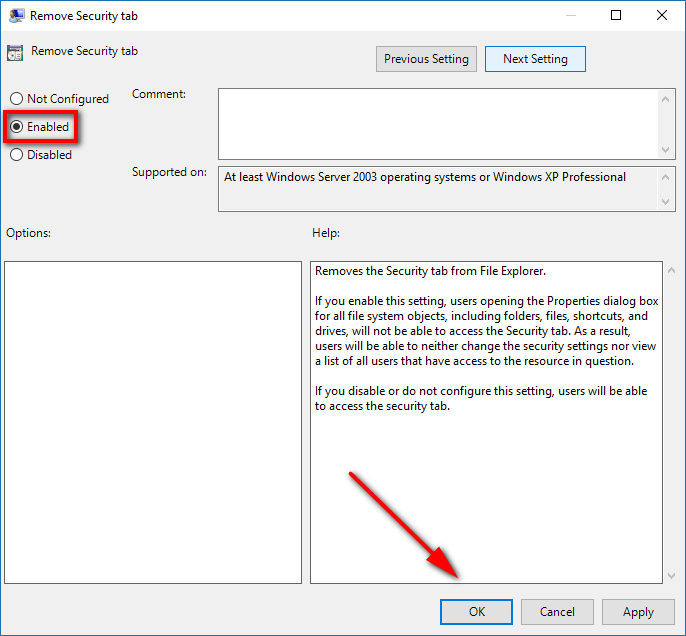
2. Using the left side pane in the Local Group Policy Editor window, navigate to the following path: User Configuration > Administrative Templates > Windows Components > File Explorer. Now in the right side pane click on the Remove Security tab once, so it’s highlighted and then click on the Edit policy setting link that becomes available.

3. You’ll then have the Remove Security tab Group Policy window open. By default, it’s set to be not configured which would have the same effect if it were to be disabled. For it to take the Security tab away, you want to change it over to the Enabled and then click on the OK button at the bottom of the policy window for the changes to be saved.
You should find that the Security tab has now bee removed, making it impossible for other users to change ownership or permissions of files.
That’s all.
This article was last updated on May 31, 2019.
Related Tutorials