Last Updated on December 26, 2022 by Mat Diekhake
You might have noticed it when something goes askew with your operating system: mouse pointer trails are normally associated with hardware or software not working the way it should be, but there’s also a setting that you can turn on from the Mouse Properties that will make the mouse always leave a trail if you enjoy them.
Most people get annoyed when seeing a pointer trail on the screen as they don’t have any issues seeing the pointer just in the one spot, but that’s not everybody. Some people aren’t able to see the default mouse pointer very well, and the pointer trail then becomes a practical solution, to better help them see where the mouse has been and where it is now.
Mouse visibility is one of the more important things you’ll need when using the Windows 10 operating system; if you always need to track where the pointer is, then it’s going to be wasting lots of time that would be better spent doing other things.
Microsoft has made it possible to turn the pointer trails on and off from the Mouse Properties dialog in Windows 10. This is what you need to make it happen.
How to Turn On/Off Display Pointer Trails in Windows 10
You can turn the mouse pointer trails on or off from within the Mouse Properties dialog in Windows 10 which is available from the Control Panel. To get there, open the Control Panel so it is showing the classic view by typing “Control Panel” into Cortana search, and then clicking on the “View by” drop-down menu and select “Small icons” and then click on the link that says “Mouse” from the list of all Control Panel items.
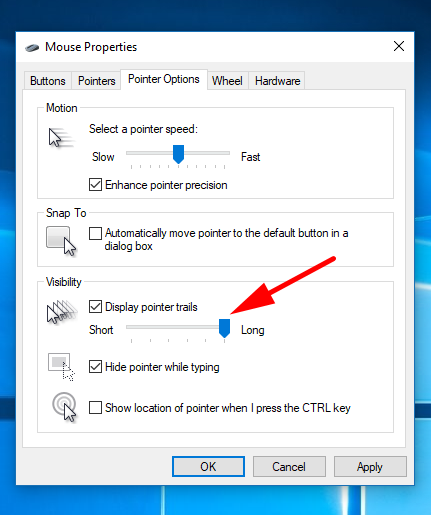
![]()
You’ll now have the Mouse Properties dialog open. Select the “Pointer Options” tab from the top of the dialog and then look under the Visibility heading for the “Display pointer trails” checkbox. Putting a checkmark in this box and then clicking on the “Ok” button will result in the trail being turned on.

When you do turn it on though you’ll also notice a bar that you can move to choose your strength in mouse trail. Keeping it on the longest setting will mean the maximum amount of pointer trail is viewable, while shifting it over to the short side will mean it’s closer to the default mouse setting. You can click on the “Apply” button after you’ve adjusted the length of the trail and then move the mouse around the computer’s screen for immediate results without having to close the dialog and reopen it again.
The default setting with no mouse trail is by far and away the better setting for people who don’t need glasses and don’t have any eye issues; however, the alternative is also there for people who need it when it works better for them.
You might also be interested in:
- How to Hide Mouse Pointer While Typing in Windows 10
- How to Remove Security Tab from Drives, Files, Folders Properties in Windows 10
- How to Turn Off Cortana Contacts, Email, Calendar Permissions in Windows 10
- How to Terminate Store Apps in Windows 10
You can subscribe to our RSS, follow us on Twitter or like our Facebook page to keep on consuming more tech.