Last Updated on December 26, 2022 by Mat Diekhake
You can format a hard disk drive or a solid-state drive when using the Windows 10 operating system to prepare them for Windows files.
When you do format a disk or drive, you will be wiping anything that’s already on them, so make sure you backup first if there is any data that you don’t want to lose.
Formatting a disk or drive used to be a common solution for fixing a disk or drive that had problems, although it is less common to do now that there are so many other troubleshooting methods available.
With formatting, there are two options you can choose from: a quick format or a full format. Neither of them, unfortunately, will save your data from being erased, but the quick format will not check for bad sectors. That’ll save you some time but at the cost of doing no checkups, which are usually advised unless you are positive that you don’t have any bad sectors. People who have recently formatted a disk or drive use this option, but only if they are sure that there aren’t any bad sectors. It’s best always to take the full format option in most cases, particularly if you aren’t sure if you have a bad sector or not. If the reason you are taking the format is that something is wrong, there’s always going to be a chance that you do have a bad sector that’s the cause of the issue.
Importance of Looking After Solid State Drives (SSDs)
Nowadays when you go shopping for a new laptop, you shouldn’t just automatically buy what is most expensive with the assumption that it’ll obviously serve you well. Most laptops aimed at the top end of the market will come with all sorts of different configurations, and if what you do on a laptop doesn’t ever put some of those configurations to good use, there’s no point paying for it. For example, someone like me who has no time for playing games, doesn’t video edit, and only browses the internet or writes all day long doesn’t really need a processor above that of a core i5. Yet, some of the higher configurations will have a Core i7 or even an i9 available these days. And you can apply that same logic throughout most of the rest of the optional extras: touch screen, resolution, battery, graphics card, Windows edition, RAM, so forth.
But one optional feature that you should think twice about before skipping is the amount of storage space available. Even if you’re someone who doesn’t put many files on a hard drive, you still might want to not go for the minimum option. Here’s why: the Solid State Storage drive which stores the data will eventually break down at some point. In order to give your laptop the best chance at a more prolonged survival, it wants to have as much free space as possible. If you’re using up 80% SSD storage, that hard drive is inevitably going to need replacing sooner than someone who is using up only 10% of their SSD storage. The reason for this is because the more free space on an SSD the less that data needs to be written; and there’s no getting away from the fact that data must be written on SSDs, which is why you want to save as much of those write times as possible.
If you still think you can get away with buying a laptop without much storage, you should at least look into the options for freeing up as much of that space as possible. Deleting your files manually when you’re finished with them, such as any movies or music you no longer need, will do a lot of the job, but there are also unnecessary files that you probably weren’t aware of that are being collected on the PC, too, and those can be cleaned by using a built-in Windows tool such as Disk Cleanup.
A tool that should be avoided if you’re dealing with solid-state drives (SSDs), however, is the disk defragmenter, even though there is still a place available in Windows 10 to optimize and defragment drives for the computers still using hard disk drives (HDDs). Newer versions of Windows such as Windows 10 are good enough to look after the same tasks that the disk defragmenter used to take care of, and according to those who work at Microsoft, the disk defragmenter doesn’t offer enough upside anymore to warrant the added disk writing to the SDD that it would inevitably need to do for it to do its job of defragmenting.
How to Format Disk or Drive using This PC from File Explorer
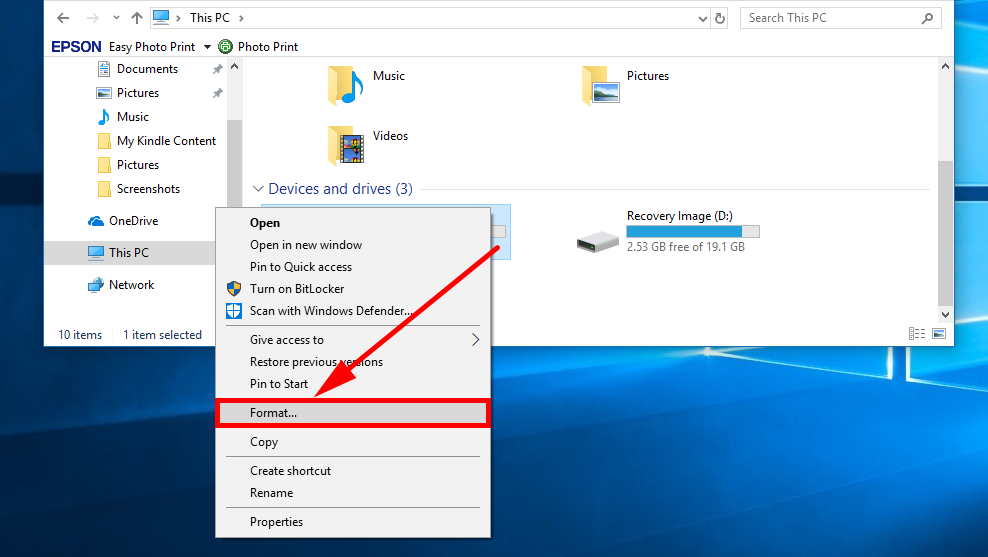
You can format a disk or drive by using the This PC section of the File Explorer that all versions of the Windows 10 operating system have. To do it, head to Start > Settings > This PC using the File Explorer navigation pane and then right-click on the drive that you want to format and then click on the Format link as shown in the screenshot below.
How to Format Disk or Drive in Disk Management
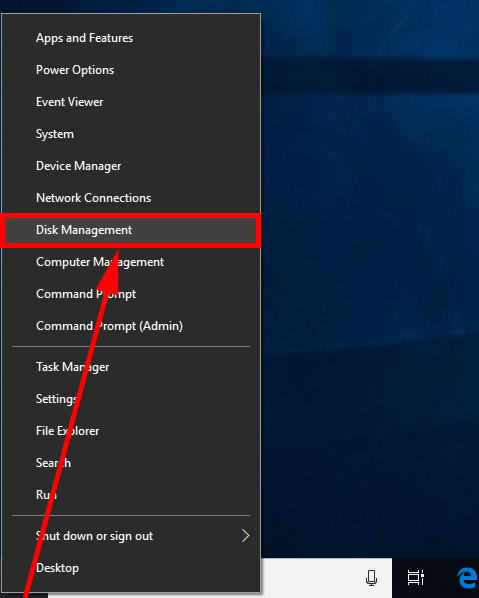
You can also use Disk Management in Windows 10 to format a disk or drive. Right-click on the Start button in the taskbar to bring up the Win+X Quick Links menu and then click on the Disk Management link as shown in the screenshot below.
You’ll see your disks and drives listed at the bottom of the Disk Management section. You can’t format the Disk 0 from here, which is the default disk that computers come with, but if you have more than one you’ll be able to do it. Just right-click on the one you want and then click Format from the menu.

How to Format Disk or Drive in Command Prompt
Note: You need to be signed in as an administrator before you can format a disk or drive using the command line. The first account created on a new Windows computer always has the administrative permissions that you need to be assigned to it and then it can grant those same permissions to other user accounts from the Settings application.
1. You can also format a disk or drive by using the Command Prompt in Windows 10 as well. Start by opening either the elevated Command Prompt window or just the standard version of the Command Prompt and then type diskpart followed by list volume.
2. You’ll now see a list of all volumes that are on your computer. You now need to specify the drive that you want to be formatting by entering the select volume command and replace where it says “Number” with the actual number of the drive that the Command Prompt has listed above for you.
3. You now have the option of performing a quick format or a full format (see the introduction for which one you should choose). For the quick format, enter the format fs= label=" Volume Label Name" command and for the full format, enter the format fs= label=" Volume Label Name" command.
How to Format Disk or Drive in PowerShell
Note: You’ll need to be signed in as an administrator before you can use the elevated version of the Windows PowerShell. The first account created on a new Windows computer always has the administrative permissions that you need to be assigned to it and then it can grant those same permissions to other user accounts from the Settings application.
1. Similarly to the command line, you can also use commands from the Windows PowerShell to format a disk or drive. You’ll need to start by opening up the elevated version of the Windows PowerShell window. Next, type the Get-Volume command and then it’ll give you the drive letters listed in the results after you hit the “Enter” key. Take note of the drive letter for the one that you want to format.
2. Now type the Format-Volume -DriveLetter "Drive letter" -FileSystem "FileSystemType" -NewFileSystemLabel "Volume Label Name" command for the quick format or the Format-Volume -DriveLetter "DriveLetter" -FileSystem "FileSystemType" -NewFileSystemLabel "Volume Label Name" command for the full format.
Most disks and drives come preformatted so you don’t need to do anything but just begin using them, but there are also occasions when you may need to format one yourself before it’s usable. Formatting can also be useful if you want to erase everything on a drive because it’ll be quicker doing it that way than actually doing it manually. A lot of the time though people are choosing to format to fix problems. Whatever your reason you’ll be able to use the newly formatted drive when you’ve finished with the steps above.
This article was last updated on May 11, 2019.
Format New Hard Drive in Windows 10https://t.co/G0FYpapP0p
— ConsumingTech (@ConsumingTech) May 10, 2019
Related Tutorials