Last Updated on December 26, 2022 by Mat Diekhake
When used correctly, the File Explorer in all editions and versions of the Windows 10 operating system is a very useful tool. And although many people need to spend a bit of time learning how to make the most of File Explorer, it is, in our opinion, one of the quickest and easiest ways to find your files out of all other operating systems out there in existence—a parable of operating system navigation. Few are able to make finding files anywhere near as simple. Microsoft’s File Explorer is intelligently laid out with clever architecture, and offers a much more simplified experience to finding stuff that you’ve downloaded or saved than the likes of Android, for example, where you would often need to resort to installing other applications just to find what you’re looking for, as if trying to find them on a much smaller screen wasn’t already bad enough.
Before diving into the specifics and more technical stuff, we’ve sat and watched many people who don’t know Windows 10 very well try to use File Explorer, and right off the bat, their first problem is apparent: they are very hesitant to move anywhere with folders because they’re worried they’ll get lost and not know there way back. One of the first things you should learn about File Explorer is that, much like when using a web browser for websites, it offers an address bar at the top to help you with your navigation. When you click on a folder from File Explorer, like the “Pictures” folder, for instance, it will then keep that address which you can see as your navigation in the address bar like in the picture below. To the left of that address bar is a couple of arrows which you can use to navigate back where you were before. That way if you start exploring around the place, don’t like where you’ve gone, you can just click in the arrow, and it will take you back to where you were before. Now that you know that, all you need to do is not touch the delete key, and your time with File Explorer won’t ever cause much damage.

The point of File Explorer is to make files available when you want to search. You can use the search field in the taskbar for lots of things, but you won’t find all the same stuff available from the search field as you would from File Explorer, unless you were to tweak it from its default settings. As they are now, you’ll need to use File Explorer to find anything that’s a document or file that you have saved and use the search from the taskbar for bringing up other stuff you would find on the operating system like standard Windows features. There’s a reason for this other than to promote File Explorer, too. If you were able to search for everything from the search field itself, it would take a long time to search for what you are looking for. By splitting all the stuff up into two different indexes, you get your results much quicker, and once you get the hang of it, it isn’t difficult to know when you should search from the search field or the File Explorer.
Opening File Explorer
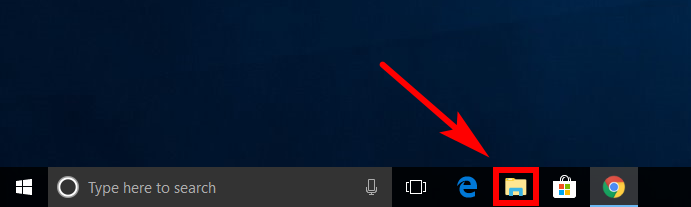
The first thing you’ll need to know is how to open the File Explorer in Windows 10. All versions of the Windows 10 operating system offer lots of different ways to do that, the two most obvious being by clicking on the “File Explorer” icon in the taskbar or from the “Start” menu. Not all versions of Windows 10 have it available from the Start menu by default though so you’ll need to enable it from the Settings application, which is a guide you can find available from the same link as dropped above, if you want to get it.
File Explorer Ribbon
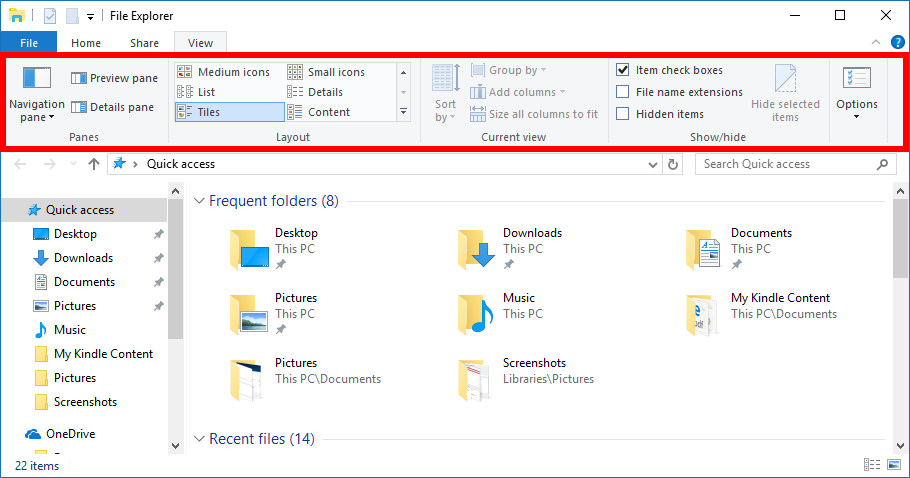
You can choose to have the ribbon always showing, so you don’t have to bring it up ever, or you can also get it to open up several different ways. You can read how to hide or show the File Explorer ribbon if you’re interested in learning more about that.
You’ll see that File Explorer has its own menu with a few links on it. Clicking either of the links not named “File”—namely the Home, Share, or View links—will result in the File Explorer ribbon showing up. You can use the ribbon for completing common tasks such as copying, emailing, zipping items, moving and creating new folders. Some of the features, like creating new folders, can also be done by right-clicking and using the context menu.
Navigation Pane
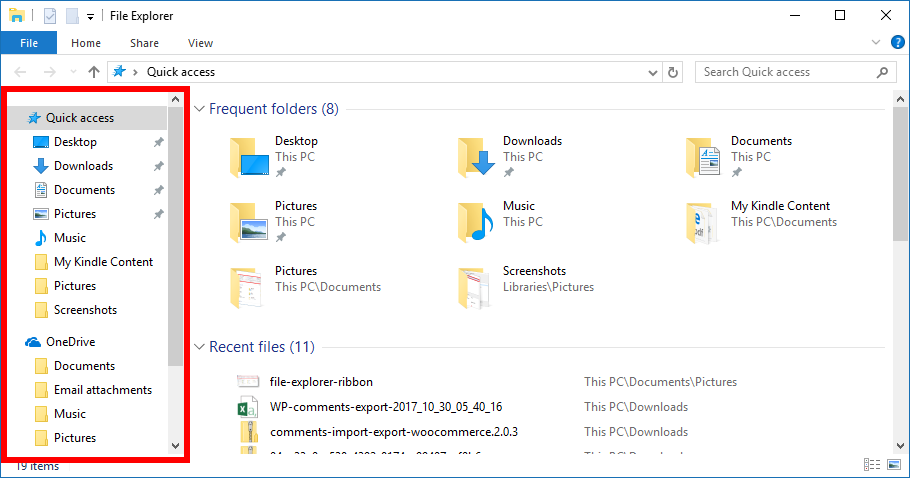
Use the left side pane, also known as the navigation pane, for browsing your folders. There are two headings—Quick Access and OneDrive–that you’ll see both have folders listed beneath them. Anything under Quick Access is showing you folders that you frequently use. If there aren’t any, then you might not have used enough yet. Under the OneDrive heading is the folders that are related to Microsoft’s integrated OneDrive storage. Beneath those are three other links: Network, This PC, and Homegroup. If you haven’t yet set up a Homegroup, then you won’t be able to get access to anything from there. You can learn how to create a homegroup or leave a homegroup if you’re interested in learning more about those. You can read how to remove the network option from the Navigation pane in File Explorer if you no longer want it there as well.
You get a bunch of default libraries which can be found by clicking on the “This PC” link. Within This PC is where most of your action happens. When you use the internet and save a picture, it ends up in the “Downloads” folder. Likewise, when you use something like Microsoft Word and save a document, it ends up in the “Documents” folder. You’ll find all of your default folders, that is the folders that stuff lands in by default when you save them, in these library folders from This PC.
Quick Access
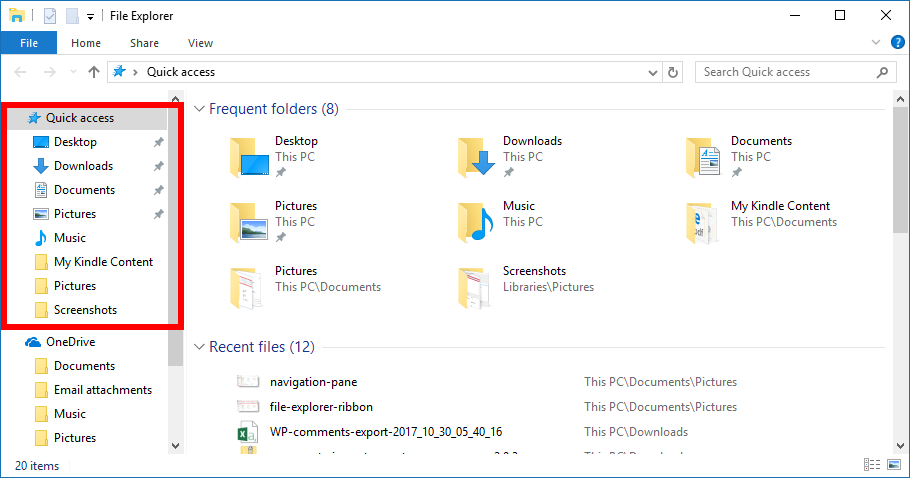
And as for the rest of the tips for how to use it, well, there are plenty. You’ll want to get to know Windows 10’s new “Quick Access” feature first, which you’ll find up the very top of the left side pane. It’s has caused quite a stir since its introduction, both from people who don’t like it for the repercussions it might bring (getting sprung by other people seeing what you’ve looked up, kind of like having your history on display) and for its genius in helping people navigate quicker than before. Quick Access is designed to show you the folders in which you frequently visit when spending time with File Explorer. It compliments another new feature to File Explorer where you can find recently accessed files. You can learn more about it by reading how to add or remove Quick Access from File Explorer pane in Windows 10 if you like.
This PC
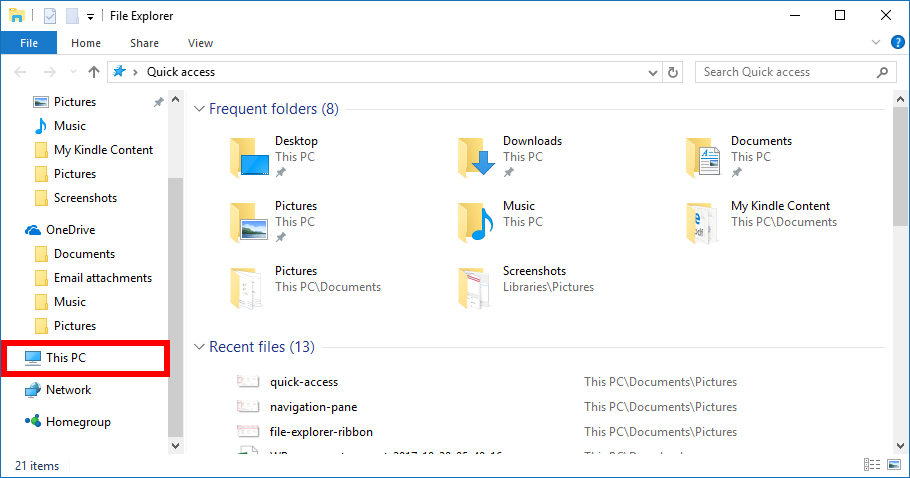
You’re supposed to click on the “This PC” icon from the navigation pane moreso than anything else. Don’t get confused by the number of folders that are showing up under the Quick Access heading. It’s a good heading to have, but it also confuses people a bit and adds to the clutter. You aren’t expected to necessarily be able to see the folder you want from the navigation pane. What you may need to do is click on “This PC,” and then you’ll see the central libraries from there. A library is just a term that Microsoft uses to describe the category folder for whatever it is in This PC. Microsoft also makes it possible to remove the libraries from the navigation pane in File Explorer if you prefer, but we don’t recommend doing that without a good reason.
Microsoft organizes your default save locations in File Explorer by default and the way they do it makes almost perfect sense. When you save things you’ve downloaded, they end up in the Downloads folder and so forth. However, like with most other things in Windows 10, it’s also possible to change the default locations if you wanted them to be something different. You can read how to change storage save locations in Windows 10 if you’re interested in that.
Libraries

The folders you see after clicking on “This PC” from the navigation pane are called libraries. You can remove folders from the libraries from that front page that you see that lists all of the default ones, or you could even add some more folders to the libraries too if you wanted. It’s also possible to click on one of the library folders and then create other folders within a library. To do that, just click on the library that you want—the “Downloads” library for example—and then right-click on the background and choose New > Folder. As long as you don’t click on a file, it should work.
Context Menu
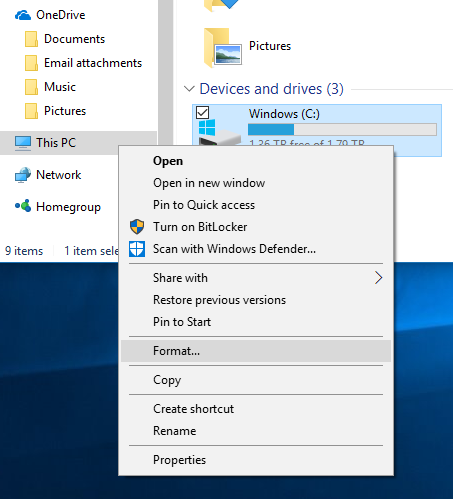
There are a few areas around the Windows 10 operating system that offer context menus, and the File Explorer is one of them. It means that with File Explorer open you can do things like right-click on a folder. That menu you see after the right-click is the context menu. It offers some additional options for you to choose that you wouldn’t find anywhere else, not from the File Explorer ribbon, navigation pane or anywhere. One of the common links that people often use from the context menu is the Properties, which directs you through to being able to choose the location of a file, who you want to share the file with, your options to customize it, its security and other general features. You can bring this context menu up for each folder, and the changes you make will only be applied to that one folder that you have brought it up with. For example, right-clicking on the “Pictures” folder and then clicking “Properties” from its context menu will then allow you to change things for the Pictures folder only and no others.
You might also be interested in:
- How to Turn Off Microsoft’s Notifications from File Explorer
- Why is My File Explorer Window Opening Slowly?
- How to Start Picture Slideshows from File Explorer in Windows 10
- How to Disable Ads in File Explorer in Windows 10
- How to Fix File Explorer Opening Slowly in Windows 10
- How to Add/Remove File Explorer from Start Menu in Windows 10
- How to Enable/Disable Thumbnail Previews in File Explorer in Windows 10
- How to Add/Remove “This PC” in Navigation Pane of File Explorer in Windows 10
- How to Add/Remove File Explorer Default Context Menu in Windows 10
- How to Enable/Disable Numerical Sorting in File Explorer in Windows 10
You can subscribe to our RSS, follow us on Twitter or like our Facebook page to keep on consuming more tech.