Last Updated on December 26, 2022 by Mat Diekhake
Managing wireless networks in Windows 10 is now easier than any of the earlier versions of Windows. Anything directly related to the wireless networks has been some of the more common stuff for people to need to fiddle with around the home, and it’s also been plenty of cause of anxiety attacks, as people quickly realize that they aren’t close to being the Windows experts they thought they were.
If you are one of the people who actually bothered to take the time to learn how to manage wireless networks in past versions of the Windows operating system, hopefully you’ve already had the chance to use that knowledge before Windows 10 came out because, starting from then, it was clear that hardly any knowledge was going to be required going forward.
Microsoft is making it abundantly clear that they plan on “dumbing down” the operating system as much as they can. Just about anyone can now get a wireless connection up and running themselves, with little more than a relaxed temperament. If your government rolls out a new internet connection that requires setting up, don’t pay for someone to help you without giving it a go yourself first because there’s every chance you’ll manage to set it up without too many hassles. Part of the reason why that is is that of how simple the Windows operating system has made it and not just how straightforward your router is to use.
As much as managing Windows wireless connections has changed over the years, there are some things that they have in common. You’ll still get a wireless network profile, for example, when you use Windows 10, and it comes with a network name (often referred to as your SSID by your internet service provider), password key, and other security information. These details are still required because you need them to connect to the wireless network and start using the internet. If your internet connection were to be working without them, then it means other people would be able to use your network and your data. That’s also why you can expect the wireless network profiles to continue to be a thing as we head into the future.
How to Delete a Wireless Network Profile in Settings Application
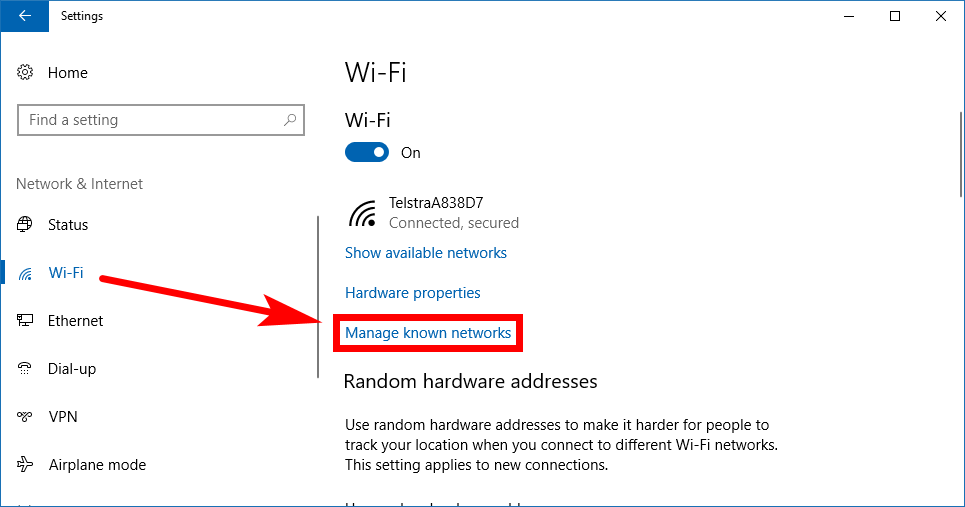
If you’ve connected to a few different wireless networks and you haven’t deleted any of them from your computer yet, you can do it from the Settings application. This is the quickest way to go about deleting several wireless network profiles, but it can also be used if you just have plans to delete the one as well. To get started, open the Settings application by heading to the Start menu > Settings and then click on the “Network and Internet” from the Windows Settings screen. From there, click on the “WiFi” link available in the left side pane and then scroll down the right pane a little bit until you can see the “Manage known networks” and click on it.
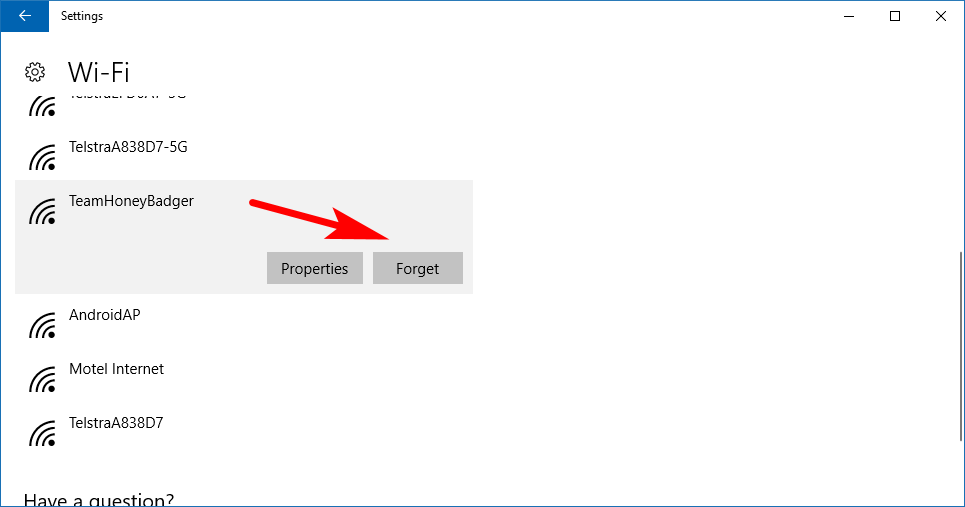
Scroll down the list of known networks until you find the one you want, and then click on the name just once. It opens up to reveal a couple of buttons, one of which is labeled “Forget.” Click that button, and the computer will then forget the details to that wireless network.
How to Delete a Wireless Network Profile in Networks Flyout
If you just wanted to delete the one wireless network, and the one you are using now, you can do that directly from the taskbar. To do it this way, click on the “Wireless” icon available in the taskbar, as shown in the picture below, and then right-click on your wireless network name. When you do, it’ll give you three options, one of them being the chance to “Forget” it. Click on that option, and then the computer forgets your wireless network.

How to Delete a Wireless Network Profile Using Command Prompt
You can also use the Command Prompt to delete a wireless network from the computer as well if you like. To do it this way, open up a Command Prompt window (it doesn’t have to be the elevated variety) and then type the
netsh wlan show profiles
command to bring up the results that include the wireless network details you want to delete.
Now type the netsh wlan delete profile name="WirelessProfileName" command, being sure to change where it says the wireless profile name with your actual wireless profile name that you want to be deleted.
If you wanted, the Command Prompt also makes it possible to delete a wireless network from an interface on the computer as well. To do that, you use the same command and then add interface="InterfaceName" at the end of it. For example, the full command would be: netsh wlan delete profile name="WirelessProfileName" interface="InterfaceName".
You might also be interested in:
- How to Turn On/Off Notifications from Apps and Senders in Windows 10
- How to Install and Configure WinDBG for Blue Screen of Death Analysis
- Classic Shell For Windows Is No Longer Being Developed
- How to Turn On/Off AutoPlay in Windows 10
You can subscribe to our RSS, follow us on Twitter or like our Facebook page to keep on consuming more tech.