Last Updated on December 26, 2022 by Mat Diekhake
Microsoft does a lot of things behind the scenes helping your computer stay in perfect working order, so you don’t have to be a geek anymore to use a computer without running into issues. That’s part of the reason being a technician in I.T. doesn’t have much of a future. As time goes on, the software gets better and better, and there will soon be no need at all for a computer repair workers. Or if there is a need for them, nobody is going to be willing to pay much money to get it fixed.
Automatic maintenance is one tool available in Windows 10 designed to take away the need for manual maintenance on the computer. For anyone looking to save as much money as possible, that’s a beautiful thing. However, it might not be perfect for you with the way Microsoft has set it up by default, which is why they also give you the chance to change the settings manually to better suit your needs.
The automatic maintenance that Windows 10 does is set for 2 am by default for everyone. That will be 2 am local time (or the time time you have set for Windows to follow, which can be quickly seen by looking at the notification tray, in the bottom right corner of your computer’s display). Why Windows has chosen 2 am is likely because it is what they worked out was the most logical time for the average person. But that doesn’t mean it is going to be the best time for you as an incredibly unique individual who strives to be original. If you’re anything like me, 2 am won’t be ideal because your computer might consistently be on at 2 am—in fact, 2 am is when I do most of my best work because the home is finally quiet. The automatic maintenance feature doesn’t work when the computer is off, so the idea of it being set to 2 am is so that the maintenance begins when you turn it on the next day. For it to work, the computer only needs to be idle or sleeping. If you use your computers regularly, like I suspect our readers do, you might want to schedule it during your lunch break if you have a consistent lunch hour, or something similar, instead rather than when you first start using the computer in the morning.
The reason you might be interested in taking it away from 2 am is because if it doesn’t get a chance to run when the computer is idle or sleeping, it can run when you are using the computer. If you don’t have a top of the line computer, you might notice that performance decreases when you are using it. You still might prefer not putting your hardware under the additional stress even if you do have a top of the line computer. Why run it in the background while you are using the computer when you could have it running when there is a particular time in your life when you know the computer will be idle instead? It’s a better solution to the problem. It may also be a wise choice to change its default 2 am time if you are someone who works from a computer. If you set it to up for automatic maintenance after work, assuming you use the computer of a night time before you go to bed, then even if it does run while you are using the computer, at least it won’t be running while you’re at work and need to get important tasks done. Having a play with the automatic maintenance settings if you don’t have powerful hardware under the hood is likely to be beneficial to you if you think 2 am isn’t a time that makes much sense for your daily use.
What System Maintenance Checks
- Unused Desktop Items. Anything that has been on the desktop without being touched for three months is then classified as an unused desktop item. System Maintenance will remove any shortcuts or items from the desktop if they are unused, helping your computer get quicker loading times. The fewer items and shortcuts on the desktop the faster your computer completes loading, and any item or shortcut not used in three months becomes a questionable choice to have around still.
- Disk Volume Errors. As if having lost clusters, bad sectors, hard disk volume errors, directory errors and cross-linked files weren’t bad enough, they also contribute to you losing out on disk space thanks to their unnecessary usage. You can free plenty of space on your disk by allowing the System Maintenance to automatically help deal with fixing the volume errors.
- Error Reports Using Disk Space. Error reports can come in handy should you ever need them for troubleshooting challenging tasks at a future date so you can see exactly what is wrong with the computer. Most troubleshooting is done with specific codes or sentences commonly used to explain computer problems, which helps with finding solutions. While an error report won’t take up too much space, it is still using up disk space each time the operating system creates one, and if you create many of them, then it’s an amount of space that you wouldn’t mind having freed up again so you can use it elsewhere. Typically any error reports older than one month are no longer required for the average computer because you should have used them to fix whatever was wrong by then, and thus, system maintenance will delete all error reports older than one month for freeing up your disk space.
- System Time Incorrectly Set. The default clocks in Windows operating systems, typically located on the bottom right side of the screen, are pretty accurate most the time, and one of the reasons for that is because System Maintenance checks it periodically and fixes any inaccurate times, resulting in you hardly ever noticing incorrect times.
- Troubleshooting History Taking Up Disk Space. All troubleshooters available in the Windows 10 operating system are recorded in the troubleshooting history. Having the history there means administrators and users can check it to help fix any lingering problems that have not been fully resolved. The downside is that, like with the error reports, the troubleshooting history takes up disk space the more of it you use up. System Maintenance removes logs older than one month to help free up more space that was being taken up by unnecessary logs.
- Broken Shortcuts. You may have some shortcuts set up in Windows 10, such as a desktop shortcut to a particular program. If one of them becomes broken (no longer opening what was intended), it then gets removed by system maintenance. Instead of going by time, System Maintenance removes the shortcuts once you have built up more than four of them. Note that System Maintenance will delete the shortcuts without fixing them. You may need to set up the shortcut again to get it working.
How to Run System Maintenance Troubleshooter in Windows 10
1. You can run the system maintenance troubleshooter from Control Panel in Windows 10. To get started, type Control Panel into the taskbar’s search field and then click on the Control Panel desktop application when you see it under the Best match section.
2. Choose to view the Control Panel items in their classic view by right-clicking in the top right corner and choosing to view them by their small icons.
3. Click on the Troubleshooting icon from the list of All Control Panel items.
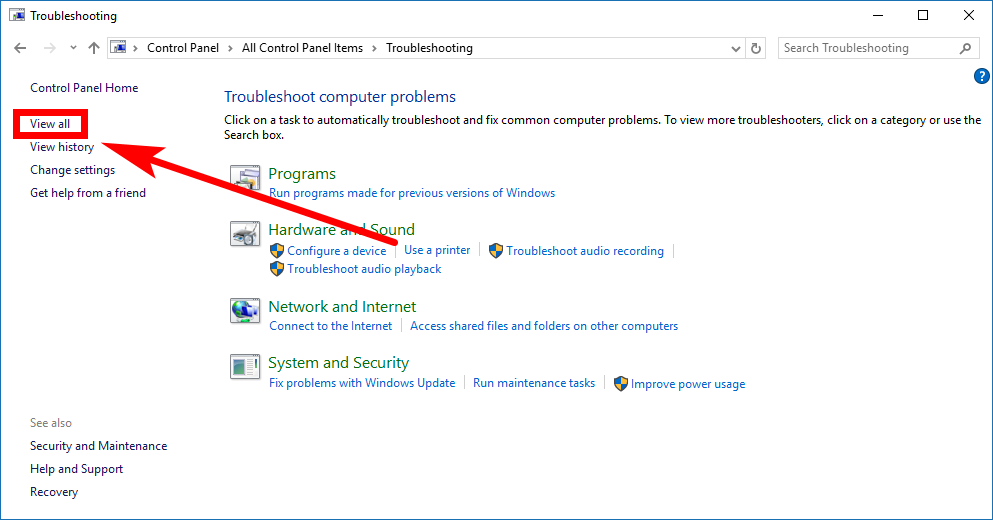
4. It’ll then open up to the same picture as you can see below with the Troubleshoot computer problems heading, where you then need to click on the View by link in the left side pane. (click to enlarge screenshot below)
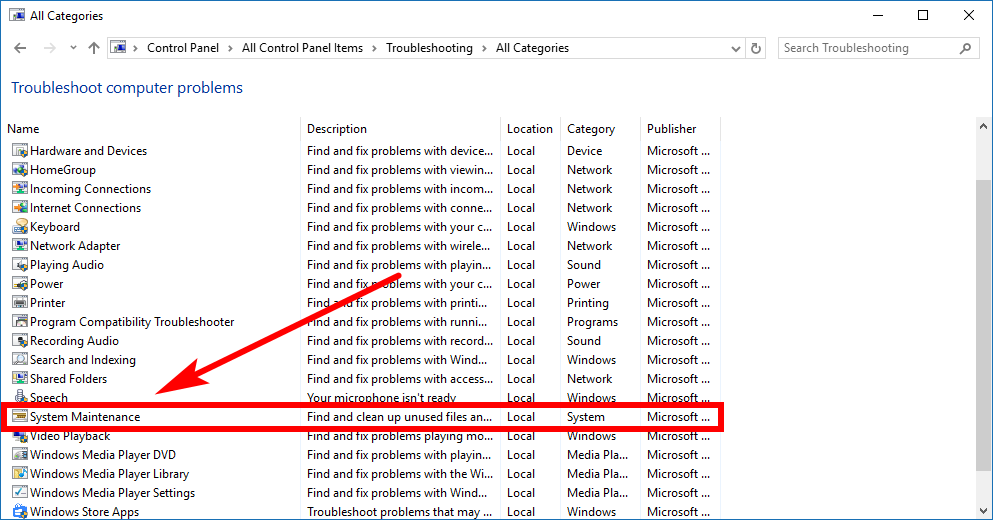
5. Scroll down the list of names for the Troubleshoot computer problems and then click on the one that says System Maintenance. (click to enlarge screenshot below)
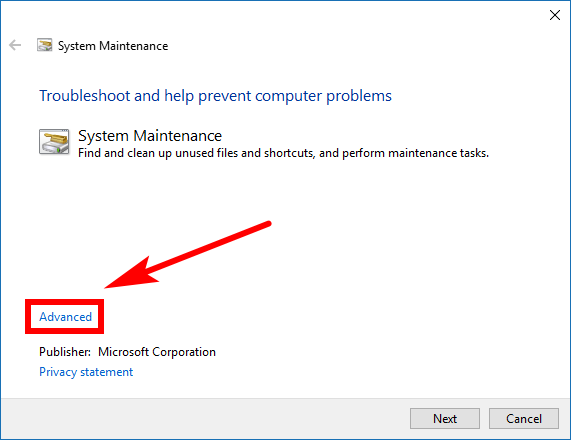
6. Click on the Advanced link in the bottom left corner of the System maintenance window.
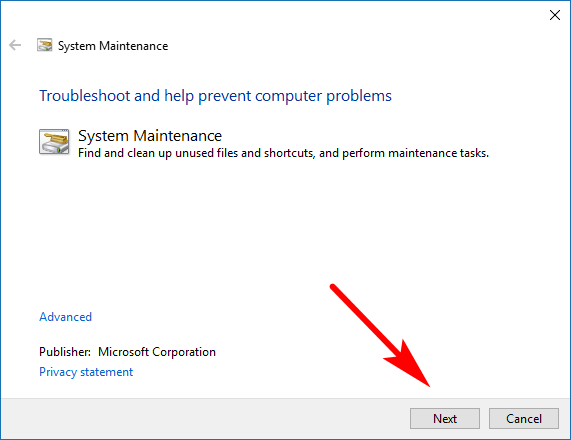
7. In the same small area, you’ll now see the chance to Run as administrator and Apply repairs automatically. Choose to do with those options what you wish.
You may need to run the System Maintenance troubleshooter as administrator to fix particular problems, so we recommended clicking on that link before you continue. We also recommend checking the box to apply repairs automatically, so you aren’t left with doing them manually.

8. Now just click on the Next button in the bottom right corner of the window.
9. It then runs the system maintenance troubleshooter and will detect any problems you may be having. You can also view the troubleshooting report. That report will now stick around in the troubleshooting history if you ever need to check it out again in future, and it will get removed after one month by the scheduled system maintenance if left enabled.

System Maintenance handles the complex tasks for you so you don’t have to manually. If you ever find it not working and you haven’t disabled it, you can run the specific system maintenance troubleshooter that Windows has to try to help diagnose and fix what may be wrong. As with all troubleshooters that Windows has on offer, it won’t necessarily be a simple solution to whatever is wrong, and there are no guarantees you won’t have to get a professional to take a look at it, but it is there to help with many of the common problems that people have with it. Don’t forget that Microsoft hires its own set of technicians, there to help you should you ever suffer issues that they are willing to help fix. Typically that’s anything you think has gone wrong that you don’t believe you had anything to do with, as long as it’s related to the operating system.
This article was last updated on April 30, 2019.
Related Tutorials
- How to Enable or Disable Scheduled System Maintenance in Windows 10
- How to Remove Windows Defender Icon in Windows 10
- How to Clear Troubleshooting History in Windows 10
- How to Run Troubleshooters in Windows 10
- How to Choose What Control Panel Applets Get Shown in Windows 10
- How to Reset Folder View for All Folders in Windows 10
- How to Add or Remove Words in Spell Checking Dictionary in Windows 10
- How to Disable Hardware Acceleration in Windows 10 Photos App
- How to Windows Modules Installer Worker High CPU & Disk Usage in Windows 10
- How to Create System Restore Wizard Shortcut In Windows 10
- How to Disable Telemetry and Data Collection in Windows 10
- Windows 10 Search Not Working? Here’s What You Can Do to Solve It
January 13, 2019 @ 20:11
Does this look after itself automatically or I am supposed to be running the scans periodically?
January 13, 2019 @ 20:15
System Maintenance works automatically (the default time is set to be at 2 am (but you can change it to another time that better suits you if you usually turn your computer off when you’re not using it). As Perry said, if you leave your computer on Sleep mode, then Windows 10 can actually wake it up to run the scheduled maintenance tasks. If it hasn’t run the tasks automatically yet, then it will run them at a later date when you start using the computer. These tasks are generally very light and don’t cause most people issues with RAM usage and so on.
January 13, 2019 @ 20:11
I thought Microsoft said System Maintenance was deprecated for Windows 10? And yet here it is.
January 13, 2019 @ 20:10
If your computer is connected to a power cable then System maintenance will actually wake the computer from sleep to perform system maintenance tasks if it’s not on during the scheduled hours. That is why you might put your computer to sleep sometimes but hear the fan kicking in as if it is still doing something. If you fan stays on a lot of the time then it might be something else to look into to.
January 13, 2019 @ 19:56
Correction! Microsoft used to offer decent support to help you fix your problems. I have noticed it going downhill lately.
January 13, 2019 @ 19:56
You can still get good support but they have put extra layers of trying to get people to solve problems with answers to questions than before.
Last year you could start talking to a real person if you chose right off the bat. Now it takes you through at least a few attempts at finding troubleshooting guides based on what you tell it is your problem before it then offers you a real person.
But on a positive note, I have noticed more westerns in the technical support section than I used to. Not that I have a problem with the Indians but chatting is easier when they’re from the same area.