Last Updated on December 26, 2022 by Mat Diekhake
Microsoft does a lot of things behind the scenes helping your computer stay in tip-top shape, so you don’t have to be a geek anymore to use a computer without running into issues. That’s part of the reason being a technician in I.T. doesn’t have much of a future. As time goes on, the software gets better and better, and there will soon be no need at all for a computer repair workers. Or if there is a need for them, nobody is going to be willing to pay much money to get it fixed.
Automatic maintenance is one tool available in Windows 10 designed to take away the need for manual maintenance on the computer. For anyone looking to save as much money as possible, that’s a beautiful thing. However, it might not be perfect for you with the way Microsoft has set it up by default, which is why they also give you the chance to change the settings manually to better suit your needs.
The automatic maintenance that Windows 10 does is set for 2 am by default for everyone. That will be 2 am local time (or the time time you have set for Windows to follow, which can be quickly seen by looking at the notification tray, in the bottom right corner of your computer’s display). Why Windows has chosen 2 am is likely because it is what they worked out was the most logical time for the average person. But that doesn’t mean it is going to be the best time for you as an incredibly unique individual who strives to be original. If you’re anything like me, 2 am won’t be ideal because your computer might consistently be on at 2 am—in fact, 2 am is when I do most of my best work because the home is finally quiet. The automatic maintenance feature doesn’t work when the computer is off, so the idea of it being set to 2 am is so that the maintenance begins when you turn it on the next day. For it to work, the computer only needs to be idle or sleeping. If you use your computers regularly, like I suspect our readers do, you might want to schedule it during your lunch break if you have a consistent lunch hour, or something similar, instead rather than when you first start using the computer in the morning.
The reason you might be interested in taking it away from 2 am is because if it doesn’t get a chance to run when the computer is idle or sleeping, it can run when you are using the computer. If you don’t have a top of the line computer, you might notice that performance decreases when you are using it. You still might prefer not putting your hardware under the additional stress even if you do have a top of the line computer. Why run it in the background while you are using the computer when you could have it running when there is a particular time in your life when you know the computer will be idle instead? It’s a better solution to the problem. It may also be a wise choice to change its default 2 am time if you are someone who works from a computer. If you set it to up for automatic maintenance after work, assuming you use the computer of a night time before you go to bed, then even if it does run while you are using the computer, at least it won’t be running while you’re at work and need to get important tasks done. Having a play with the automatic maintenance settings if you don’t have powerful hardware under the hood is likely to be beneficial to you if you think 2 am isn’t a time that makes much sense for your daily use.
The following tutorial demonstrates how to change the automatic maintenance settings when you’re using a version of the Windows 10 operating system.
How to Change Automatic Maintenance Settings in Windows 10
Here is how you can change the automatic maintenance settings from the Control Panel in Windows 10:
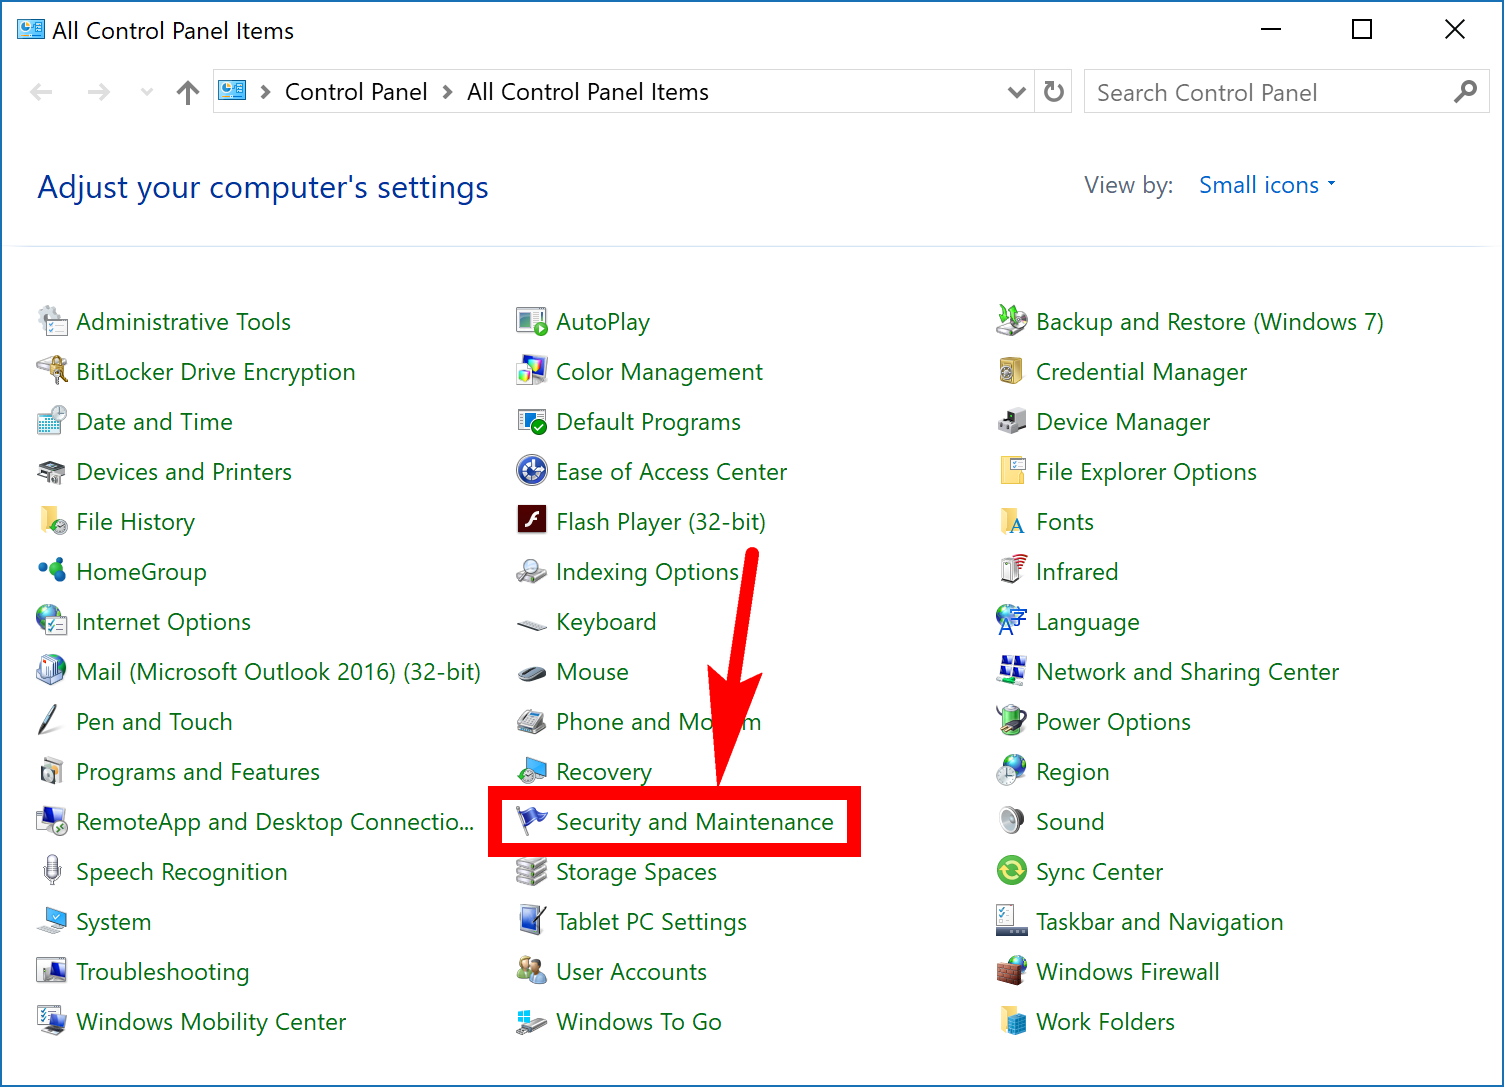
To get started with getting it done, open up the Control Panel in its classic view, so you have the smaller icons on the computer’s display. When done, click on the Security and Maintenance link from the menu that is showing those small icons. (click to enlarge screenshot below)
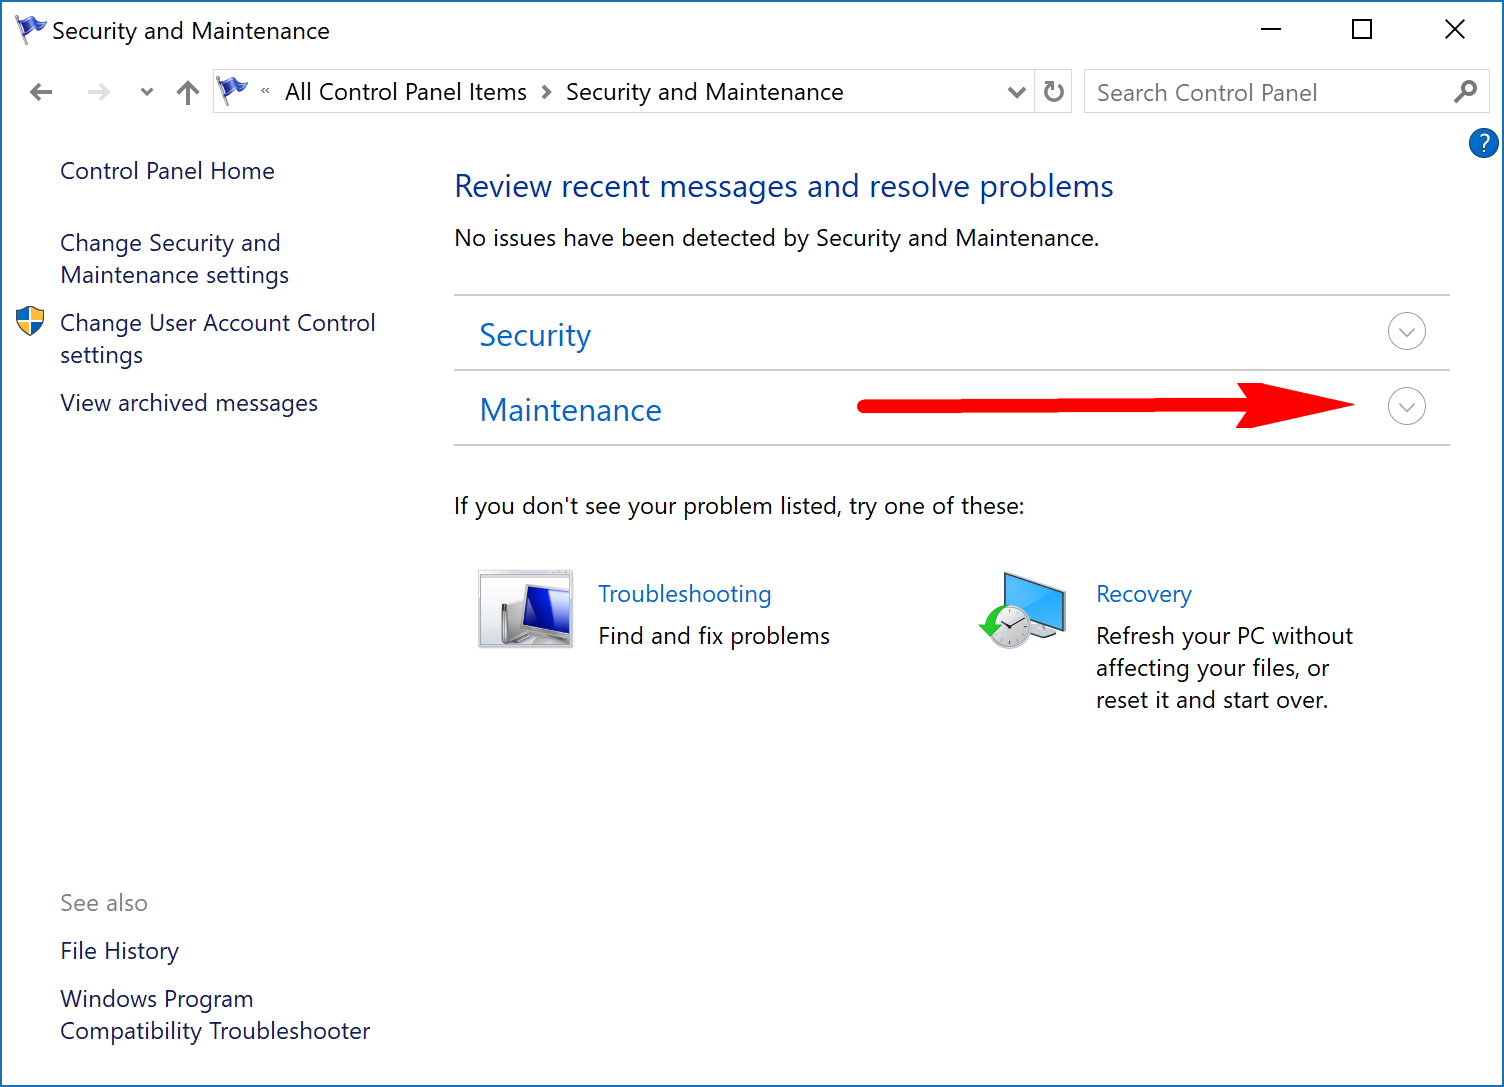
You’ll then see an option for Security and another option for Maintenance that can both be expanded. Expand the one for Maintenance by clicking on its little arrow to the right side of the word. (click to enlarge screenshot below)
You’ll get some more stuff relating to the maintenance side of things. The link you want to click is the one that reads Change maintenance settings under the Automatic Maintenance heading. (click to enlarge screenshot below)

There are now two Automatic Maintenance headings on this page. The top one is the larger one, and everything comes underneath it, including the full written explanation as to what it is and what it does. The secondary one is the one you want to look at at the bottom of the writing. That’s where you can click on the time’s drop-down menu to change the time from its current 2 am time slot to something else. (click to enlarge screenshot below)
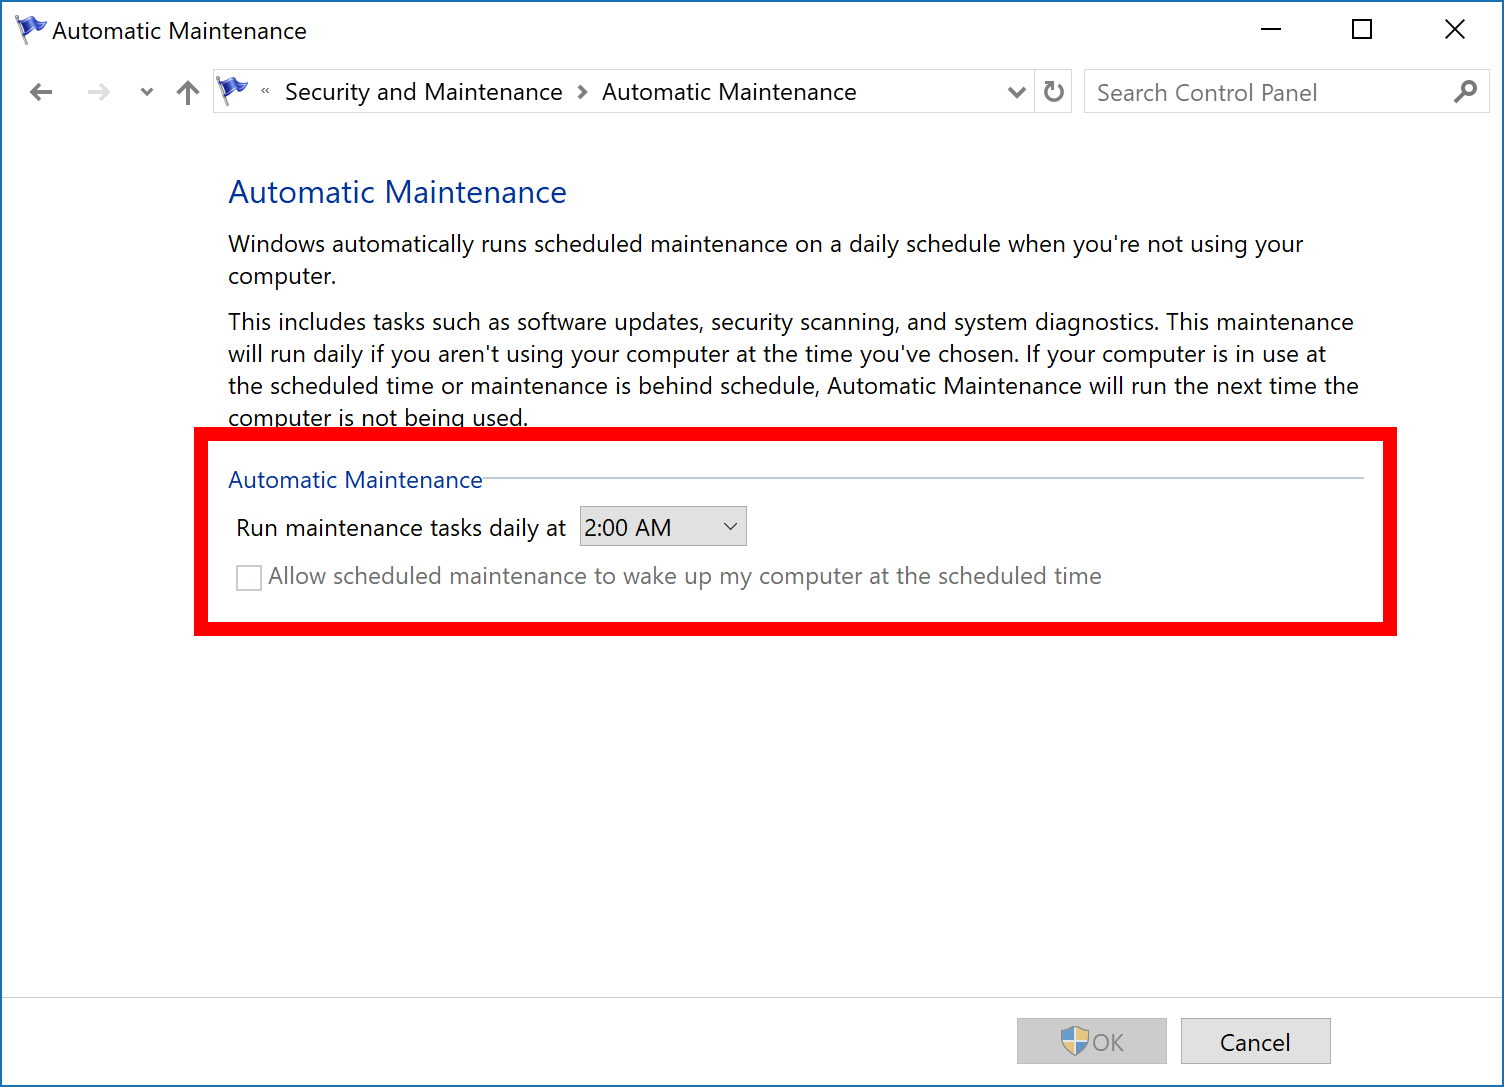
You can choose any time within the 24 hour period, but only at one hour intervals. So if you take your lunch break at 12:30, it’s not ideal. But you can choose 12:00 pm from the menu, and when your computer starts to idle at about 12:05 pm, the automatic maintenance might begin to work, for instance. (click to enlarge screenshot below)

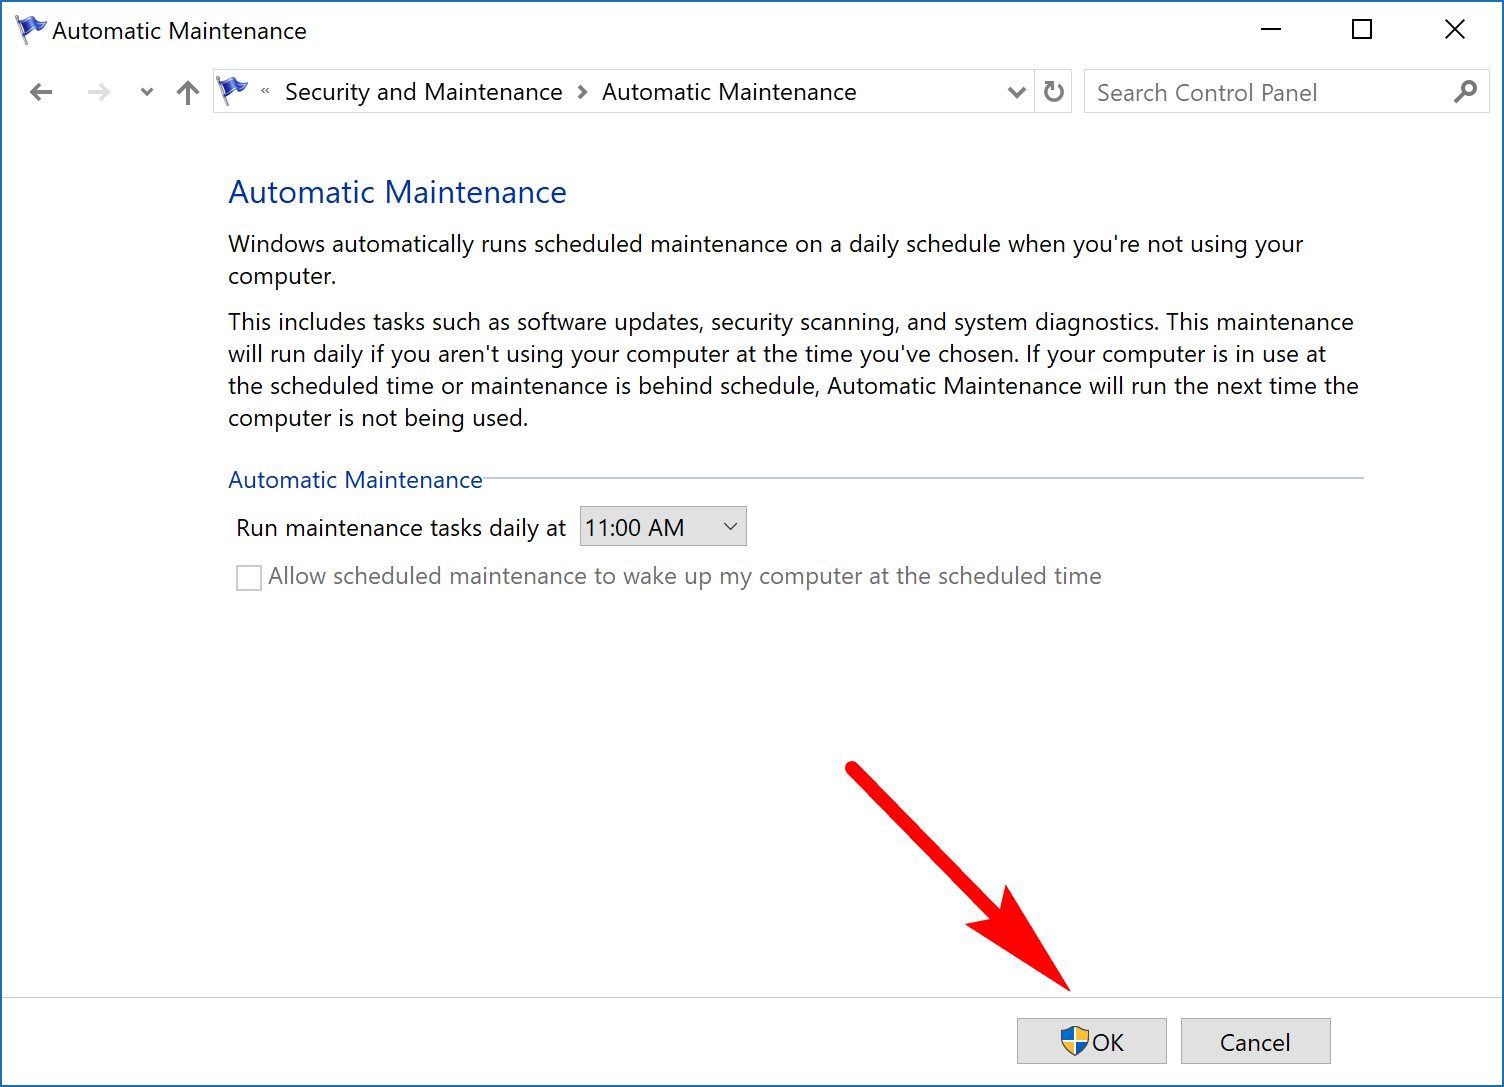
After you have chosen your time from the drop-down menu, you then need to confirm it by clicking on the OK button at the bottom of the window. The changes are now applied and will begin over the next 24 hours when it gets to be that time you have selected. (click to enlarge screenshot below)
You can now close the Automatic Maintenance window and continue using the computer.
How to Manually Start and Stop Automatic Maintenance
If changing the time for the automatic maintenance still isn’t providing favorable results for you as an individual (which it might not), Windows 10 also offers you the chance to manually choose when you want to start and stop the automatic maintenance without you having to select a time at all. To do it this way instead, head to the Control Panel in classic view > Security and Maintenance > maintenance and then click on the Start maintenance button. It then begins the maintenance as soon as you click the button. (click to enlarge screenshot below)

What’s more, the button that said Start maintenance now reads Stop maintenance so you can click the button if you want to stop it again before it finishes its maintenance. An example of when you might want to do that is if you need to start using the computer again for something and the performance isn’t good enough. You might need to do something important for your job, so you click on the Stop maintenance button, and you get your regular computer hardware performance coming back to you again so you can use it.
Throughout the years of dealing with wonderful Windows operating systems, there have always been several maintenance tools that regular users should have used, but most people never did because they didn’t know how or they would forget that it needed doing. Microsoft has done a great job at adjusting by running lots of the programs in the background instead. Hardware has come a long way over the years a well, and that’s ideal for these types of tools being able to run in the background without pestering you. Although, people still using older computers that don’t have great hardware or are doing something on a computer that is taking up lots of computer resources might still notice the performance issues. You can then adjust the Automatic maintenance feature in Windows 10 to better suit your needs if you are finding it becoming a problem on your computer by adjusting the time that it runs, either by selecting a new time or by just clicking on the Start button when you want the scan to begin.
This article was last updated on April 30, 2019.
Related Tutorials