Last Updated on February 25, 2024 by Mat Diekhake
Microsoft does a lot of things behind the scenes helping your computer stay in tip-top shape, so you don’t have to be a geek anymore to use a computer without running into issues. That’s part of the reason being a technician in I.T. doesn’t have much of a future. As time goes on, the software gets better and better, and there will soon be no need at all for a computer repair workers. Or if there is a need for them, nobody is going to be willing to pay much money to get it fixed.
Automatic maintenance is one tool available in Windows 10 designed to take away the need for manual maintenance on the computer. For anyone looking to save as much money as possible, that’s a beautiful thing. However, it might not be perfect for you with the way Microsoft has set it up by default, which is why they also give you the chance to change the settings manually to better suit your needs.
The automatic maintenance that Windows 10 does is set for 2 am by default for everyone. That will be 2 am local time (or the time time you have set for Windows to follow, which can be quickly seen by looking at the notification tray, in the bottom right corner of your computer’s display). Why Windows has chosen 2 am is likely because it is what they worked out was the most logical time for the average person. But that doesn’t mean it is going to be the best time for you as an incredibly unique individual who strives to be original. If you’re anything like me, 2 am won’t be ideal because your computer might consistently be on at 2 am—in fact, 2 am is when I do most of my best work because the home is finally quiet. The automatic maintenance feature doesn’t work when the computer is off, so the idea of it being set to 2 am is so that the maintenance begins when you turn it on the next day. For it to work, the computer only needs to be idle or sleeping. If you use your computers regularly, like I suspect our readers do, you might want to schedule it during your lunch break if you have a consistent lunch hour, or something similar, instead rather than when you first start using the computer in the morning.
The reason you might be interested in taking it away from 2 am is because if it doesn’t get a chance to run when the computer is idle or sleeping, it can run when you are using the computer. If you don’t have a top of the line computer, you might notice that performance decreases when you are using it. You still might prefer not putting your hardware under the additional stress even if you do have a top of the line computer. Why run it in the background while you are using the computer when you could have it running when there is a particular time in your life when you know the computer will be idle instead? It’s a better solution to the problem. It may also be a wise choice to change its default 2 am time if you are someone who works from a computer. If you set it to up for automatic maintenance after work, assuming you use the computer of a night time before you go to bed, then even if it does run while you are using the computer, at least it won’t be running while you’re at work and need to get important tasks done. Having a play with the automatic maintenance settings if you don’t have powerful hardware under the hood is likely to be beneficial to you if you think 2 am isn’t a time that makes much sense for your daily use.
What System Maintenance Checks
- Unused Desktop Items. Anything that has been on the desktop without being touched for three months is then classified as an unused desktop item. System Maintenance will remove any shortcuts or items from the desktop if they are unused, helping your computer get quicker loading times. The fewer items and shortcuts on the desktop the faster your computer completes loading, and any item or shortcut notused in three months becomes a questionable choice to have around still.
- Disk Volume Errors. As if having lost clusters, bad sectors, hard disk volume errors, directory errors and cross-linked files weren’t bad enough, they also contribute to you losing out on disk space thanks to their unnecessary usage. You can free plenty of space on your disk by allowing the System Maintenance to automatically help deal with fixing the volume errors.
- Error Reports Using Disk Space. Error reports can come in handy should you ever need them for troubleshooting challenging tasks at a future date so you can see exactly what is wrong with the computer. Most troubleshooting is done with specific codes or sentences commonly used to explain computer problems, which helps with finding solutions. While an error report won’t take up too much space, it is still using up disk space each time the operating system creates one, and if you create many of them, then it’s an amount of space that you wouldn’t mind having freed up again so you can use it elsewhere. Typically any error reports older than one month are no longer required for the average computer because you should have used them to fix whatever was wrong by then, and thus, system maintenance will delete all error reports older than one month for freeing up your disk space.
- System Time Incorrectly Set. The default clocks in Windows operating systems, typically located on the bottom right side of the screen, are pretty accurate most the time, and one of the reasons for that is because System Maintenance checks it periodically and fixes any inaccurate times, resulting in you hardly ever noticing incorrect times.
- Troubleshooting History Taking Up Disk Space. All troubleshooters available in the Windows 10 operating system are recorded in the troubleshooting history. Having the history there means administrators and users can check it to help fix any lingering problems that have not been fully resolved. The downside is that, like with the error reports, the troubleshooting history takes up disk space the more of it you use up. System Maintenance removes logs older than one month to help free up more space that was being taken up by unnecessary logs.
- Broken Shortcuts. You may have some shortcuts set up in Windows 10, such as a desktop shortcut to a particular program. If one of them becomes broken (no longer opening what was intended), it then gets removed by system maintenance. Instead of going by time, System Maintenance removes the shortcuts once you have built up more than four of them. Note that System Maintenance will delete the shortcuts without fixing them. You may need to set up the shortcut again to get it working.
How to Turn On or Off Scheduled System Maintenance using Troubleshooting Settings from Control Panel
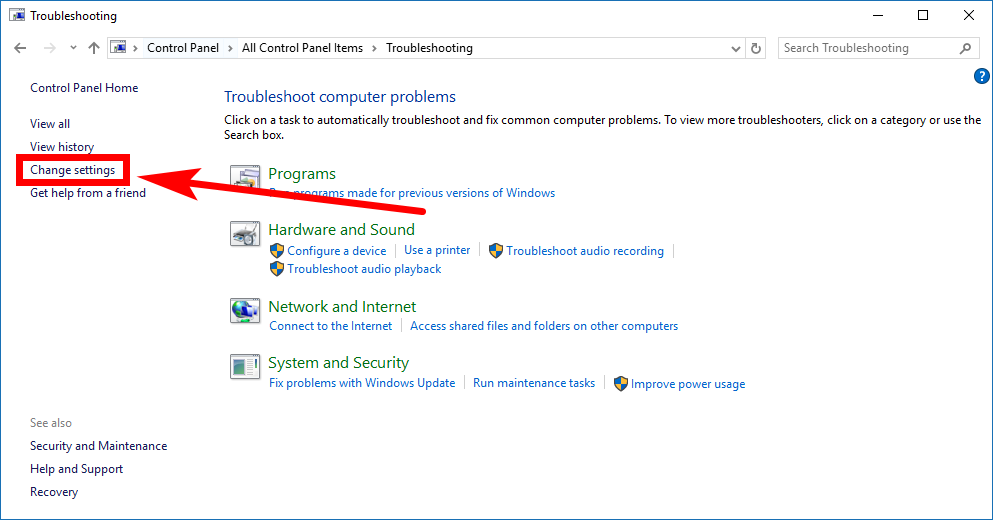
You can turn the scheduled system maintenance on or off by using the Troubleshooting settings that are available from the Control Panel in Windows 10. To find out how, open up the Control Panel so that it is showing its classic view with the smaller icons and then click on the Troubleshooting link from the list of all Control Panel items. You’ll then be directed through to the same screen as in the picture below where you can then click on the Change settings link from its left side pane. (click to enlarge screenshot below)
Now under the Computer Maintenance heading, click the mouse pointer in the checkbox for On (Recommended) and then click on the OK button at the bottom of the window to apply the changes. (click to enlarge screenshot below)

How to Enable or Disable Scheduled System Maintenance in Local Group Policy Editor
You can also use the Local Group Policy Editor to enable or disable the scheduled System Maintenance if you prefer. Start by opening up the Local Group Policy editor by typing GPedit into the search field in the taskbar and then clicking on the Edit Group Policy result from under the Best match section.
The Local Group Policy editor doesn’t show up on top of your web browser like most other windows will do. Instead, you’ll find the new icon available from your taskbar to click on, or you could minimize your web browser, and you’ll see it there in the background. It’s that way for all versions of the Windows 10 operating system up until now, but it may change in future versions as it seems like something they haven’t spent much time on rather than it being a voluntary thing.
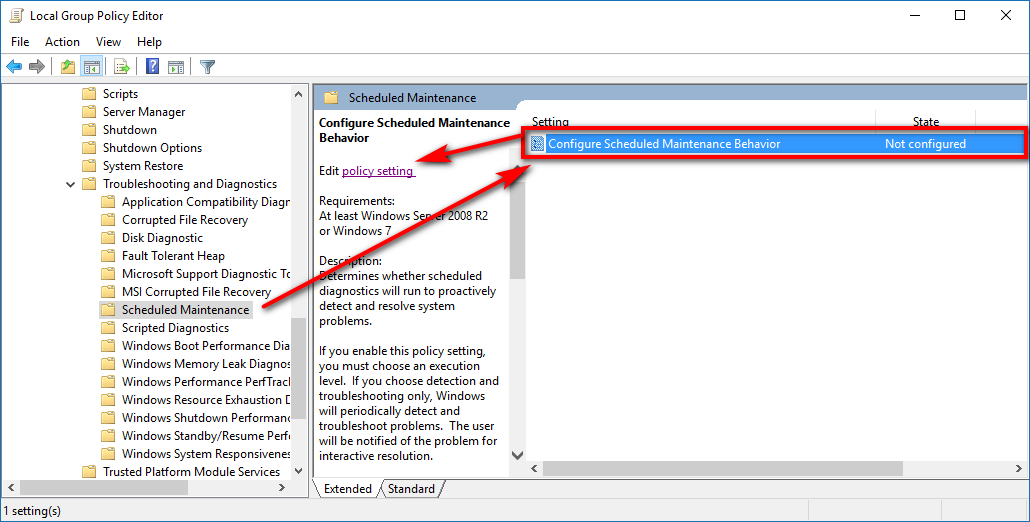
Now that you have the window open, navigate to the Computer Configuration\Administrative Templates\System\Troubleshooting and Diagnostics\Scheduled Maintenance, using the folders in the left side pane by clicking on each of them so that they expand and reveal your additional folders that you need. After you’ve clicked on the final Scheduled Maintenance folder click on the Configure Scheduled Maintenance Behavior object from the right side pane and then click on the Edit policy setting from the middle column when it appears. (click to enlarge screenshot below)
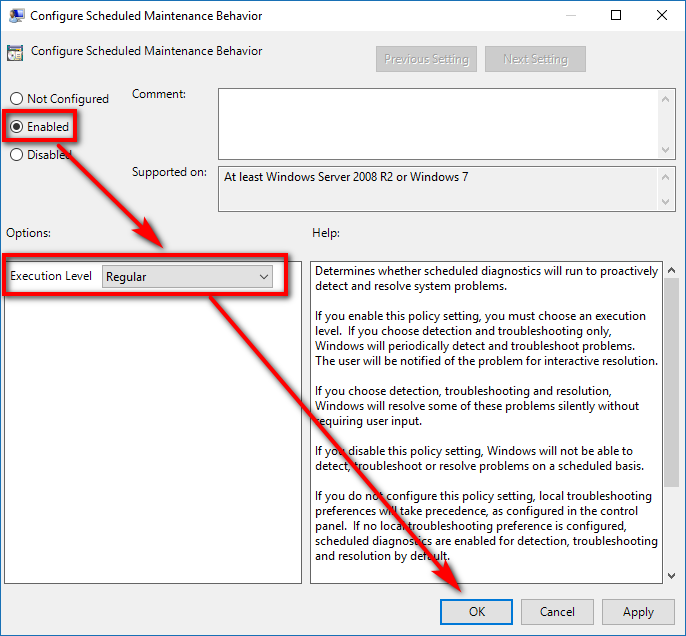
It’s set to be not configured by default, like all policies, so you’ll need to change it over to the Enabled position. When you do, there will also be a drop-down menu available for the execution level that you can change if you want. Set it to Regular if you want to disable the system maintenance. Set it to Troubleshooting only if you want to enable the scheduled system maintenance for troubleshooting only. (click to enlarge screenshot below)
Many nerds would go to some pretty extreme lengths for the sake of manually looking after jobs relating to system maintenance in the past. Doing tasks like disabling startup items, using disk cleanup, installing CCleaner, defragging the hard drive, checking the hard drives for integrity, plus enigmatic tasks like getting cans of air to help dust the motherboards were all jobs classified under “maintenance.” Many of those tasks are still good things to practice—canned air, which we can confirm is a real and useful item, should be researched—but Windows 10 is also designed to take away as much of the work as it can for you with its own system maintenance. As such, we don’t recommend you turn off the system maintenance feature unless you have a good reason to do so, or else then you’ll miss out of having the operating system automatically look after things like broken shortcuts, unused desktop items, error reports that are chewing up disk space, an inaccurate system time, disk volume errors, and the troubleshooting history that’s taking up unnecessary disk space.
This article was last updated on April 30, 2019.
Related Tutorials