Last Updated on May 13, 2023 by Mat Diekhake
If you are lucky enough to own the Samsung Galaxy A9 SM-A9100 smartphone, then you are already in for a real good time. That time gets significantly better when you find out all the extra apps waiting for you that need root access before they can run.
You can often find a few ways to root a smartphone like the Samsung Galaxy A9 smartphone, and it all depends on what comes out first if you want to root your device now. Chainfire has created an official version of the CF-Auto-Root tool to root this device, and you can use it to get the root access which then allows you to install any of the root apps that you wanted to try.
The other way that many people choose to root Samsung smartphone is by flashing a custom recovery image over the stock recovery partition and then flashing Chainfire’s SuperSU that way. They both result in the same thing at the end which is having SuperSU not only installed on the smartphone but enabled correctly too which is what allow you to be installing the root applications.
One of the root apps that is available to you as soon as you complete the steps after the break is the Titanium Backup app. If you haven’t heard of the Titanium Backup app, then you are in for a pleasant surprise. Titanium Backup makes backing up easier than any other app out there and is ten fold better than another backing up app solutions like Helium that people had no choice but to resort to using without root access. In fact, the only ways to take full backups like Titanium Backup can is by using ADB commands from a computer or using the NANDroid Backup feature from a custom recovery image. Titanium backup and the NANDroid Backup are both very different tools, though, and many people prefer Titanium for its ability to backup individual apps when you want.
Notes:
- Chainfire was running on the MMB29M.A9100ZCU1APF1 firmware build number when he created the working version of CF-Auto-Root tool found in this guide. You do not need to be on that same firmware version that he was on when you attempt to root your device using this file. You just need to be using the right model number and running on any firmware that is part of the Android 6.0.1 Marshmallow software updates and the guide should work well for you.
- If you find that your device does not boot or the file just does not flash it could be because a new bootloader is present and the file needs updating by Chainfire. Before he can do that, he asks for people to leave a message that contains the new recovery image from the firmware you are running on the official CF-Auto-Root tool thread made at the XDA-Developers website. He then uses that recovery image that you left to help update the files, so they start working again.
Download Samsung Galaxy A9 SM-A9100 CF-Auto-Root and Drivers
- Download the CF-Auto-Root tool for the Samsung Galaxy A9 SM-A9100 smartphone running on the Android 6.0.1 Marshmallow software updates.
- Download the Samsung USB Drivers on the Windows computer.
How to Root Samsung Galaxy A9 SM-A9100 on Android 6.0.1 Marshmallow Using CF-Auto-Root
1. Unlock the Developer Options menu on the Samsung Galaxy A9 SM-A9100 smartphone so you can use the options on that menu.
2. Enable the USB Debugging Mode from the Developer Options menu so that the Android software allows for you to make changes to it when is what needs to happen if you are to become the root user.
3. Run the Samsung USB Drivers on the computer that is running on a version of the Windows operating system so the Odin flashing tool that is going to be flashing the rooting file to your device can detect your device and allow for that to happen.
4. Extract the CF-Auto-Root tool to the Downloads folder on the computer and you get the Odin flashing tool and the rooting file available now in the same Downloads folder.
5. Boot the Samsung Galaxy A9 SM-A9100 smartphone into the Download Mode and then connect it to the computer with the USB cable that issued for charging the battery.
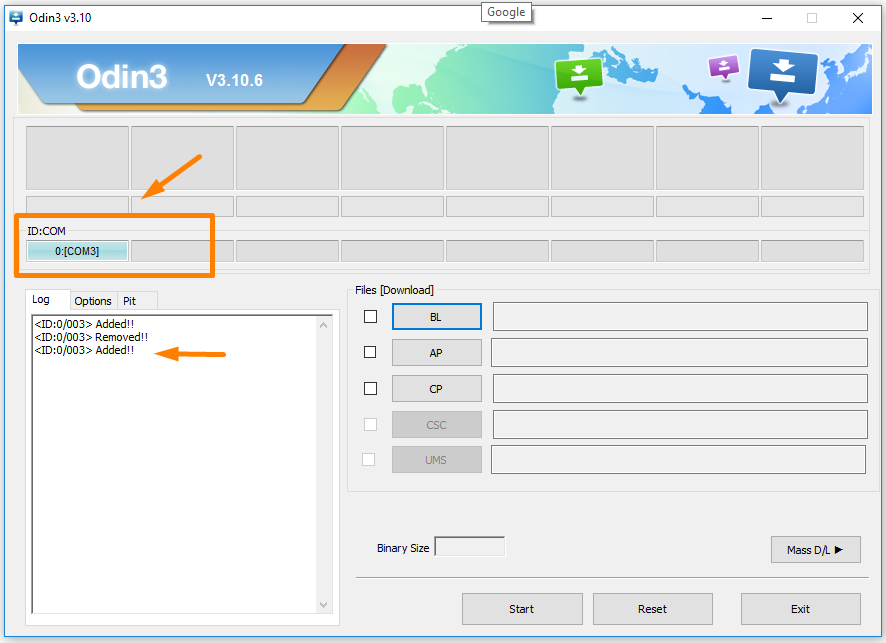
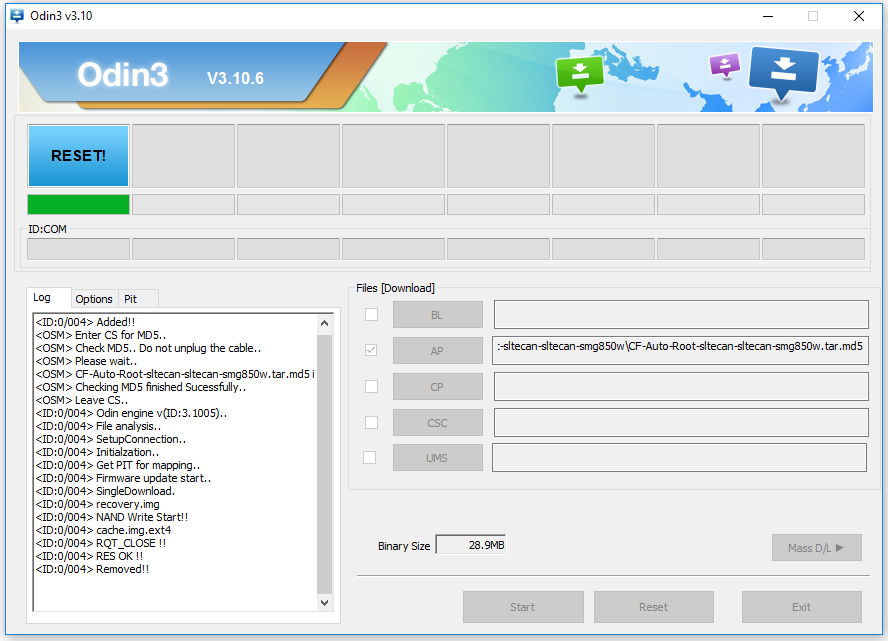
6. Open the Odin flashing tool file that is available in the Downloads folder and the flashing tool user interface opens. You should see a blue or yellow color coming from the ID: COM port box and the added message inside the Log entry, Both of those things are there to let you know the Samsung USB Drivers are working correctly, and the Samsung Galaxy A9 smartphone is ready for the flashing.
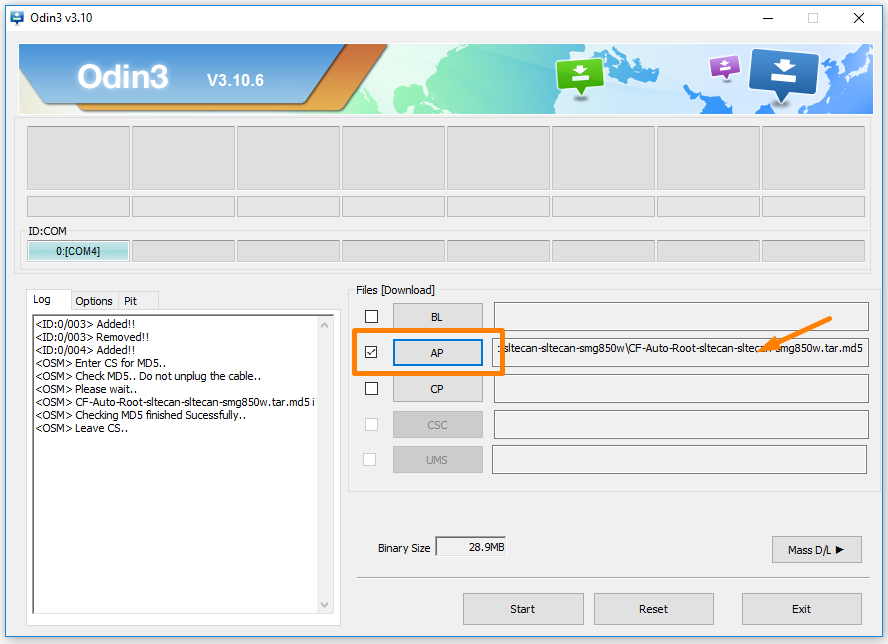
7. Click on the AP button and then browse the Downloads folder for the rooting file that you can see because it has the MD5 file extension. You know it is uploaded to Odin correctly when you can see the file extension in the Area. (Note that your file extension differs from the sample because we used a different device).
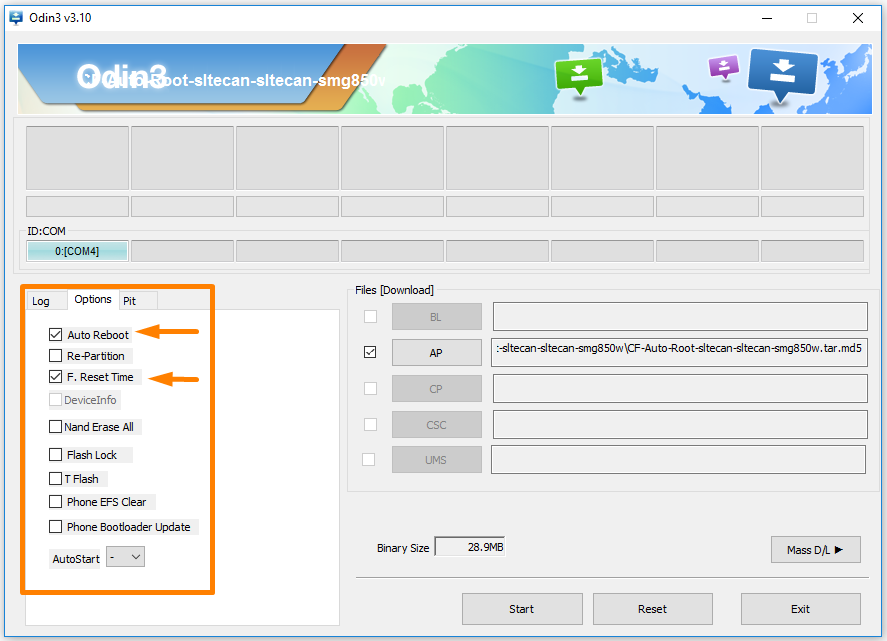
8. Click on the Options tab that is showing next to the Log and then check that your options match up with the same default options that are shown on our screenshot below.
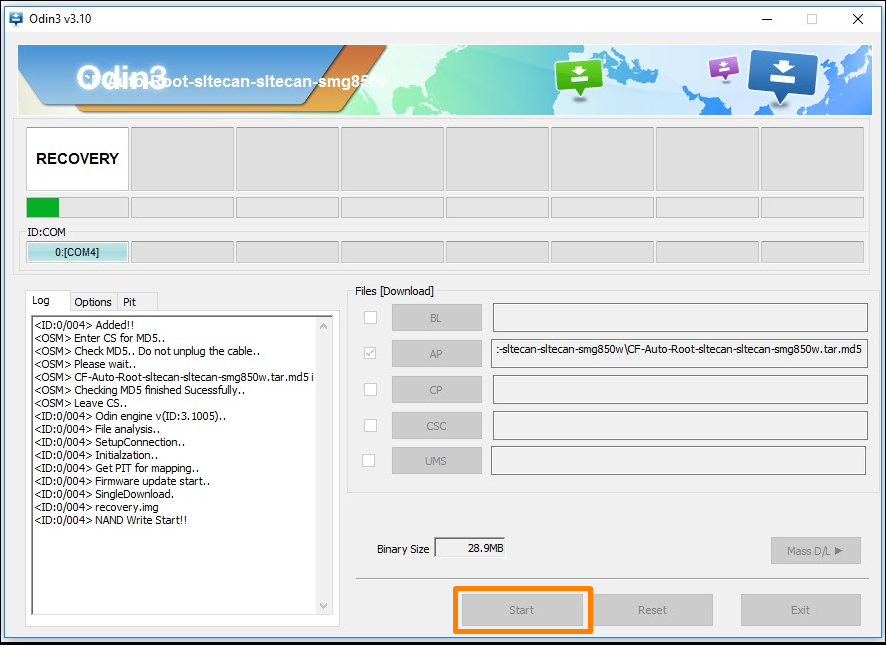
9. Click on the Start button and the rooting of the Samsung Galaxy A9 SM-A9100 smartphone begins. It will start showing words like Recovery and Cache from the box in the corner of the display. That is when your device is getting the modified cache and recovery installed which then allows or the SuperSU to be installed and enabled. Both the modified cache and recovery and uninstalled before you start using your device and everything goes back to normal.
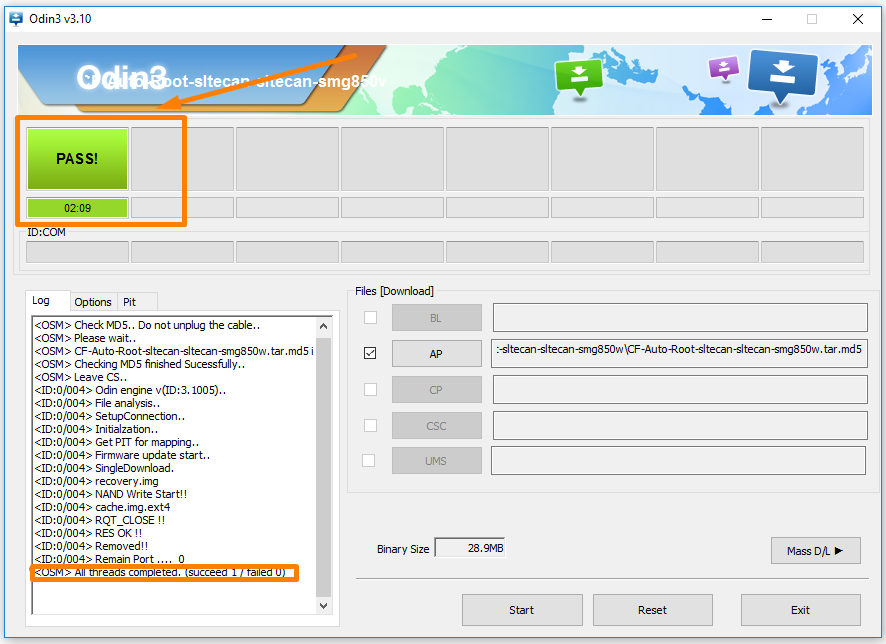
10. It then shows the reset box when your Samsung Galaxy A9 smartphone is due to reset, and the rooting is nearly complete at this point.
11. The Odin user interface then shows a pass message when the rooting is complete. You know at this stage you can unplug from the computer and star using the newly rooted Android smartphone.
In conclusion, that is how to root the Samsung Galaxy A9 SM-A9100 smartphone running on the Android 6.0.1 Marshmallow software updates by using the CF-Auto-Root tool developed by Chainfire. You can find the SuperSU app available from the app drawer now, and it needs to remain there if you are going to stay rooted.
Related Tutorials
- How to Root Nexus 5 on Android 6.0 Marshmallow Developer Preview 3 (MPA44G)
- How to Root Nexus 9 on Android 6.0 Marshmallow Developer Preview 3 (MPA44G)
- How to Root Nexus 6 on Android M MPZ79M (Developer Preview 2)
- How to Root Nexus 6 on Android M Developer Preview with SuperSU and Despair Kernel
- How to Root Android N Developer Preview on Nexus Devices
- How to Root Google Nexus 6 on Android 6.0.1 MMB29X Marshmallow
- How to Root Google Nexus 6P on Android 7.1
- How to Root LG Nexus 5 on Android 6.0 Marshmallow
- How to Root LG Nexus 4 on Android 6.0 Marshmallow
- How to Root Google Nexus 5X with Encryption Disabled