Last Updated on May 13, 2023 by Mat Diekhake
You’ll hear a few things about why you should not want to root your Android operating system and why it’s something you should try to avoid. Some manufacturers do make it so that it voids the warranty even though that is technically illegal in the United States and there is a law in place that says companies must fix devices under the warranty if they are rooted. Other people like to stress the fact that an operating system is less secure with root access because malware if installed, can leave the general area it would have been fenced in by without root access. Then there’re the people who like to emphasize the fact that bricking can happen and you should never put your wallet on the line.
Once you have established that you know how to not install malware, and you don’t really care about your warranty because you will probably never use it anyhow, then you might start warming to the idea of rooting the Android operating system.
Rooting Android gets a bad reputation, but it isn’t nearly as bad as these folks make it out to be. In fact, if you were a developer then you always need to have root access on the Android operating system. Otherwise, you can’t do anything. All we are doing when we root a device is get access to the root user account that is always there on Android and Linux but Android takes it away from us until we choose to grant ourselves those permissions again. When you have control of the root user account it is then up to you to choose what it installed and uninstalled. That is always referring to the applications that are going to be running on your device.
There are thousands of applications available out there. Some of those apps like Xposed Framework and Viper4Android are situated outside of the Google Play Store while thousands of others are available from the Google Play Store that you use already. The Titanium Backup, Greenify, Root Firewall, Link2SD, Root App Deleter and Disk Digger Undelete apps are all great examples of some root apps you will find from the Google Play Store. Google doesn’t mind these apps being available from the Play Store because they aren’t bad. They just require root permissions before they can run.
Notes:
- Chainfire had the MMB29K.A710KKKU1BPG1 firmware build number running on the Samsung Galaxy A7 SM-A710K when he developed the version of the CF-Auto-Root tool that is available in this guide. You don’t need that same firmware build number running on your Samsung Galaxy A7 smartphone when you follow this guide. He just gives that firmware information he was using if you ever want to use it as an indicator.
- If you find that your device is not booting after flashing the CF-Auto-Root tool then it is because a new bootlaoder is present in the firmware you are running. Chainfire needs people to leave a message on the CF-Auto-Root tool thread at XDA-Developers that contains the recovery image from the new firmware and he uses it to update the rooting file so it begins working again.
- You can only follow this guide if you have the Samsung Galaxy A7 smartphone that comes with the SM-A710K model number. The CF-Auto-Root tools that install and enable the SuperSU on your device will probably brick the device if you flash the wrong version. There is usually a different version developed for each model number.
- You need to have a computer that runs on the Windows operating system to use the Odin flahsing tool. Since the CF-Auto-Root tool is an Odin flashable file, that is the tool we are using in the guide.
Download Samsung Galaxy A7 SM-A710K CF-Auto-Root and Drivers
- Download the CF-Auto-Root tool for the Samsung Galaxy A7 SM-A710K smartphone running on Android 6.0.1 Marshmallow software updates.
- Download the Samsung USB Drivers for the Windows operating system on the computer.
How to Root Samsung Galaxy A7 SM-A710K on Android 6.0.1 Marshmallow Using CF-Auto-Root
1. Unlock the Developer Options menu on the Samsung Galaxy A7 SM-A710K smartphone so you can turn on the USB Debugging Mode that is available on the menu.
2. Enable the USB Debugging Mode on the Samsung Galaxy A7 SM-A710K phone from the Developer Options menu that was just unlocked in the step above so you can make the necessary changes to the Android software when you try to root it.
3. Run the Odin flashing application that is now available inside the Downloads folder, so the flashing tool user interface is open on the computer.
4. Open up the Downloads folder on the computer (the default downloads location when you download a file) and then extract the CF-Auto-Root tool file that is in there to the same Downloads folder.
5. Run the Odin flashing application that is now available inside the Downloads folder so the flahsing tool user interface is open on the computer.
6. Boot the Samsung Galaxy A7 SM-A710K smartphone into the Download Mode and then connect it to the computer with the USB cable.
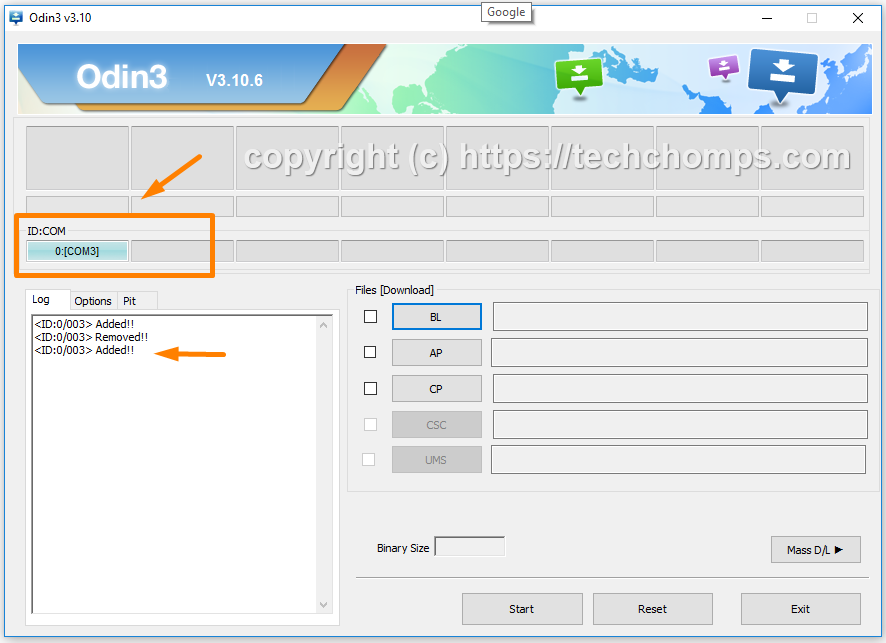
7. Check that Odin shows a blue or yellow ID: COM port and the added message is preparing in the Log which is there to tell you that your Galaxy A7 smartphone is connected to the computer and detected by the flashing app because the Samsung USB Drivers are working.
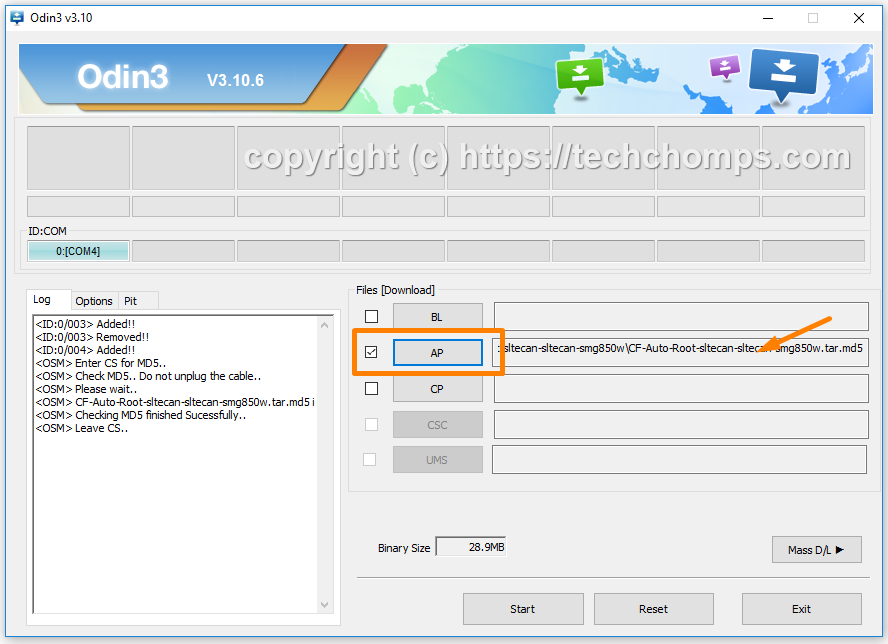
8. Click on the AP button and then browse through to the Downloads folder where you extracted the file earlier and then select the Md5 rooting file. You know it is upload to Odin correctly when you can see the file extension available. (Note that your file extension will not be the same as ours in the sample).
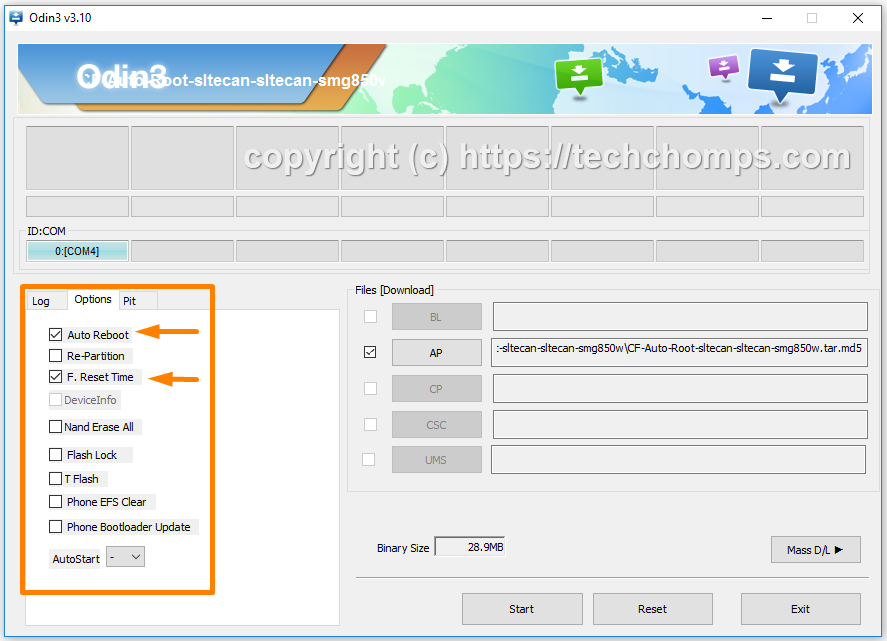
9. Click on the Options tab and then make sure that your settings are the same as the default settings available in the screenshot below.
10. Click on the Start button, and the rooting of the Samsung Galaxy A7 SM-A710K smartphone begins. Wait for the modified cache and the modified recovery to be installed.
 11. It the installs and enables the SuperSU on the Samsung Galaxy A7 smartphone and then resets when it is done. The systemless root version of CF-Auto-Root can take a few minutes to complete and reboot several times; don’t be alarmed by any of this. You can read the information that is on the display of the smartphone if you want more details.
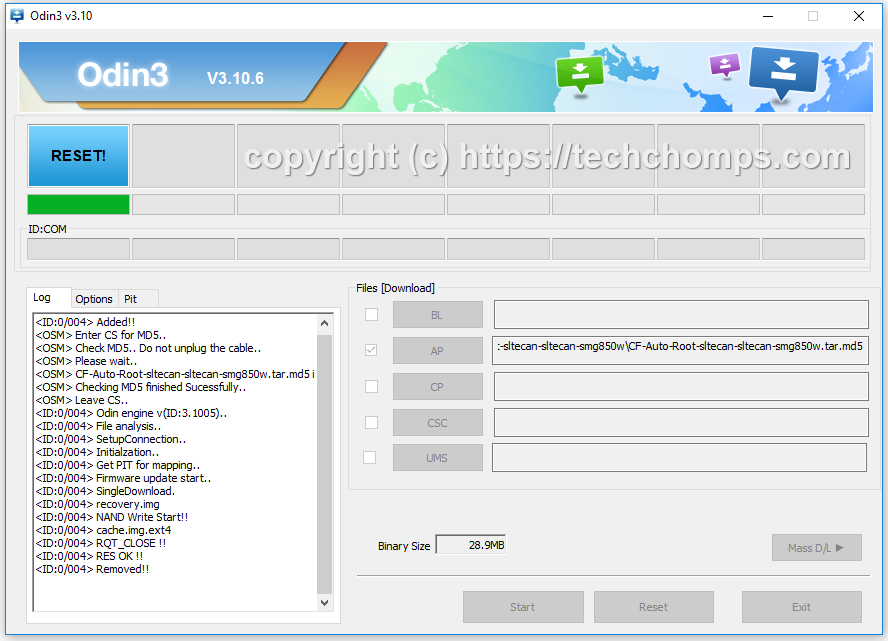
12. Odin then shows a pass message box on the display when the rooting is complete, and it is safe to unplug the Samsung Galaxy A7 smartphone from the computer.
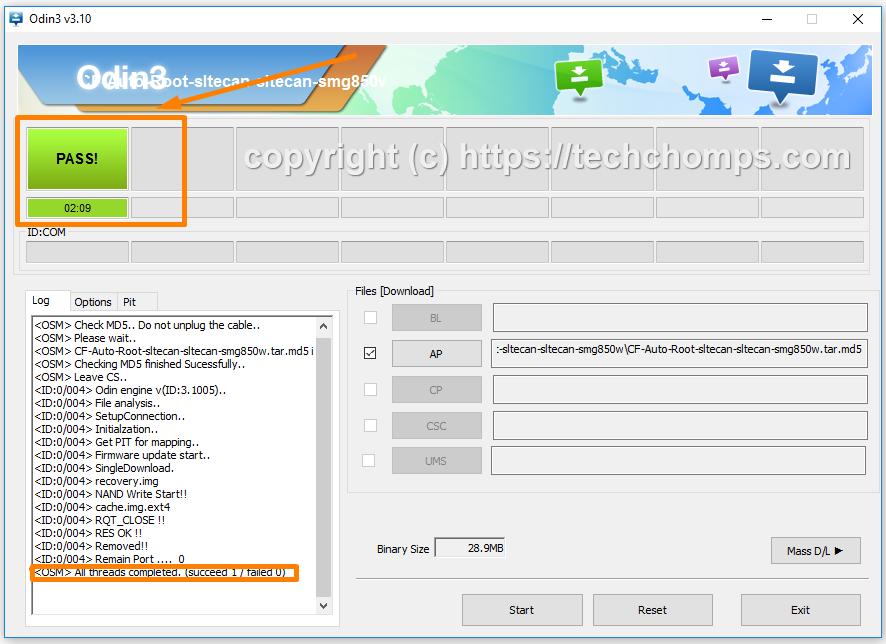
In conclusion, that is how to root the Samsung Galaxy A7 SM-A710K smartphone when it is running on the Android 6.0.1 Marshmallow software updates by flashing the systemless root version of the CF-Auto-Root tool developed by Chainfire. The CF-Auto-Root tool installs and enabled the SuperSU on your device. The systemless root version just means it did not get root access through the system partition like it did in an earlier version of the tool. It also means you can now unroot when you take a factory reset from the recovery mode. The main thing you need to understand about the CF-Auto-Root tool is that it is a one-click rooting tool that does not install a custom recovery on the smartphone which means it is only useful for people wanting to install root applications. For everyone else, you need to install a custom recovery. There are no problems installing a custom recovery when you have rooted with the CF-Auto-Root tool. You can install the new recovery either before or after using CF-Auto-root.
Related Tutorials
- How to Root Nexus 5 on Android 6.0 Marshmallow Developer Preview 3 (MPA44G)
- How to Root Nexus 9 on Android 6.0 Marshmallow Developer Preview 3 (MPA44G)
- How to Root Nexus 6 on Android M MPZ79M (Developer Preview 2)
- How to Root Nexus 6 on Android M Developer Preview with SuperSU and Despair Kernel
- How to Root Android N Developer Preview on Nexus Devices
- How to Root Google Nexus 6 on Android 6.0.1 MMB29X Marshmallow
- How to Root Google Nexus 6P on Android 7.1
- How to Root LG Nexus 5 on Android 6.0 Marshmallow
- How to Root LG Nexus 4 on Android 6.0 Marshmallow
- How to Root Google Nexus 5X with Encryption Disabled