Last Updated on February 25, 2024 by Mat Diekhake
Cortana is a virtual assistant created by Microsoft for the Windows operating system and its associated services such as the Invoke smart speaker, Microsoft Band, Surface Headphones, Xbox gaming console, iOS, Android, Windows Mixed Reality, and Amazon Alexa.
Cortana can understand your natural voice and what you’re saying so you don’t need to type words with the keyboard to get her to understand what you want her to do for you. You can use Cortana to set reminders, answer questions, and give other information, some of which is personalized. The version of Cortana and device you’re using will slightly change what it is Cortana can do. Always keep Windows up to date for the best virtual assistant experience as possible.
If you ever need to troubleshoot Cortana, one of the things you may want to try is reinstalling and re-registering the virtual assistant to see if that helps solve the problem.
The following tutorial demonstrates how to reinstall and then re-register the Cortana virtual assistant when you’re using a version of the Windows 10 operating system.
Method One: How to Troubleshoot Cortana by Reinstalling and Re-registering Her for Current User
Here is how you can reinstall and reinstall the Cortana virtual assistant for the one user account that you’re signed into now:
1. Open the Windows PowerShell window.
2. Type the following command and then press the Enter key on your keyboards to execute it. (click to enlarge screenshot below)
Get-AppxPackage Microsoft.Windows.Cortana | Foreach {Add-AppxPackage -DisableDevelopmentMode -Register "$($_.InstallLocation)\AppXManifest.xml"}

You can now close the Windows PowerShell window and continue using your computer if you like.
Method Two: How to Troubleshoot Cortana by Reinstalling and Re-registering Her for All Users
Here is how you can reinstall and reinstall the Cortana virtual assistant for every user account that is set up on your computer:
Note: You need to be logged into the computer with an administrator’s account to be able to use this method. There are two ways you can log in with an administrator’s account on a Windows 10 computer: either by a) using your Windows account that already has the administrator privileges or b) logging in to someone else’s account that has the administrator privileges. The account that was created first is automatically assigned the administrator privileges and it can pass it on to other accounts; other administrator accounts can also remove the administrator privileges from the original account.
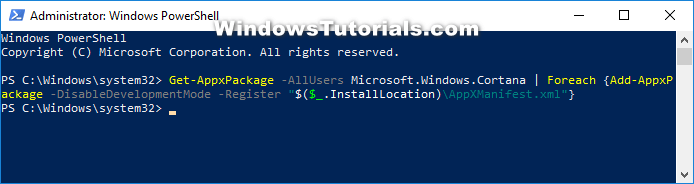
1. Open the elevated Windows PowerShell window.
2. Type the following command and then press the Enter key on your keyboards to execute it. (click to enlarge screenshot below)
Get-AppxPackage -AllUsers Microsoft.Windows.Cortana | Foreach {Add-AppxPackage -DisableDevelopmentMode -Register "$($_.InstallLocation)\AppXManifest.xml"}
You can now close the Windows PowerShell window and continue using your computer.
That’s all.
Related Tutorials
- How to Turn On/Off Cortana in Microsoft Edge in Windows 10
- How to Sign In or Sign Out of Cortana in Windows 10
- How to Clear Personal Data and Information from Cortana
- How to Hide/Show Cortana Button on Taskbar in Windows 10
- How to Help Cortana Learn Your Voice for ‘Hey Cortana’ in Windows 10
- How to Enable/Disable Cortana Floating Search Bar in Windows 10
- How to Show Cortana Web Search Results in Microsoft Edge or Internet Explorer
- How to Turn On/Off Cortana in Microsoft Edge in Windows 10
April 22, 2019 @ 00:05
Web browsers and search engines outside of the ones that Google runs still have a ways to go. I was using Firefox the other day and when one of your overlay pictures opens up so I can see it full size, Firefox can’t even get that right. There is a white line to the right side, and generally, it just doesn’t look anywhere near as nice. And I see these kinds of overlay full-size images all the time on other websites so this is not exactly a groundbreaking feature. Microsoft Edge doesn’t offer a 110% zoom (it skips from 100 to 125%) which is terrible when trying to view the web from a bunch of different laptops. My 17-inch laptops need 110% zoom for the internet to look the same as it normally does from a 15-inch laptop. And as for search results, outside of Google and Bing there is almost no competition, no matter how much Duck Duck Go wants to advertise its brilliance all over every Quora page that I visit.
But I see a good future for Bing. I don’t think they’re far away from having as good search results as Google, and sometimes I even prefer them. I know smaller sites like this one tend to rank better in Bing than in Google, and I appreciate that. As long as the writers are good writers, I would prefer seeing smaller independent sites a lot of the time instead of the same old CNN and only big brands.
One of the things I’ve noticed Bing does well is integrate Cortana with Bing. These days you can ask Cortana for a particular website and she will find it for you much more reliably than she used to. The results that you get when she can’t answer a question from BIng are also getting better. I used to think that the Bing results were just Cortana saying she gives up, but now I am finding myself clicking on the results more and more.
April 22, 2019 @ 00:05
Is there any way to keep using the newer version of Windows but downgrade to an older version of Cortana? I understand that with the complexities of software updates that that isn’t likely the case right now but one day in the future I really hope Microsoft considers spending more money on developers that allow us to do these things.
After one of my more recent Cortana updates that I assume rolled out the same time as the Windows 10 software update, one of the features noticeably changed — and for the worse in my opinion. When I used to ask Cortana about Windows Update it would take me to the Windows Update utility. Now when I ask Cortana for the same thing I get directed through to Bing search results. This seems odd to me, especially since Windows apparently wants us to get to know the Windows Update utility.