Last Updated on May 13, 2023 by Mat Diekhake
Rooting the Samsung Galaxy A8 smartphone running on the Android 6.0.1 Marshmallow software updates might be able to be done a variety of ways in the future but for now, the only way available is by using the CF-Auto-Root tool.
The CF-Auto-Root tool is a one-click rooting tool developed by Chainfire—the same guy who produces all of the versions of the SuperSU app that people use to flash from a custom recovery partition. CF-Auto-Root is flashed without the need of a custom recovery installed. It just gets flashed directly from the Odin flashing tool on a computer and Chainfire’s programming has the SuperSU installed and enabled correctly thanks to a modified cache and modified recovery that is installed first.
The people who want to install custom ROMs or custom kernels are usually the ones who install a custom recovery and then get root access by flashing the SuperSU. The rest of the people who have no interest in installing a custom recovery and just want to begin installing the root applications they want to try are the one’s who enjoy using the CF-Auto-Root tool.
At the end of the day, it doesn’t matter what way you choose, they both end up with the same thing which is you are now the root user on the operating system, and you can get to decide what it installed and what is taken away. There are no extra apps or benefits that a person has rooting one way in comparison to another.
Notes:
- Chainfire was running on the MMB29K.A800SKSU1BPG2 firmware when he managed to develop the version of the CF-Auto-Root tool that is available in this guide. You don’t need the same firmware build number running on your Samsung Galaxy A8 SM-A800S smartphone when you follow this guide, though. All you need is to be using the right model number (SM-A800S) and for it to be running on the Android 6.0.1 marshmallow software updates. You can check what the software version is on your Samsung Galaxy A8 smartphone by tapping on the Settings app > About Device > Android version.
- If you are finding your device does not boot after flashing the CF-Auto-Root tool of the file just does not flash, then it could be because there is a new bootloader available in the firmware update you are running and the rooting file needs updating. Chainfire asks for you to leave the recovery image from that new firmware in a message to the official CF-Auto-Root tool thread at the XDA-Developers forum so he can see it and use it to update the file, so it starts working again.
Download Samsung Galaxy A8 SM-A800S CF-Auto-Root and Drivers
- Download the CF-Auto-Root tool for the Samsung Galaxy A8 SM-A800S smartphone running on the Android 6.0.1 Marshmallow software updates.
- Download the Samsung USB Drivers for the Windows operating system.
How to Root Samsung Galaxy A8 SM-A800S on Android 6.0.1 Marshmallow Using CF-Auto-Root
1. Unlock the Developer Options menu on the Samsung Galaxy A8 SM-A800S smartphone so you can use the set of options that are available to you inside.
2. Enable the USB Debugging Mode from the Developer Options menu on the Samsung Galaxy A8 SM-A800S smartphone that you just unlocked so the Android software can have changes made to it which are what is required if you are to complete this guide.
3. Install the Samsung USB Drivers on the computer so that the Samsung Galaxy A8 SM-A800S smartphone can be detected by the flashing tool when it is running on the computer.
4. Open up the Downloads folder on the computer which is usually the default download location for all of your files and then extract the rooting file to that downloads folder.
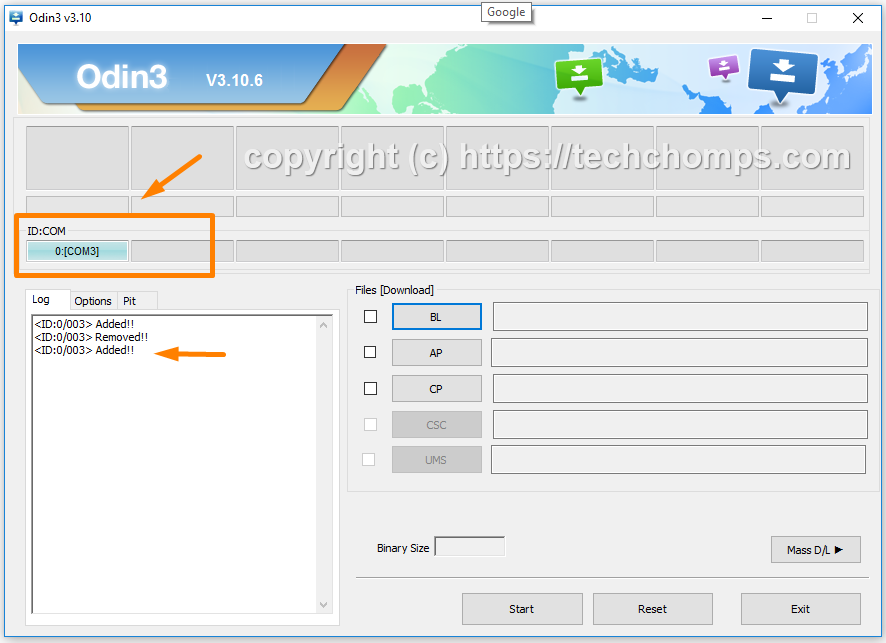
5. Boot the Samsung Galaxy A8 SM-A800S smartphone into the Download Mode and then connect it to the computer with the USB cable that is usually used for charging the battery.
6. When you connect the USB cable and phone to the computer you should see a blue or yellow color coming from the ID: COM port in Odin and the added message available from the Log entry which is both there to let you know that you have the Samsung USB Drivers installed correctly, and everything is ready for the flashing to go ahead.
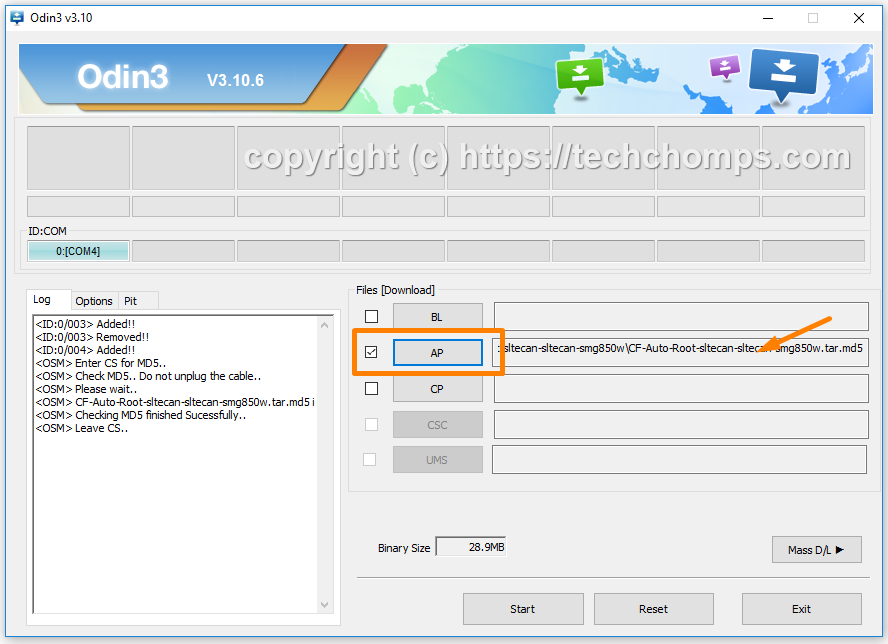
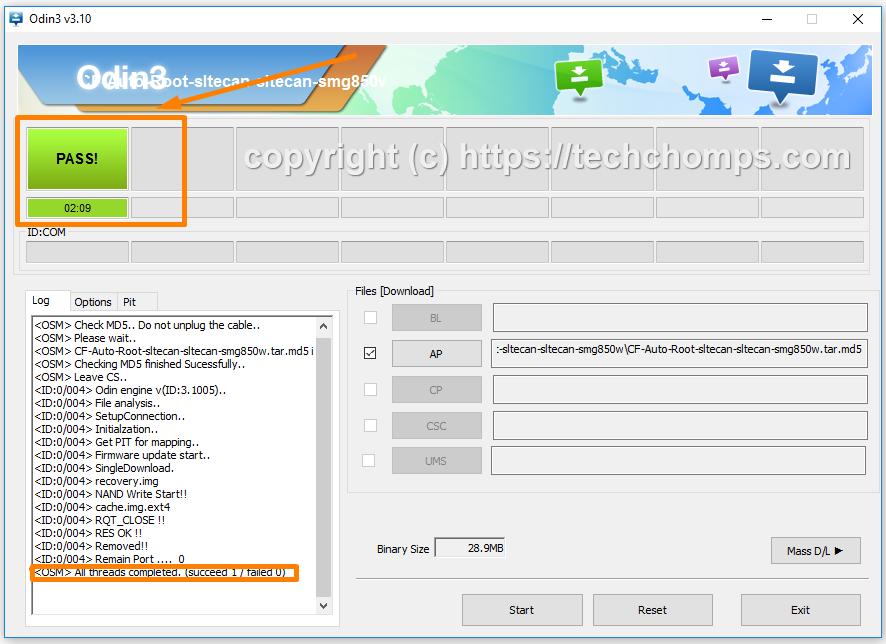
7. Click on the AP button and then browse through to the Downloads folder where you extracted the file already and choose to upload the Md5 rooting file to this location in the flashing tool. You know you have uploaded it correctly when you see the file extension of the rooting file appear in the space for it next to the AP button. (Note that your file extension differs from our sample).
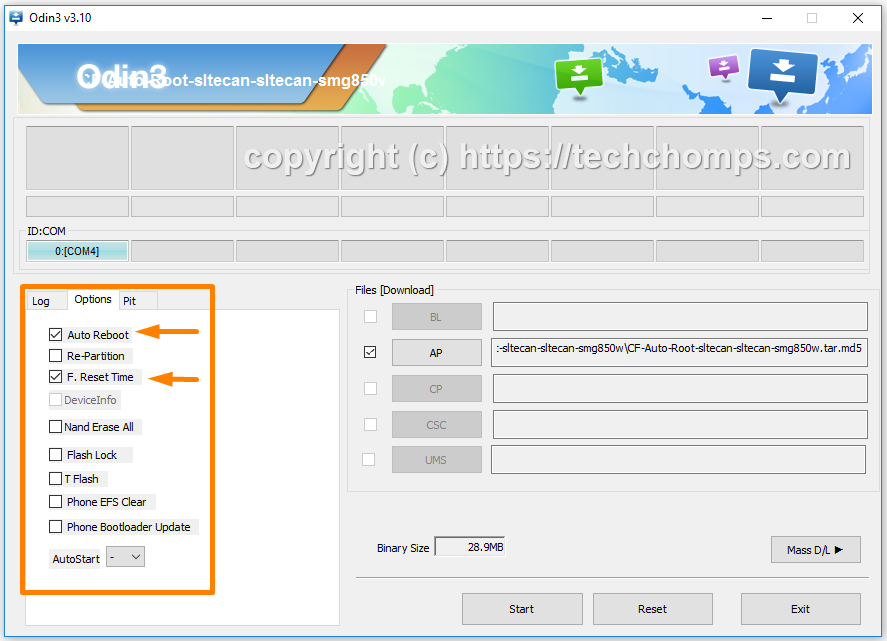
8. Click on the Odin Options tab which is available next to the Log and double-check that your options are displaying the same as the default Odin options which are on display in the screenshot below.
9. Click on the Start button and the rooting of the Samsung Galaxy A8 SM-A800S smartphone begins. Read the text that is rolling down your display which is programmed to let you know what the CF-Auto-Root tool is doing to your device and just what to expect so you don’t get any surprises. (Note that the Android 6.0.1 version of the CF-Auto-Root tool is the systemless root version which usually takes up to as few minutes longer to complete than the older versions of the rooting tool. It is also normal for it to boot loop a few times throughout the process).

10. The Odin box in the corner of the screen cycles through installing the cache and recovery and then shows a blue reset box when it is almost complete. At that time the Samsung Galaxy A8 SM-A800S smartphone will reboot on last time.
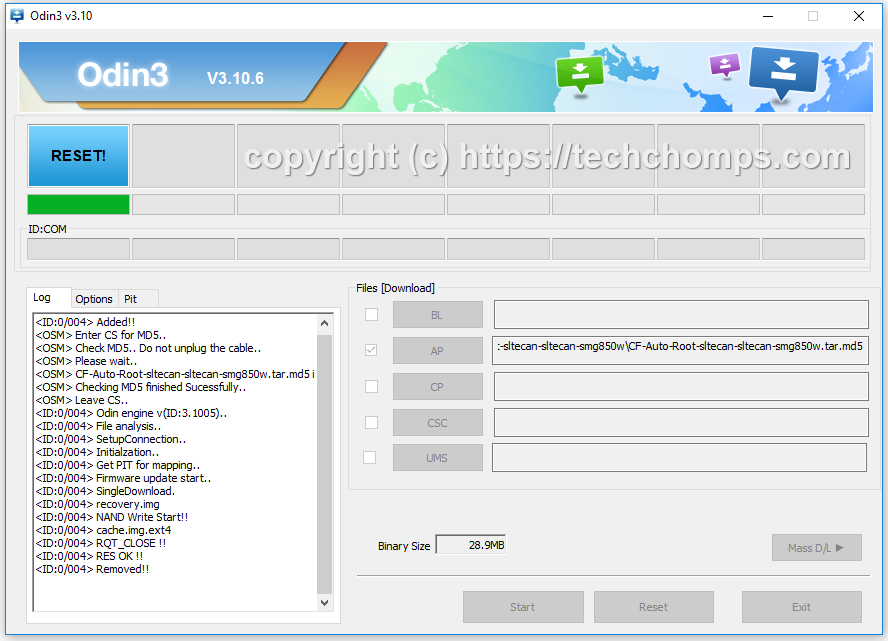
11. Odin then shows a green pass message from the corner of the screen when your Samsung Galaxy A8 smartphone is entirely rooted and has the SuperSU app installed and enabled correctly.
In conclusion, that is how to root the Samsung Galaxy A8 SM-A800S smartphone running on the Android 6.0.1 Marshmallow software updates by flashing one of the systemless root versions of the CF-Auto-Root tool by Chainfire. You get the SuperSU available from the app drawer, and it is what gives your smartphone the rooting permissions it needs to run the root apps. You can begin installing any of the apps that require root access to run now.
Related Tutorials
- How to Root Nexus 5 on Android 6.0 Marshmallow Developer Preview 3 (MPA44G)
- How to Root Nexus 9 on Android 6.0 Marshmallow Developer Preview 3 (MPA44G)
- How to Root Nexus 6 on Android M MPZ79M (Developer Preview 2)
- How to Root Nexus 6 on Android M Developer Preview with SuperSU and Despair Kernel
- How to Root Android N Developer Preview on Nexus Devices
- How to Root Google Nexus 6 on Android 6.0.1 MMB29X Marshmallow
- How to Root Google Nexus 6P on Android 7.1
- How to Root LG Nexus 5 on Android 6.0 Marshmallow
- How to Root LG Nexus 4 on Android 6.0 Marshmallow
- How to Root Google Nexus 5X with Encryption Disabled