Last Updated on May 13, 2023 by Mat Diekhake
If you have rooted Android before or at least read a great deal about rooting online, then you would know that part of the allure of becoming the root user is having the chance to improve the performance of the device in your hands. The problem with most things that are related to improving the performance is that it requires knowledge to know how to use the apps because making a wrong choice can be costly. Apps that have the power to make changes to the hardware or software are best left to the experienced Android users, so you don’t ruin the device which is a catch 22 for those who are looking for performance and don’t know how to increase it without rooting.
You’ll be pleased to know that there is help out there for anyone in that position. All you need to do is check out the Smart Booster applications that are available for root users, and it can help you increase the performance just by tapping a button and letting the app handle the rest. It is one of the newer root apps and is just becoming popular lately. If you don’t have the confidence to use an app like the SetCPU or Titanium Backup, then the Smart Booster app is a great place to turn to next.
Notes:
- Chainfire was running on the KOT49H.T530NUUEU1AND4 firmware build when he created the CF-Auto-Root file available in this guide for the Samsung Galaxy Tab 4 10.1 SM-T530NU. It does not mean you need to be running on the same firmware build number as Chainfire before you flash the rooting file available in this guide. It means you can use it as an indicator if you ever need it. The rooting tool in this guide works on any firmware build number as long as you have the right model numbered device and it is running on the Android 4.4.2 KitKat software updates.
- The Samsung Galaxy Tab 4 10.1 tablet with the SM-T530NU model number is one of the devices that comes with two unique makes, and there is a single rooting file for each also. The CF-Auto-Root tool in this guide is only made for the matissewifiue variant of the Samsung Galaxy Tab 4 10.1 SM-T530NU tablets.
- Our rooting guides have a very high success rate because the only times the CF-Auto-Root tools usually temporarily stop working is when a new version of Android has arrived and brought a new bootloader wit hit. We solve that problem by only writing our rooting guides on the latest versions of Android that we already know the files are working for today. Still, there can be times when they don’t work, and if you notice your device is not booting or not flashing, then it is likely because the CF-Auto-Root file needs updating by Chainfire. He relies on people to let him know when a file needs updating by leaving a message on the official CF-Auto-Root tool thread at the XDA-Developers web forum that also contains the new recovery image from the firmware version you are running.
Download Samsung Galaxy Tab 4 10.1 SM-T530NU CF-Auto-Root and Drivers
- Download the CF-Auto-Root tool for the Samsung Galaxy Tab 4 10.1 SM-T530NU when it is running on the Android 4.4.2 KitKat software updates.
- Download the Samsung USB Drivers for the Windows computer.
How to Root Samsung Galaxy Tab 4 10.1 SM-T530NU on Android 4.4.2 KitKat Using CF-Auto-Root
1. Unlock the Developer Options menu on the Samsung Galaxy Tab 4 10.1 SM-T530NU tablet so you can use the set of options that are available on that menu.
2. Enable the USB Debugging Mode on the Samsung Galaxy Tab 4 10.1 SM-T530NU tablets so you can make changes to the Android software when it is connected to the computer with the USB cable.
3. Install and run the Samsung USB Drivers on the Windows computer so when you do run the Odin flashing tool and have your tablet connected to the computer it can detect your device and allow for the flashing of the rooting file.
4. Extract Chainfire’s CF-Auto-Root tool on the computer so you can use the rooting file inside and also the Odin flashing tool file.
5. Double-click on the Odin executable file that is available and the flashing tool user interface opens up.
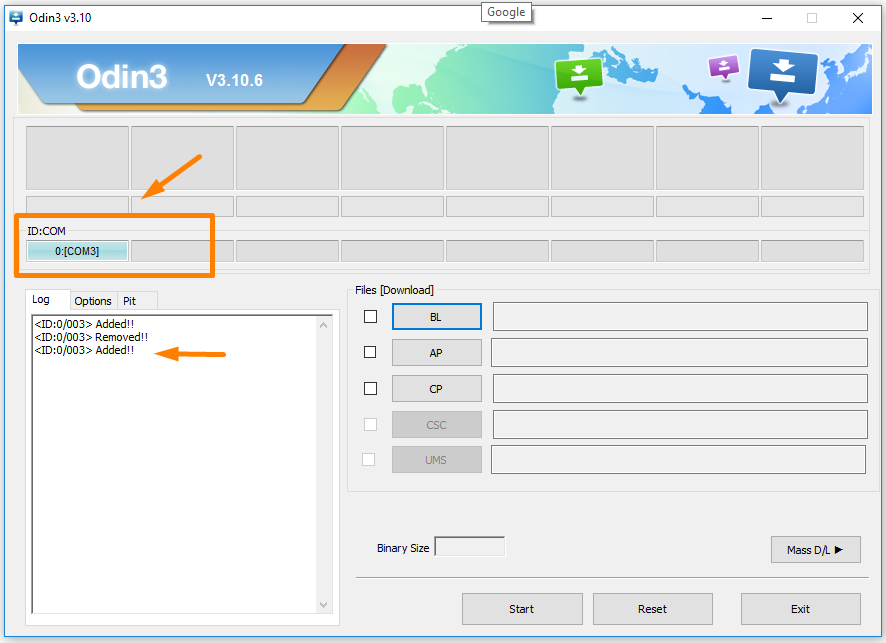
6. Boot the Samsung Galaxy Tab 4 10.1 SM-T530NU into the Download Mode and then connect it to the computer with the USB cable that is used for charging the battery.
7. You need to see a blue or yellow color coming from the ID: COM port now and the added message in the Log box from Odin which are both signs that the Samsung USB Drivers you installed are working.
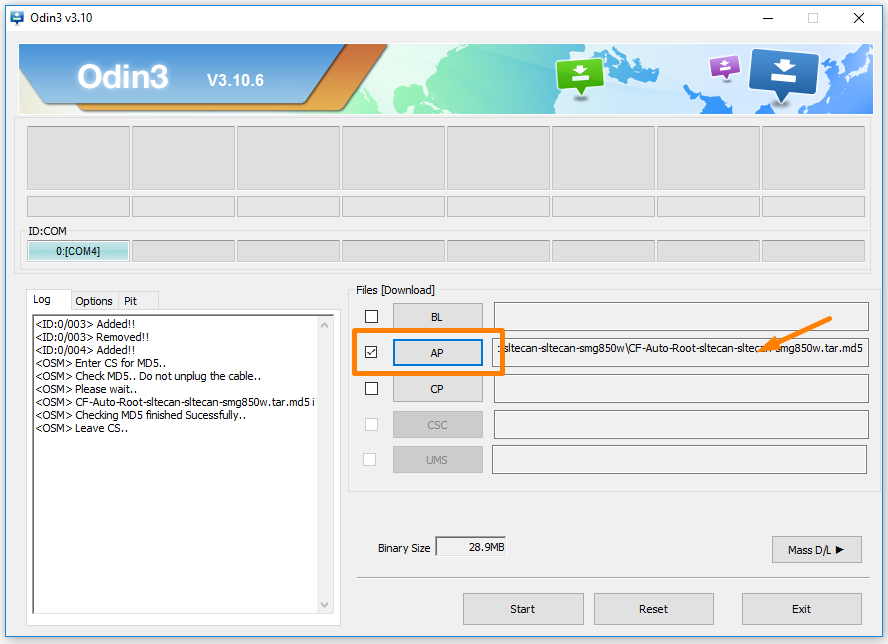
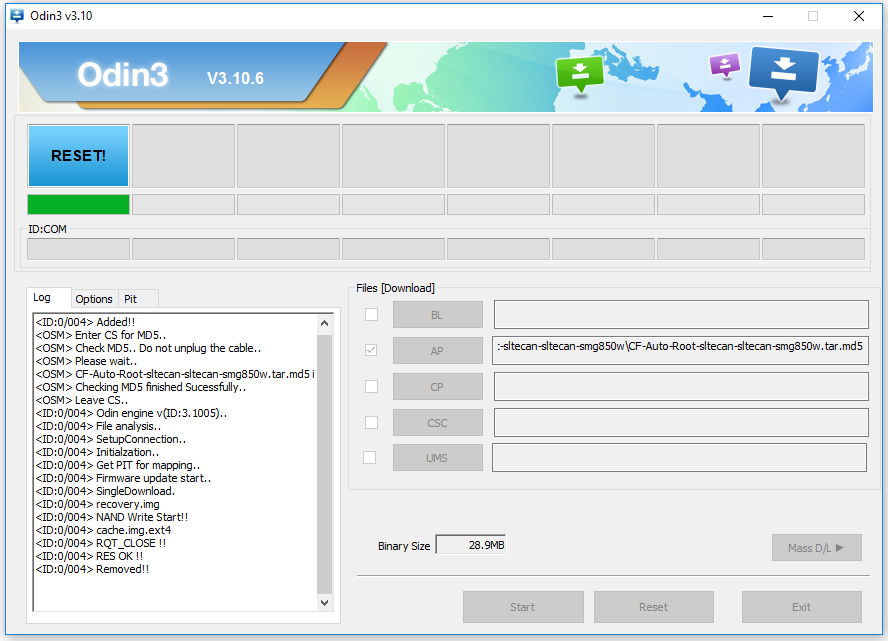
8. Click on the AP button now and then browse through to the Downloads folder or the location where you extracted the rooting file and choose to upload the rooting MD5 file to this location in Odin.
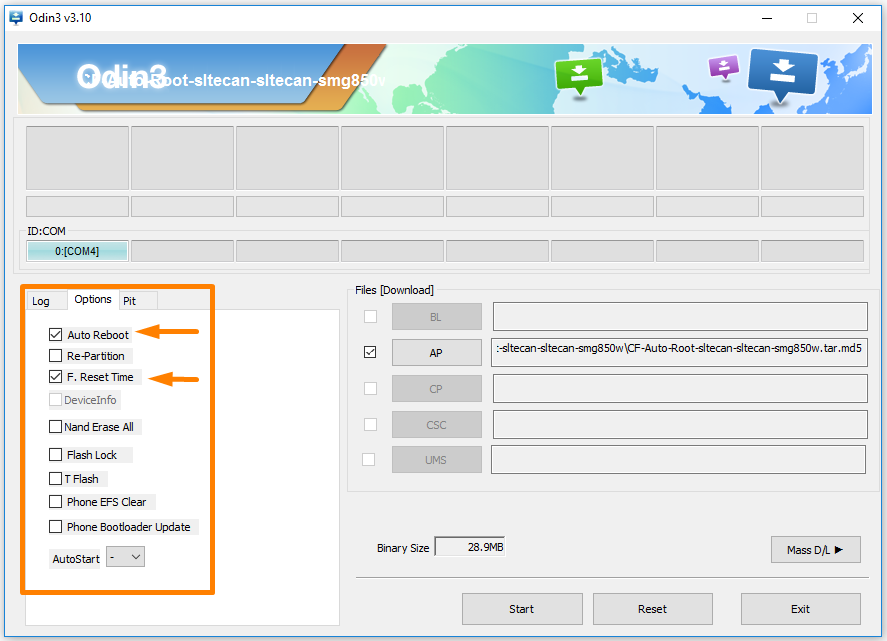
9. Click on the Options tab available next to the Log that it is displaying at the moment and then make sure the same default settings as the Odin screenshot below are being displayed before you go ahead with the rooting in the following steps. In particular, make sure you are not re-partitioning the drive.
10. Click on the Start button and the modified cache and recovery get flashed which you can see by reading those names in the top left box.
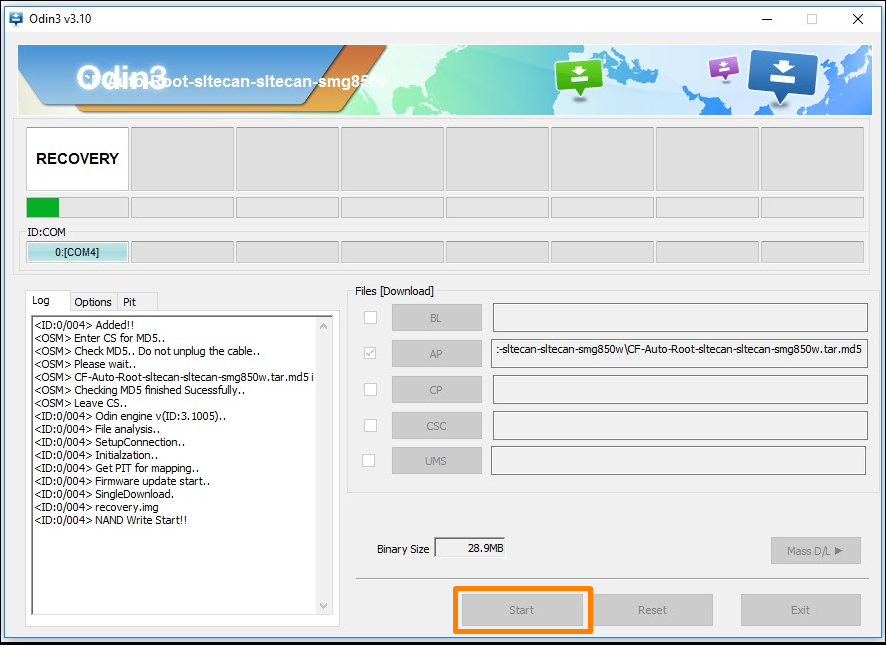
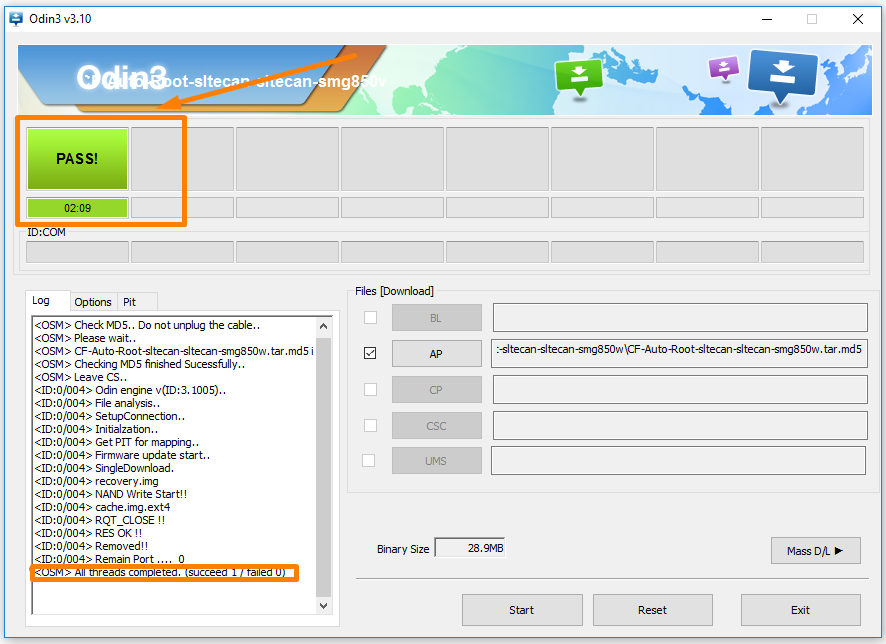
11. It then shows a reset button when your device is be being reset, and the green progress bar makes its way over to the full mark.
12. It then shows a green box with the pass message inside which is when you know the CF-Auto-Root tool has successfully managed to install and enable the SuperSU on your device. You are safe to unplug it from the computer and start using the Google Play Store as soon as your device reboots back into the normal mode.
In conclusion, that is how to root the Samsung Galaxy Tab 4 10.1 SM-T530NU tablet running on the Android 4.4.2 KitKat software updates by flashing Chainfire’s SuperSU via the CF-Auto-Root one-click rooting tool on a Windows computer.
The Google Play Store plays host to most of the root apps out there for you to start installing. There are apps out there to add more to your device from what it already is, or there are apps out there that can remove things that are already on your device such as the system apps. The apps outside of the Google Play Store are often there because the Play Store kicked them out such as the Viper4Android app and the Xposed Framework that changes the features of Android and is a bit like installing a custom ROM which Android didn’t take too kindly to when it was sitting in the Play Store. Those apps like Xposed And Viper4Android are okay for you to install, but be on the lookout for malware if you are installing no-name apps and from no-name sources.
The Google Play Store doesn’t go to the effort of making life easier for root apps lovers either by showcasing them off to everyone, so you need to do your research hand find out the names. Once you have the names of the root apps that you want to try just search for them from the Google Play Store search bar, or if they aren’t there, try Google. Our article on the best root applications for Android is also a great place to learn the names of the apps that you want to test out.
Some people also prefer skipping the root apps for now and focussing the attention on finding out if the device is rooted correctly. You can do that too by installing the Root Checker app that is available from the Google Play Store. There is always at least one free version of the Root Checker app available that allows you to check the root status of your Android operating system. There are also Pro versions of the Root Checker apps that allow for more features if you are interested in using them down the track.
Related Tutorials
- How to Root Nexus 5 on Android 6.0 Marshmallow Developer Preview 3 (MPA44G)
- How to Root Nexus 9 on Android 6.0 Marshmallow Developer Preview 3 (MPA44G)
- How to Root Nexus 6 on Android M MPZ79M (Developer Preview 2)
- How to Root Nexus 6 on Android M Developer Preview with SuperSU and Despair Kernel
- How to Root Android N Developer Preview on Nexus Devices
- How to Root Google Nexus 6 on Android 6.0.1 MMB29X Marshmallow
- How to Root Google Nexus 6P on Android 7.1
- How to Root LG Nexus 5 on Android 6.0 Marshmallow
- How to Root LG Nexus 4 on Android 6.0 Marshmallow
- How to Root Google Nexus 5X with Encryption Disabled