Last Updated on December 26, 2022 by Mat Diekhake
If you’ve ever had a computer that ran Windows and you couldn’t boot it up because of malware or some type of virus, you were probably pretty impressed when you saw the local computer guy manage to fix the problem. When malware takes over your computer, the Safe Mode can be the only way to get it booting up again. The Safe Mode then allows someone like the computer guy to run a scan with the antivirus and it then gets rid of the infection, and the computer is like new again.
Those of you who have seen Safe Mode get booted up before might remember the resolution looking all out of wack. That happens because Safe Mode is designed to use a much lower screen resolution to help minimize the amount of hardware it needs to run. You can have networking opportunities with Safe Mode so you can still do things like use the internet (helpful if you need to research a how-to guide if you ever need to find out how to do something in Safe Mode) but the third-party apps and programs are extremely limited, which is what helps the computer be usable.
Different Types of Safe Modes You Can Get Booted
Standard Safe Mode: You can enable the standard Safe Mode that loads the operating system with limited drivers and services, one of which won’t be the internet. If you need to use the web, then you need to use the Safe Mode with networking instead.
Safe Mode with Networking: The Safe Mode with networking still limits the overall drivers and services but includes the option of loading the network drivers and services that are required to use the internet. Use this added networking option if you need to research how to fix your problem online or if you need to use the internet and are unable to get the computer fixed. You’ll need to get it fixed eventually though if you want to be able to start using your regular programs you have installed. Most people tend to use this option, even when they have next to no intention of using the internet just in case they end up changing their mind and deciding to use the internet. It’ll save you the hassle of having to reboot into the Safe Mode with Networking option if you need it.
Safe Mode with the Command Prompt: If you chose the option with the Command Prompt, it means that the Windows operating system still boots into the Safe Mode, but the only thing you get to see is the command line window on your screen. You’ll need to use this option if you want to run commands from the command line. It’s best reserved for system admins, and IT professionals who know what those commands are and what commands need to be used. You shouldn’t play around with commands unless you know what you are doing.
How to Go About Fixing a PC in Safe Mode
Uninstall Recent Updates: If you have installed any updates recently, like driver updates or additional Windows 10 builds or upgrades in general, it’s possible they could be why you are now witnessing a BSoD (Blue Screen of Death) and are unable to get Windows booted properly. Getting into Safe Mode and then uninstalling the problematic update that is causing the problems is what you might need to do.
Restore the OS to An Earlier State: You can use Windows 10’s System Restore feature to turn back time and run an older snapshot of the operating system, like hitting the rewind button on a game you are playing so you can go back to a time before you came across trouble. You’ll need to find out what it takes to start taking restore points first because not all versions of Windows 10 have that feature enabled by default. Once you’ve done that all you need to do is use System Restore and load one of those restore points that the operating system has saved. You can find out what you need to achieve both those things by reading how to do a system restore of Windows 10.
Scan for Viruses and Malware: One of the most common tricks for fixing a computer that won’t allow the operating system to boot is getting into the Safe Mode and then running a scan with your installed Windows Defender antivirus to remove the virus that’s causing the problem. Most of the time when a computer won’t boot it is because of a virus that the antivirus can fix. You just need to be able to get the chance to run the actual virus scan, and Safe Mode is how you do that. Windows 10 also comes with a Malicious Software Removal Tool that you can use to help fix similar problems as well. Scanning with Windows Defender is pretty easy to do. You just need to make sure that you have Windows Defender turned on and then you shouldn’t have any issues running the scan. It’s on by default so you don’t need to make any changes for Windows Defender to start working. But if you aren’t able to find it, it might be because someone has turned it off.
How to Boot into Safe Mode in Windows 10
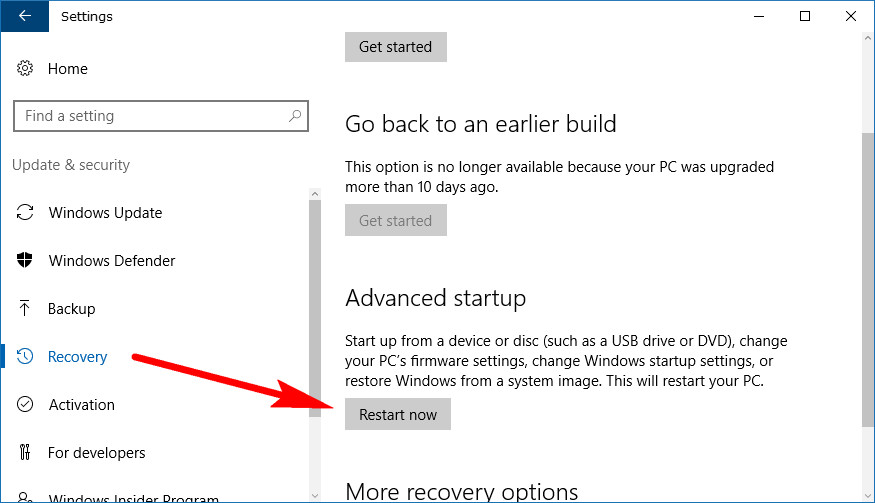
You can boot into the Safe Mode in Windows 10 a couple of ways. One of the ways is to do it from the Advanced Startup Options screen. If you wanted to do it that way, you could get your version of Windows 10 to the Advanced Startup Options screen by using the Settings application. Open the Settings app and then navigate to the Update and security > Recovery in the left pane > Restart now under the Advanced startup heading located in the right side pane. Once your computer has rebooted to the Advanced Startup Options screen, you then would need to click on the “Troubleshoot” link, followed by the “Advanced Options” from the next screen. Next, click on the “Startup settings” and then the “Restart” button in the bottom right corner. When the computer reboots this time you need to press the appropriate keys to get the PC in the right version of the Safe Mode that you want—F4 is the standard Safe Mode, F5 gives you the Safe Mode with networking, while the F6 key boots to the Safe Mode with the Command Prompt instead.
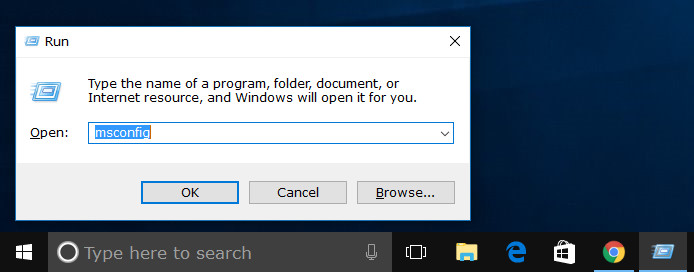
The other option you have available for booting into the Safe Mode is using the Run dialog box and then opening up the System Configuration options from there. Get the Run dialog box open by pressing the Windows logo + R keys on your keyboard and then type “msconfig” to open up the System Configuration.
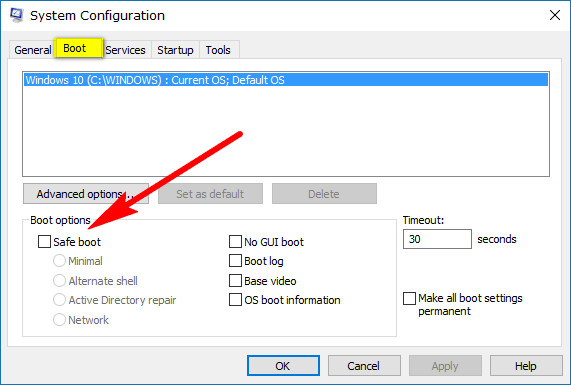
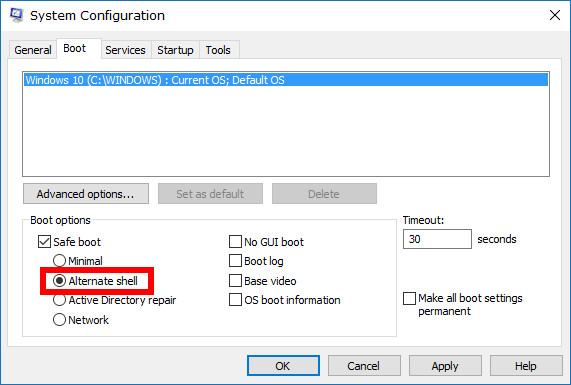
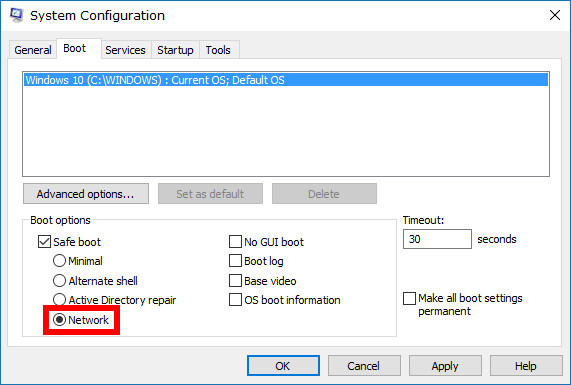
Select the “Boot” tab from the top of the System Configuration window, and then you’ll see some Boot options available. Click on the checkbox that’s available under the Boot options and then the different boot options become available for you to choose.
You’ll have four different options to pick from with the boot options. The top one called “Minimal” is what you need to select if you want just to boot the standard version of the Safe Mode that doesn’t come with any extras like networking.
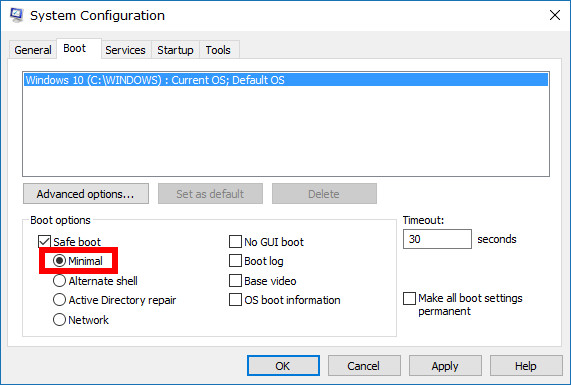
The second option from the list, “Alternate shell,” is what you need to select if you want to start the computer in Safe Mode with the Command Prompt so you can use the command line for your commands to fix problems that way, like what many system administrators often need to use, depending on your PC’s problem.
The last option on the list called “Network” is what you want to select if you want the computer to reboot to the Safe Mode with networking so you can use the internet and have the computer in Safe Mode at the same time.
A virus isn’t anything you need to fear nearly as much once you know how to fix it. Getting to know how to use Safe Mode is the first step in knowing how to tackle your viruses, malware or malicious software that has taken away your ability to load the computer and use it as you typically would. If you have tried everything you could to fix a problem within Safe Mode and the problem persists, then you should try reinstalling Windows 10 instead. If the problem is there after reinstalling Windows, then the difficulties you face might be more hardware related and not anything to do with the software.
You might also be interested in:
- How to Do a System Restore of Windows 10
- How to Check Drive for Errors in Windows 10
- How to Turn On/Off Sync Settings for Microsoft Account in Windows 10
- How to Turn On/Off Windows Optional Features in Windows 10
You can subscribe to our RSS, follow us on Twitter or like our Facebook page to keep on consuming more tech.