Last Updated on December 26, 2022 by Mat Diekhake
For many versions now, Windows developers have chosen to offer some files, folders, and drives as available for you to see and some others that are hidden. They don’t really ever bother to give people a clear explanation as to why that is unless you go looking for one.
The reason you’ll have some hidden files, folders and drives is for your safety. If you can’t find them on offer by default, then you can’t delete or modify them. Thus, these hidden items are typically of importance and ones you aren’t meant to touch without having a special reason to do so.
If there does come a time when you need to get access to a hidden item, then you can do that by finding out what is required to show the hidden files, folders and drives and then they’ll become available for you to see and use.
In typical Windows OS fashion, you don’t need to take Microsoft’s word for what is an item that should be hidden either. If there is a file, folder or drive that you want hidden but it currently isn’t you can take matters into your own hands and make it hidden manually instead.
Having hidden files, folders and drives is a feature that is common among all desktop operating systems. The holy trinity of Linux, Mac, and Windows all do it and offer a similar experience where you can choose the items you want hidden, too.
How to Show Hidden Files, Folders, and Drives in Windows 10
You can choose to either show or hide the hidden files, folders and drives by using the Folder Options. To get started, open the Folder Options on your computer. The easiest way to do that is just to click on the “Start” menu.
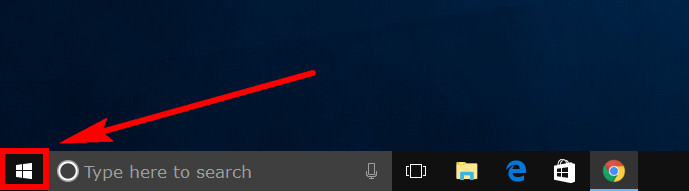
Then click on the “File Explorer” icon from the Start menu’s left side pane.
![]()
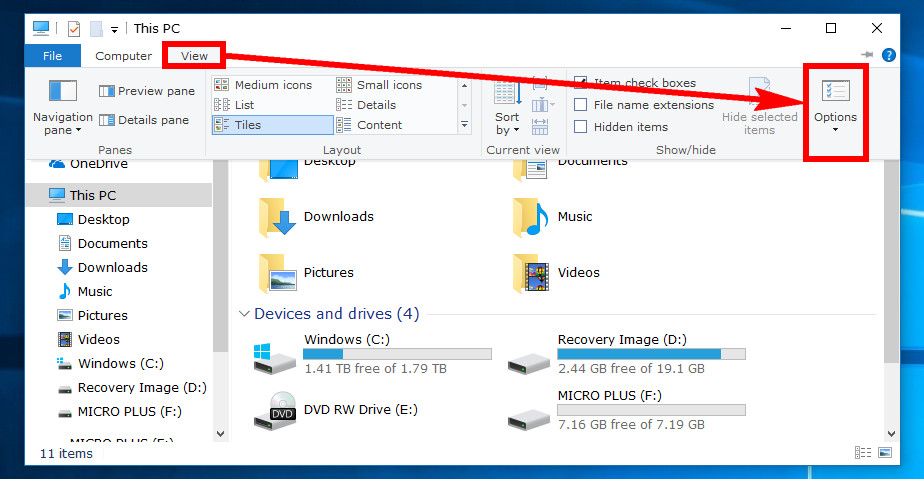
Now that the File Explorer is open, click on the “View” at the top of the window and then click on where it says “Options” from the Ribbon that you can now see.
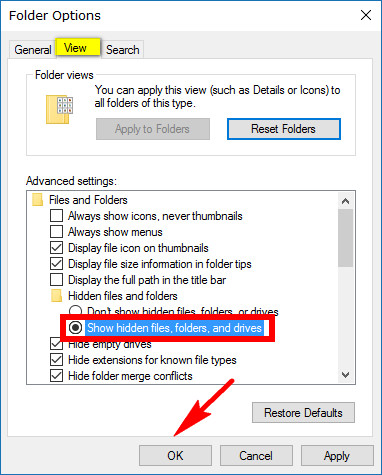
With the Folder Options now open, click on the “View” tab at the top of the dialog box and then look at the Advanced settings list for the “Show hidden files, folders, and drives” and click on it so it is the option now check-marked instead of the option above it for not showing the hidden files, folders, or drives. Click on the “OK” button, and it closes the Folder Options and applies the changes you made, so those three things are no longer hidden.
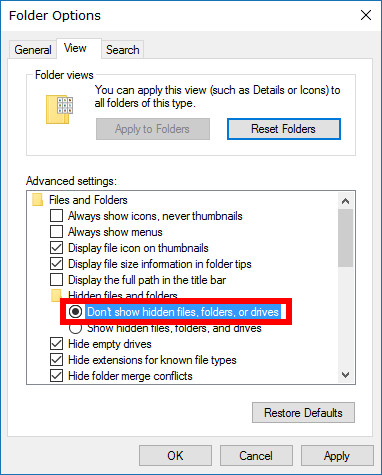
That’s all you needed to do to show the hidden files, folders, and drives, but if you change your mind in the future, you can open up the same Folder Options dialog box and then put the checkmark in the “Don’t show hidden files, folders, or drives” and it’ll all be hidden again like it was originally before you started the guide.
Unhiding the files, folders, and drives helps you use the operating system because now there isn’t ever anything you can’t find. But you might want to keep stuff hidden if you share an account with other people otherwise they might delete something that they shouldn’t have, and you might end up regretting it.
You might also be interested in:
- How to Run as Different User in Windows 10
- How to Know Full Path of File Name in Windows 10
- How to Boot into Safe Mode on Windows 10
- How to Do a System Restore of Windows 10
You can subscribe to our RSS, follow us on Twitter or like our Facebook page to keep on consuming more tech.