Last Updated on December 25, 2022 by Mat Diekhake
While those around me continue to poke fun at the Windows operating system, it still remains my all time favorite OS to use. Windows XP will forever be one for the books, and since then we’ve still seen the honorable Windows 7 arrive, and Microsoft’s latest attempt, Windows 10. You could easily make a case for those three versions of Windows being the best operating system editions ever produced, across the board from all companies that have tried coming up with something—Apple’s Mac included.
Windows 10 has a lot in common with Windows 7 and even XP. I would also say that there are some improvements that are hard to argue with, like the option of skipping the whole navigating around the OS and instead just typing the keywords into the search box for what you’re looking for. You can find just about anything from search these days, provided that you have it functioning as it should.
Some will be quick to point fingers at Windows not working like it should (again) if they were to encounter the search box not providing the usual functionality like it should, and for sure it is annoying when it happens, but the more features Windows tries to provide the more likelihood of something going wrong on occasion. For the hundreds, if not thousands, of times that I’ve used search without falter, it was enough to keep me calm when it did finally let me down. But I still had to find a solution, and find I did.
Updating and Downgrading Windows 10 Builds
You’ll see lots of tips around the Web for how to solve Windows 10 search not working the way it should—it might allow you to type words but not click on the result, or you just might not be able to type words into it at all. The easiest way to solve this problem is to update the software to a different build number. Most people who come across a faulty search box are finding it because they’re signed up to be a Windows Insider and running on Insider test builds. But there are probably at least a few people suffering from the ailing search box on standard Windows builds, too.
If you are signed up to be a Windows Insider, you’ll want to report the problem to the feedback hub, and then turn off Insider builds by navigating to Settings > Update and Security > Windows Inside Program, if waiting it out for Windows developers to offer a fix isn’t an option. This way you’ll be back on regular Windows’ builds.
Those who aren’t Windows Insiders will need to look at updating or downgrading the software right away instead. This too can be achieved by heading to Settings > Update and Security, but this time click on the Windows Update > Check for Updates button. Windows will now check if there are any newer builds available for your computer, and if it finds any, you can install them and that should be enough to rid yourself from the problem you were facing.
Those of you looking to downgrade Windows instead can head to Settings > Update and Security > Recovery and then you’ll see an option to go back to an earlier build. In the event that none of those solutions suffice, you can also choose to start fresh with a clean installation of Windows, also found on the same Recovery screen (Settings > Update and Security > Recovery). And if you get stuck, Microsoft is nice enough to offer you help with clean installation online if you go looking online for their free assistance.
Windows Search Service
There aren’t many simpler solutions as just updating or downgrading the software on your computer, but you could make a case for it not always being the quickest solution. Those looking to save time and try to solve the search not working with a more direct solution can try checking to see if the Windows Search service is still running. The Windows OS doesn’t start or stop the Search service intentionally, but it’s possible that it has indeed stopped temporarily. A computer reboot should fix it if it has, but you can also stop and start it from the list of services in Windows.
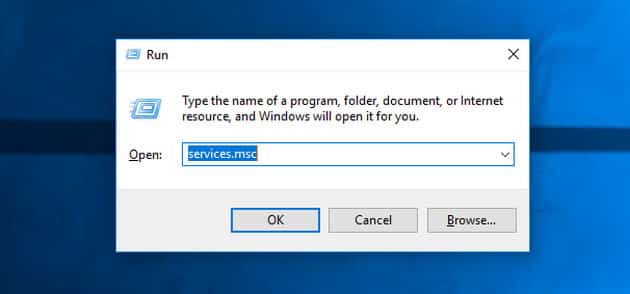
To do that, press the Windows logo key + R to open the Run dialog box and then type “services.msc” into the search field and hit the “OK” button.
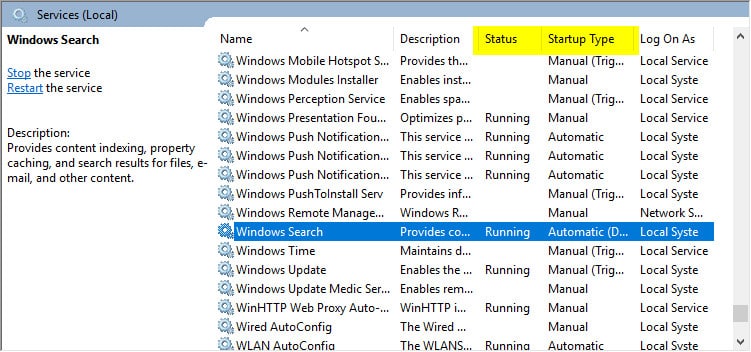
Scroll down the list until you can see the “Windows Search” entry and check to see if it running. If yours has stopped, double-click on it and then click on the “Start” button to get it running again.
Rebuild Search Index
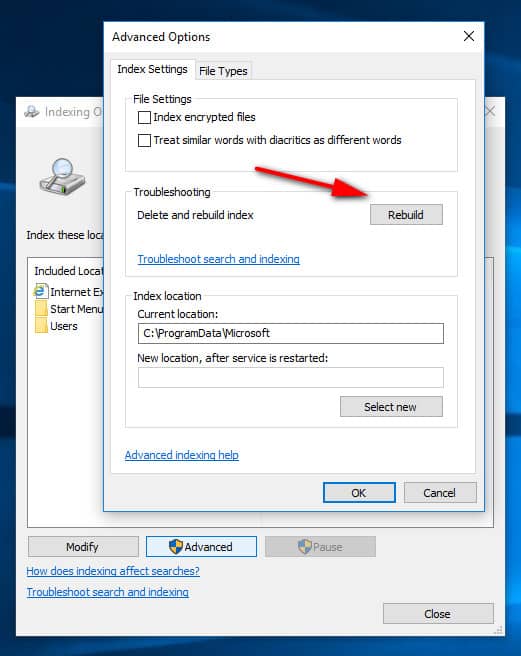
Similarly to how you can choose what files Windows Search indexes and how you can add or remove locations from the Windows Search index, it’s also possible to rebuild the search index. The quickest way to head there is by typing “Indexing Options” into the search field in the taskbar itself, but if you can’t type at all, then the same location can still be reached by opening up the Control Panel and then clicking on the “Indexing Options” link from there instead. (You will of course need to have the small icons selected from the main Control Panel window before you’ll be able to see it.)
When the Indexing Options dialog opens, you’ll see an “Advanced” button toward the bottom of it that you need to click. The Advanced Options dialog then opens, where you can click on the “Rebuild” button to start rebuilding that search index of yours.
Windows troubleshooter
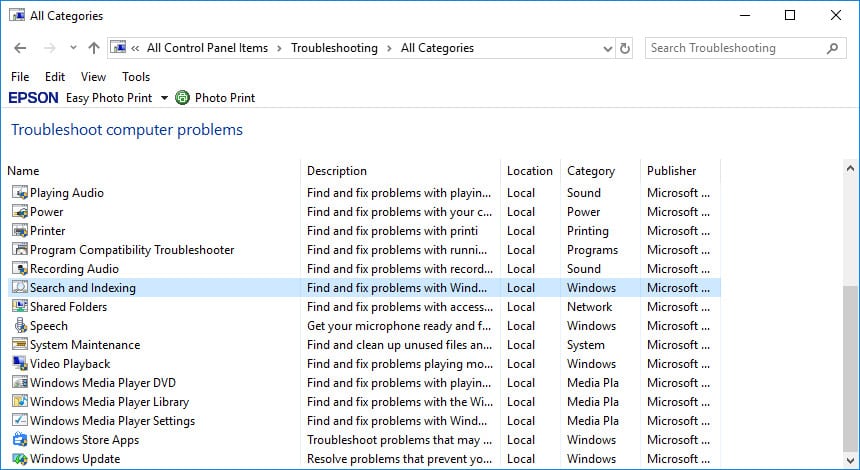
The Windows 10 operating system comes with a built-in troubleshooter that can help you diagnose and solve problems to do with your OS. You can find it by clicking on “Troubleshooting” from the Control Panel’s main window when you have it set to show the small icon view. Once inside, click on the “View all” from the left pane and then click on the “Search and indexing” troubleshooting pack.
Once you click on the link, it’ll run you through the process of checking for issues relating to your search feature, as well as automatically attempt to solve them for you.


February 3, 2019 @ 02:23
I thought I might have been having problems with my keyboard because I’ve never spent a lot of money on a keyboard and the ones that always seem to come with my computers are far worse than the ones I spend money on.
After connecting all my different keyboards it seems that I’m just having issues getting some keys to press and it might be to do with the Windows software instead.
I opened the task manager and deleted a process called ctfmon.exe (or CTF Loader). As a result, I can’t type anything into the search field in the taskbar at all.
After doing some research, the CTF Loader is apparently related to Microsoft Office, however, I can’t prove this in any way. I’m just assuming that what I read from another computer website that I found from Google is telling the truth.
If it is related to Microsoft Office, I’m at a loss with how to deal with it. Should I delete Office and see if that fixes the problem and then install Office again and the process will come back with it? Or should I be looking to fix the search in the taskbar? Or something different altogether?
February 3, 2019 @ 02:25
You van try rebuilding the search index using the guide above or do a repair install of Windows 10.
See: How to Do a Repair Install of Windows 10 with an In-Place Upgrade
February 3, 2019 @ 02:30
The repair installation will fix the computer for you. Otherwise you might want to go to the Settings app and install a previous version of Windows from the Recover section.
You should take a system image backup before making system changes like you did. That way you can restore the system image and then the computer will be fine again. When you use System Restore or recover the computer you will lose whatever data you had installed between now and the date you return to. That’s why creating system images is the way to go.
See: Create a System Image in Windows 10, What is Macrium Reflect and Why Would I Want to Use It?