Last Updated on December 26, 2022 by Mat Diekhake
Most people shop around for a new computer that looks like a pretty good bargain and if you’ve chosen a computer that isn’t something from the top-of-the-line, then you’re likely bringing home a computer that comes with Windows 10 Home; it’s the most affordable version of the Windows 10 operating system out there. The computer you bought might still be a capable machine, but it might not suit everyone in the household. Certain things that can only be done on the more expensive Pro version of the Windows 10 OS.
Unlike previous years when updating was one of the last things you wanted to think about having to do, Windows 10 makes it easy to make the switch from Windows 10 Home to Windows 10 Pro. If someone in your household is telling you that they need the Pro version, but you don’t quite believe them yet, you can check out another article that explains many of the differences between Windows 10 Home and Windows 10 Pro.
The Windows Store link available at the conclusion of the guide below also explains many of the differences. There are also some additional things that it leaves off the list though. If you wanted to do something with the Local Group Policy Editor for example, then that would require the Pro version of Windows 10 as well. You’ll know if you need to update to the Pro version if you go to do something but that option isn’t available to you in the Home version you have now.
Costs Involved in the Windows 10 Pro Upgrading Process
The Windows 10 Pro costs $99 still today. It was that price years ago, and it remains that same price. It isn’t one of those things that looks like it’s going to get cheaper if you wait. That said, there are stores out there that are selling copies of Windows 10 Pro cheaper—I’ve seen one advertised for $78 (and some as low as $18 from some Asian regions, but I don’t recommend buying those, not because I know it’s a scam for sure, but if something isn’t adding up then it usually is going to end up not worth your time from my experience.)
While the cheaper alternatives sound like a good idea on the surface, it means you’ll need to install it from a DVD, and you’ll also need to wait for that DVD to get delivered. Going with the Windows Store options like in the guide below where you buy it directly from Microsoft for the higher fee of $99 results in it getting installed directly onto your computer as soon as you make the purchase—no DVD’s and no messing around, plus no wait either. Some of your more modern or smaller laptops might not come with a DVD drive anyway.
How to Upgrade From Windows 10 Home to Pro
You need to head to the Settings application that Windows 10 offers to get started with the upgrade process. To do that, click on the “Start” button in the taskbar.

Now click on the “Settings” gear icon available from the Start menu’s far left side pane, just below the File Explorer icon.

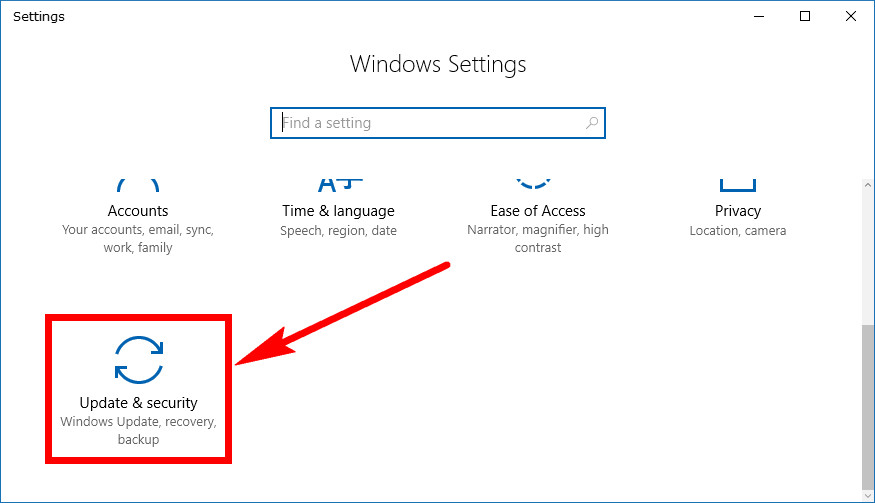
You now get the Windows Settings screen open up on the computer’s display. The Windows might not be large enough to display all icons available from the Settings, so you might have to scroll down to find the “Update and security” link that you need next. Click on it when you find it.
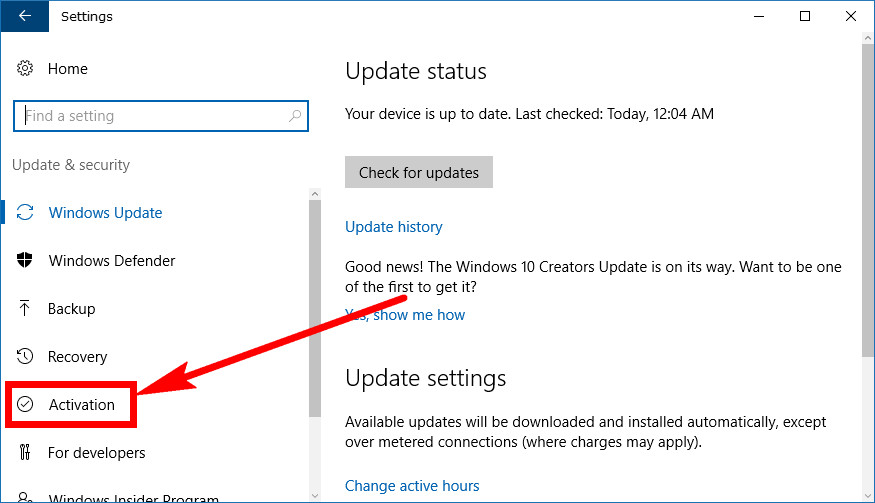
In the left pane click on the “Activation” link to find everything to do with getting Windows up and running on a computer.
You’ll now see a big heading that says “Upgrade your edition of Windows” in the right side pane. Underneath it is a link that says “Go to Store” that you need to click on next.

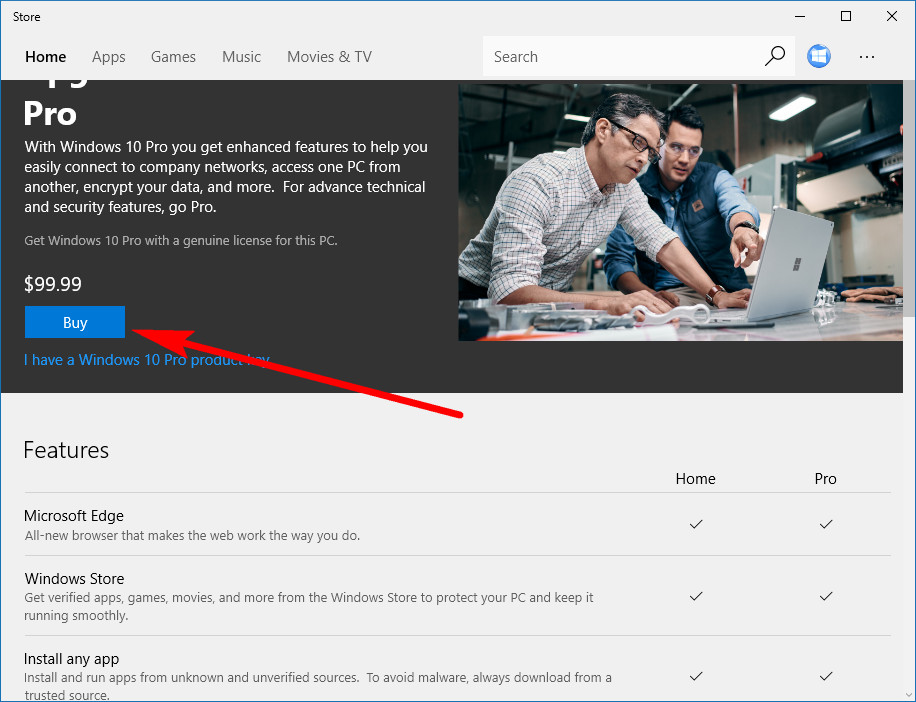
You’ll now see the blue button on the screen that says “Buy” for you to click on to begin the upgrade process to the new operating system version. You need to provide your Microsoft account details and your payment option as well before you can go ahead and pay the fee of $99 and get the upgrade underway. If you already have a product key to use, then you don’t need to pay the $99. Instead just click on the link beneath the Buy button that says “I have a Windows 10 Pro product key” and it’ll let you input the product key code to get the installation underway that way instead.
Note: if you don’t have your operating system set to the correct country/region then it’s going to cause problems when you to go pay for the upgrade. You don’t need to worry too much because Windows is designed not to take your money if it senses the problem, even though it doesn’t make it clear that is the case. But you will find your money still in your bank accounts if you try going through the checkout process thinking it has already accepted your money and then realize it is asking you for an address from a country you don’t reside in and thus making the purchase impossible. To make sure you don’t have to worry about things not going smoothly, you can make sure your current copy of Windows 10 is set to the right country and region by heading to the Start menu > Settings gear in the left pane > Time and language > Region and language > Select the appropriate country from the drop-down menu. Now when you open the Windows Store link for purchasing the Windows 10 Pro, it’ll checkout smoothly without any issues.
Most of the features that you see available from the right column aren’t necessary for most households, and I’ve also gone into detail before about why you probably shouldn’t even want to have BitLocker working on your computer unless you have a legitimate reason to want it. Knowing that we don’t recommend just upgrading for the sake of it or just in case you might need it in the future. It can be a bit of a hassle committing to a version of Windows because once you start using one, you’ll build up many of your files that you might need–like documents from the File Explorer if you use the computer for work, for example—but you should be able to tell fairly quickly after you start using the OS you are running whether it’s going to be suitable for your needs or not. The exception being other people who share the same computer with you.
You might also be interested in:
- How to Change a Network Profile Name in Windows 10
- How to Hide or Show File Explorer Ribbon in Windows 10
- How to Change Screen Resolution of Display in Windows 10
- How to Uninstall and Block Updates and Drivers on Windows 10
You can subscribe to our RSS, follow us on Twitter or like our Facebook page to keep on consuming more tech.
October 7, 2018 @ 19:54
Before upgrading to Windows 10, you may wish to view the Get Compatibility report which is made available in the Get Windows 10 application.
With the compatibility report, you can see if your computer is able to handle the upgrade to Windows 10, as well as any errors, problems with applications, programs, and anything else that may be relevant to you before you upgrade.
Most of you can probably tell already if your computer is going to be fine to upgrade, but for those who aren’t sure, this tool is great because Microsoft regularly checks different apps for compatibility and thus they know better than anyone if your computer is going to upgrade without any issues.
September 16, 2018 @ 21:43
FYI, there are now two versions of Windows 10 Pro. One is called Windows 10 Pro for Workstations and the other just Windows 10 Pro.
The Windows 10 Pro for Workstations is considered the better of the two and comes with support for server grade PC hardware.
More on Windows 10 Pro for Workstations here: https://www.microsoft.com/en-us/microsoft-365/blog/2017/08/10/microsoft-announces-windows-10-pro-workstations/
When you go to buy Windows 10 Pro where you show in the guide, it is the standard Windows 10 Pro. If anyone wants the Pro for Workstations version, you can get it here: https://www.microsoft.com/en-us/p/windows-10-pro-for-workstations/dg7gmgf0dw9s
As you can see from the price, it is considerably more expensive (as well as rarer) to install. That’s why you don’t see it from the Store when you visit it from the Settings app.