Last Updated on December 26, 2022 by Mat Diekhake
When you buy a new computer that runs on Windows 10 out of the box, it’ll likely just come with the one hard drive, and one partition called the C: drive when you first start using it. That partition will use up all the available space on the hard disk drive so you can make use of it all.
You can shrink partitions (volumes) on your Windows 10 operating system to make room for others to be created.
There are numerous reasons why you might want to have more than one partition on a computer. . . .
Firstly, when you have more than one partition, the computer then treats them as separate drives. This can be useful if you fear to suffer from a system failure: when failure happens, and all your stuff is on the one drive, you won’t be able to recover your stuff unless you’ve backed it up to another computer. With multiple drives, however, you can backup one drive to the other drive, allowing you to recover that data while still using the same computer.
In addition, having more than one partition means you can use more than one operating system on the same computer. You can only have one operating system per partition, which is why you’ll always be restricted to just the one operating system if you leave your computer with the single partition.
It’s also possible for you to improve the performance of the computer by using multiple partitions. It’s not uncommon for a hard disk drive to work better when it is broken up into smaller volumes compared to just one large one. There is also a logical explanation for some of this added performance as well: you’ll get a reduced number of reading head repositioning delays. This is called “short stroking” and can be very noticeable if you have a partition that’s only taking up about a quarter of the total hard disk drive’s space.
There are also some advantages to be had for organizing your files if you have a lot of them. For example, on a regular computer without partition, you can open File Explorer have found a separate folder for your pictures, music, documents, etc. If you have a lot of files, or just not much hard disk space, then you might want to have a separate partition for something like the pictures and use it as your pictures folder.
How to Shrink Volume or Partition on Disk in Disk Management
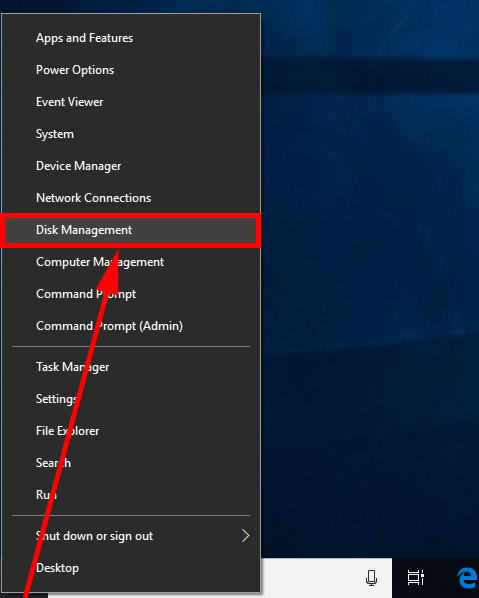
You can shrink a volume or partition that’s on a disk by using the Disk management feature that Windows 10 has available from the Win+X Quick Links menu. You can get there by right-clicking on the “Start” button and then selecting “Disk Management” from the Quick Links menu.
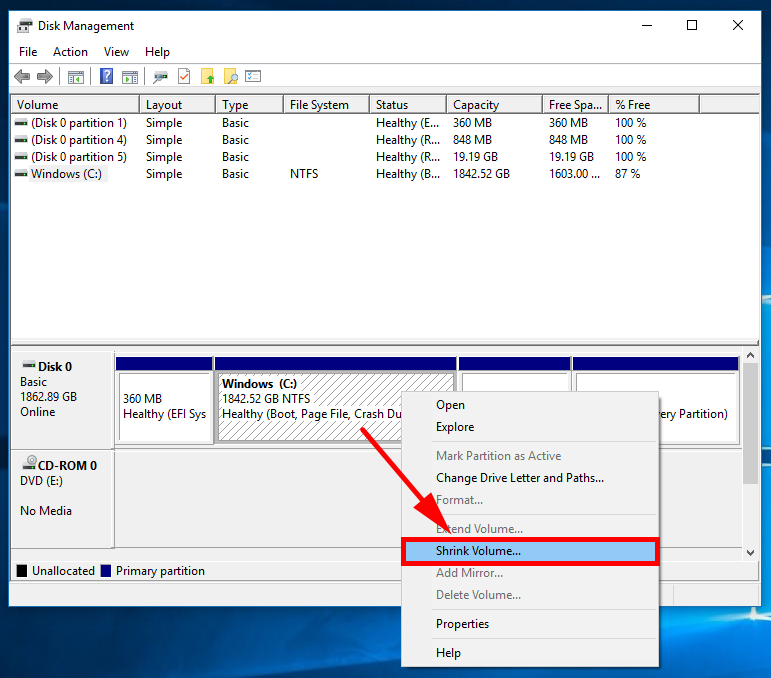
The Disk Management window will now be open. At the bottom portion of it will show your different volumes and partitions. Right-click, the mouse on the one you want to shrink and then select the “Shrink volume” option from the menu.
How to Shrink Volume or Partition on Disk Using Command Prompt
You can use the elevated Command Prompt or the Command Prompt at boot to shrink a volume/partition. Open the Command Prompt of your choice and then type the diskpart command, followed by list volume to bring up the list of volumes and their numbers.
Now type the select volume (number) command and change where it says “number” and put in the actual number of the partition that you want to shrink.
If you type the shrink querymax command next, you’ll see the maximum size that the partition can be shrunk.
If you want to take Windows up on that offer and shrink the partition to the maximum amount, type the shrink command and be done with it. If, however, you want to only shrink it a certain amount, then type the shrink desired= (MBs) command and change the “MBs” for the number of megabytes that you would like to shrink it to.
How to Shrink Volume or Partition on Disk in PowerShell
You could also choose to shrink the volume/partition on a disk by using the Windows PowerShell if you prefer. You’ll need to open up the elevated version of the Windows PowerShell.
Once you’ve got it open, type the Get-Partition command and then you’ll be given all the different drive letters associated with your different volumes. Make a note of the number for the volume that you want to shrink.
Now type the Get-PartitionSupportedSize -DriveLetter (drive letter) command and swap where it says “(drive letter)” for the actual drive letter that it shows, i.e., if I wanted to remove the third volume and the second one started at Drive C then I would type the Get-PartitionSupportedSize -DriveLetter "D" command.
You’ll now be given in the results the minimum and maximum size for that drive letter. The size that you want to shrink it to will need to be in between those two numbers. With that knowledge, now type the Resize-Partition -DriveLetter “(drive letter)” -Size (size) command and replace where it says the “(drive letter)” and “(size” with the actual letter and size that you want, i.e., Resize-Partition -DriveLetter "D" -Size 500 MB.
Note that the Windows PowerShell sizes can support KBs, MBs, GBs, and TBs. TB use them you just remove the “S” on the end: KB, MB, GB, TB.
You might also be interested in:
- How to Change Mouse Pointer Speed in Windows 10
- How to Restore Windows Photo Viewer in Windows 10
- How to Choose Between Having Emoji Panel Close Automatically in Windows 10
- How to Change Touch Scrolling Friction in Windows 10
You can subscribe to our RSS, follow us on Twitter or like our Facebook page to keep on consuming more tech.