Last Updated on December 25, 2022 by Mathew Diekhake
The DNS (Domain Name Resolver) cache, or sometimes called DNS resolver cache, is a record of all visits and attempted visits to websites from a computer that runs on a computer’s operating system.
All commonly used operating systems—Windows, Mac, Linux distros, et cetera—have a DNS cache working by default.
Like all operating systems, Windows stores the DNS cache so that it can load the records of website visits quicker. The reason the process is slow without DNS is that every time a user browses a site, the web browser being used on the computer as the portal to the internet sends out a request first ( this process is called name resolution), and that takes time. With the DNS cache keeping the records of the sites, the computer speeds up the process by handling the name resolution before the request is sent out to the internet.
Like all caches, the DNS cache is stored temporarily with the chance for you to reset or “flush” it to show fresher results if you feel they have changed.
Most Windows users won’t ever have to reset the DNS cache when they’re using their computers—at least not nearly as much as you might want to flush your browser cache anyway. Most of the times people look to reset the DNS cache is when they’re dealing with websites—more specifically when they change web servers and need to make sure that what they see on the new server is correct.
This tutorial demonstrates what you need to flush the DNS cache—aka the DNS resolver cache—when you’re using a version of the Windows 10 operating system.
Flush and Reset DNS Cache from Run Dialog Box
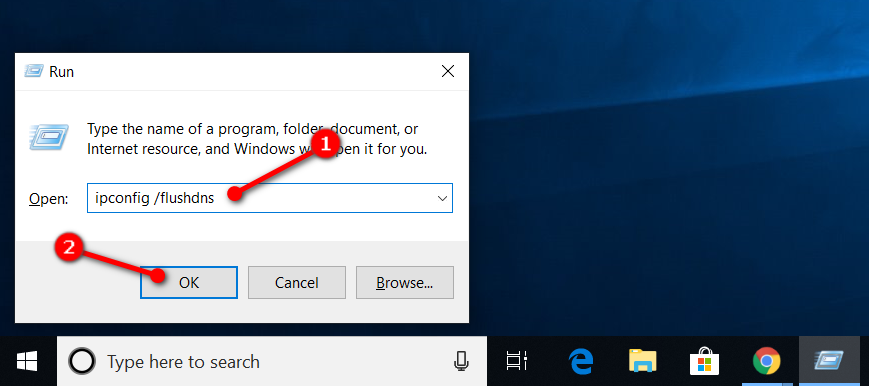
Press the Windows logo + R keys on your keyboard to bring up the Run dialog and then type ipconfig /flushdns and tap/click on the “OK” button.
You can now close the Run dialog box and expect to find the DNS cache flushed.
Flush and Reset the DNS Cache from Command Prompt
Open a Command Prompt window.
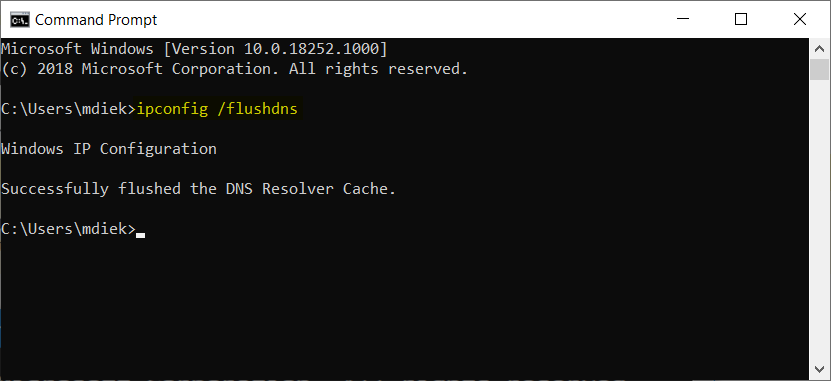
Enter the ipconfig /flushdns command and then press the “Enter” key.
You can now close the Command Prompt window and expect to find the DNS cache flushed.
Related Tutorials
- How to Clear DNS Cache in macOS Sierra
- How to Clear DNS Cache in Android
- How to Disable Hardware Acceleration in Windows 10 Photos App
- Windows Modules Installer Worker High CPU & Disk Usage in Windows 10
- How to Automatically Sign-in After Restarting Windows 10
- How to Disable Telemetry and Data Collection in Windows 10
- How to Add or Remove People Icon from Taskbar in Windows 10
- How to Zip and Unzip Files in Windows 10
- How to Rebuild Icon Cache in Windows 10
- How to Fix “You’ve been signed in with a temporary profile” Error in Windows 10
- How to Clear Windows Update Cache in Windows 10
- How to Install and Configure WinDBG for Blue Screen of Death Analysis


November 13, 2018 @ 21:50
Clearing the DNS cache isn’t just useful for when you want to make sure what you’re seeing on the computer is updated with the new information; it is also possible that your computer has been struck with unauthorized domains names or IP addresses that have been inserted into it. You can also experience caching glitches and corruptions that need fixing as well.
November 13, 2018 @ 21:50
I think what you mean to say is that while you will always want to make sure that you’re seeing the correct information on your screen, there are more ways that information can become corrupted than just because you’ve updated information.
November 13, 2018 @ 21:44
Nice post!
Just for clarification that is a space between the ipconfig and the forward slash in the command: ipconfig[space]/flushdns