Last Updated on December 24, 2022 by Mat Diekhake
I want to be able to stop automatic updates on Windows 10 because I’m not interested in Windows 10 automatically handling these on its own. I prefer to be in control of the Windows updates being installed myself. But I would only stop automatic updates if I knew I could choose to continue them again at a later date. Resolution:
The settings inserted into automatic maintenance dictate when Windows 10 will automatically check for new Windows updates.
You needn’t worry about having to understand when your computer may need updating manually; Windows 10 handles the downloading and installation of all essential and critical updates for you.
There are some other updates, however, that Microsoft calls optional updates. The optional updates are not installed automatically, but rather upon visiting Windows Update from the settings or when you go to shut down your computer. For most, it is when they are shutting down that they will see the chance to install these optional updates. All you have to do is accept the updates when you see them from the Power menu—occasionally, when you go to shut down your machine, you will see Windows requesting to update its software; you are then given a chance to “update and shut down” or “update and restart.” This ensures the computer is only taking the time to update when you planned on walking away from the machine. Minimal time will be taken upon turning the computer back on again the next time you try to use it.
The following tutorial demonstrates how to enable or disable the Windows Update Automatic Updates when you are using a version of the Windows 10 operating system.
Method One: How to Enable/Disable Automatic Updates Using Group Policy
You may enable and disable the Windows automatic updates via the Local Group Policy Editor in Windows 10. Here is how you can do that:
Notes:
- This method is only available to Windows 10 Pro and Windows 10 Enterprise editions of the Windows 10 operating system; Microsoft has disabled the option for Home users, which makes up most of the Windows user-base, because it prefers people install updates rather than deny them.
- If you manually check for updates from Windows Update, it will result in the updates still being automatically downloaded and installed.
- If you have Windows 10 set to check for updates automatically and to be notified when the updates are available, this policy allows for the automatic updates to be disabled.
1. Open the Local Group Policy Editor application. See this tutorial for all the different ways in which you can open the Local Group Policy Editor application when you are using a version of the Windows 10 operating system: How to Open Local Group Policy Editor in Windows 10
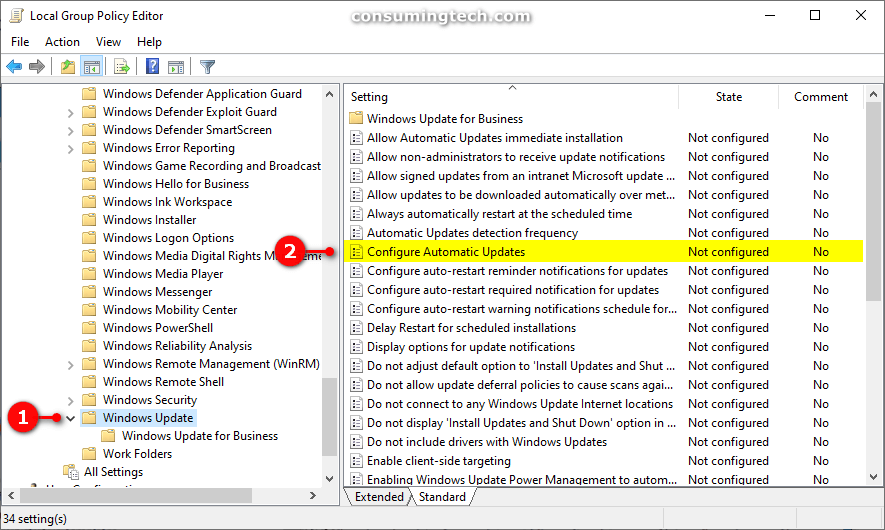
2. Using the Local Group Policy Editor’s left pane, navigate to the following location:
Computer Configuration/Administrative Templates/Windows Components/Windows Update
3. With Windows Update expanded, click on Configure Windows Updates from the right side of the same window.
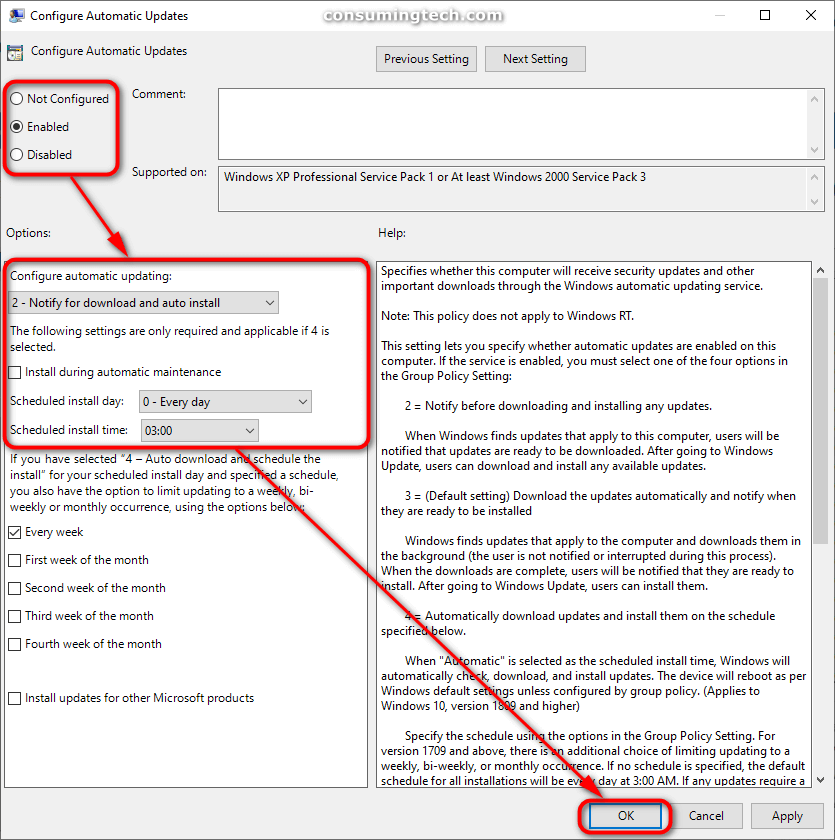
4. From the Configure Automatic Updates policy window, choose between either Not Configured (to enable automatic updates), Enabled (to set Windows Update to notify for download and automatically install updates [recommended]), or Disable (to set Windows Update to never notify or check for updates).
Note: Should you choose the option Enabled, you will then have several more drop-down menus to choose from under the Options section of the Configure Automatic Updates policy window. For example, if choosing to Notify for download and auto install, you can then schedule the install day as well as the install time from the appropriate drop-down menus.
5. Close the Local Group Policy Editor app and then head to the Settings > Update and Security > Windows Update and click on the Check for Updates button to apply the changes.
Method Two: How to Enable/Disable Automatic Updates Using Windows Update Service
Notes:
- You can use this option for the enabling and disabling of the Windows Update service on all editions of the Windows 10 operating system. That includes Windows 10 Home, Windows 10 Pro, and Windows 10 Enterprise.
- If you disable the Windows Update service (from the Services window), Windows 10 will no longer be able to download or install updates.
- Should there come a time in the future you want to start accepting Windows updates again, you will need to head back into the Services are and enable the Windows Update service once again.
1. Open Services by opening the Run dialog (Windows logo key + R) and then typing services.msc and clicking OK. See this tutorial for everything related to Services, including how to start, stop, disable, and restarting them when you are using a version of the Windows 10 operating system: How to Start, Stop, Disable and Restart Services in Windows 10
2. Scroll down and then double-click on the Windows Update service to open the Windows Update Properties dialog.
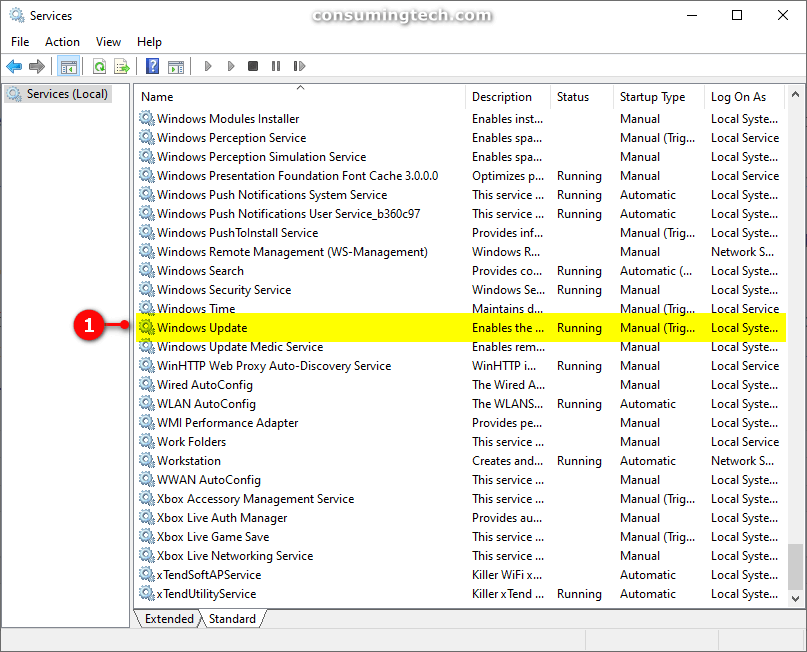
3. From the General tab, choose between Automatic (to enable Windows Update) or Disabled (to disable Windows Update), and then click on the OK button to save the changes and close the Windows Update Properties dialog.

That’s all.
Related Tutorials
- How to Prevent Windows Update from Updating Individual Device Drivers
- How to Change Active Hours for Windows Update in Windows 10
- How to Check Reserved Storage Size for Windows Update
- How to Start/Stop Receiving Insider Preview Builds in Windows 10
- How to Turn On/Off Automatic Updates for Offline Maps in Windows 10
- How to Schedule Restart Time for Windows Update in Windows 10
- How to Check for and Install Windows Updates in Windows 10
- How to Uninstall a Windows Update in Windows 10