Last Updated on December 26, 2022 by Mathew Diekhake
One of the features that has been with Windows operating systems for a long time is the System Restore. With it you can rewind time and go back to an earlier day before you developed a problem that you might have been having on the computer as of today. Doing that means the problem will be gone and then you can continue living again and give your computer a new timeline, just like a real life Back to the Future movie.
Back when Windows 10 first came out, there were many reports about some computers not creating restore points by default because of the System Restore feature being disabled by Microsoft and manually needed to be enabled if people wanted to use it. We don’t know the exact numbers, but it seems at least that as time has gone on more and more people have found the feature enabled and not disabled.
We’ve already gone over how you can do a System Restore on your computer that runs Windows 10, which means it will be restoring that older version of the operating system and bypassing whatever problem you have now. Don’t do that unless you do really have a problem now or else you might lose data that you collected between the date that you are restoring to and now.
As long as you have the system protection feature turned on, then your Windows 10 operating system is going to be taking restore points automatically for you without you having to do anything. These restore points are done when Windows notices something of significance that has changed, although it doesn’t always work out perfectly. Sometimes people want to have an exact image that gets restored and not just an image sort of around the last couple of weeks, and those are the time when creating system restore points is useful.
How to Create System Restore Points Using Control Panel
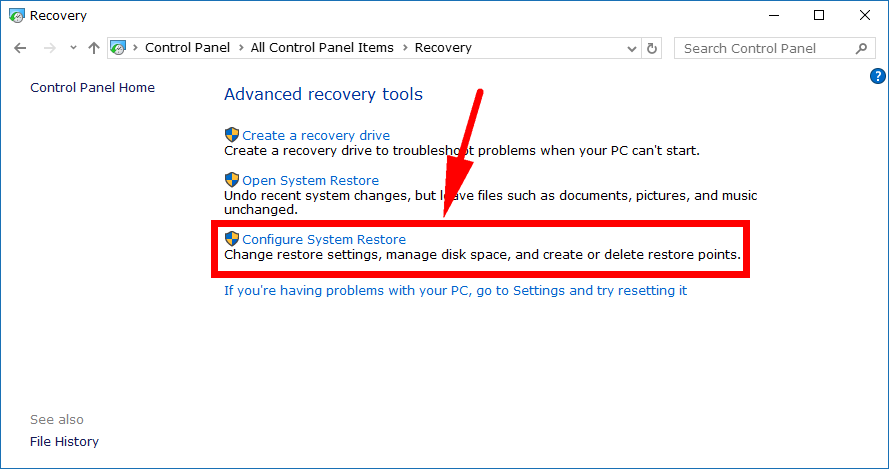
You can create a restore point using the Control Panel in Windows 10. To get started, make sure you open the Control Panel with the classic view so you can see all the smaller icons so you can see all of the links available and then click on the “Recovery” link from the Control Panel items. The Recovery link is where you can head anytime you need to recover something to do with your system, hence why you’ll find the chance to make restore points from within that area.
From under the Advanced recovery tools heading, click on the “Configure System Restore” link.
The older versions of the Windows 10 operating system keep you within the Control panel window still. If you find yourself within Control Panel now, then look for a “System protection” link in the left side pane that you need to click on which will then direct you through to the System Properties dialog box. For everyone else, you don’t need to worry because the System Properties dialog box is already open like in the picture below. Click on the “Create” button under the protection Settings heading to get the chance to create your restore point.
Before a restore point can be created Windows 10 makes you give it an identifiable name first. There’s no use putting the time or date here either because your restore point will automatically be dated anyway. If you have a particular reason for wanting to have created the restore point today, then perhaps use that as your description also. For example, if you plan on installing Microsoft Office today and want to create a restore point on this day so you can use System Restore just in case you find out something is wrong after its installation (that’s should never happen with Office, but we’ll roll with it for the example.)
Once you are happy with the name, click on the “Create” button and then your restore point is created. You can close the System Properties dialog box once it’s finished saving and then continue using your computer as normal. When you want to put your saved work into action, then you can read how to do a System Restore of Windows and get it loaded. Otherwise, you might want to delete the restore point you just created to free up more disk space for the computer again.
How to Create System Restore Points Using PowerShell
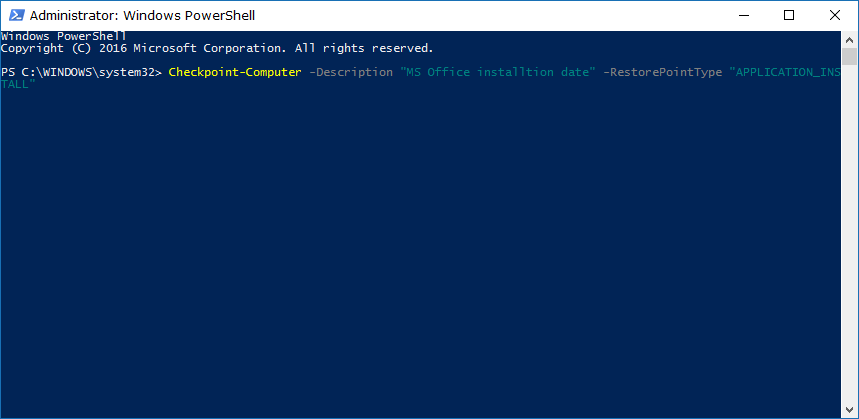
You can also create restore points using Windows PowerShell in Windows 10 if you want. To do it this way, you’ll need to open up the elevated version of the Windows PowerShell on your computer, so it’s got the administrative permissions. Now copy and paste the Checkpoint-Computer -Description "Restore Point Description" -RestorePointType "Type" command, making sure you add the details you need to it including the type and description and then hit the Enter key on your keyboards to execute the command.
Note that you can enter any description that you want as it’s only there for you to be able to identify it later. The type, however, needs to be chosen between one of the four parameters that best describes when you are doing: APPLICATION_INSTALL, APPLICATION_UNINSTALL, DEVICE_DRIVER_INSTALL, MODIFY_SETTINGS.
System Restore is a feature that offers a lot of security for the user because if there’s a problem that you can’t work out how to fix, then you can erase it by rewind the time with restore points. The only potential issue with restore point is that you might end up losing some data that you installed on the computer between the time you took the restore point and the date that you chose to restore. If you haven’t installed any new problems since the two dates, then your losses will just be whatever documents you have in File Explorer, pictures saved, or something more minor.
Related Tutorials


