Last Updated on December 25, 2022 by Mathew Diekhake
OneDrive is Microsoft’s answer to your storage woes: if you don’t have enough space to store pictures and video on your computer’s hard drive then you can send it up into the Microsoft-owned cloud storage company OneDrive that also comes fully integrated into Windows 10.
OneDrive uses a very limited amount of resources and runs very smoothly, so there’s no reason to remove it from the operating system just because you want to make sure the hardware is able to perform optimally. If you don’t like seeing the icon you can drag it over the arrow next to the notification tray so it sits in with the rest of the icons that aren’t shown on the taskbar. That way it still can run when you need it and you don’t have to look at it when you’re using the computer.
Windows 10 offers you the chance to have files automatically sent to your OneDrive account as soon as you connect your smartphones, cameras, and other devices to the computer.
For Windows 10 to automatically save your files to OneDrive when you connect a device to the computer, you’ll need to enable Autoplay first.
This tutorial demonstrates how to turn on or off the option to automatically have photos and videos saved to your OneDrive account after connecting a device to the computer that runs on a version of the Windows 10 operating system.
How to Turn On/Off Auto Save Photos and Videos to OneDrive in Windows 10
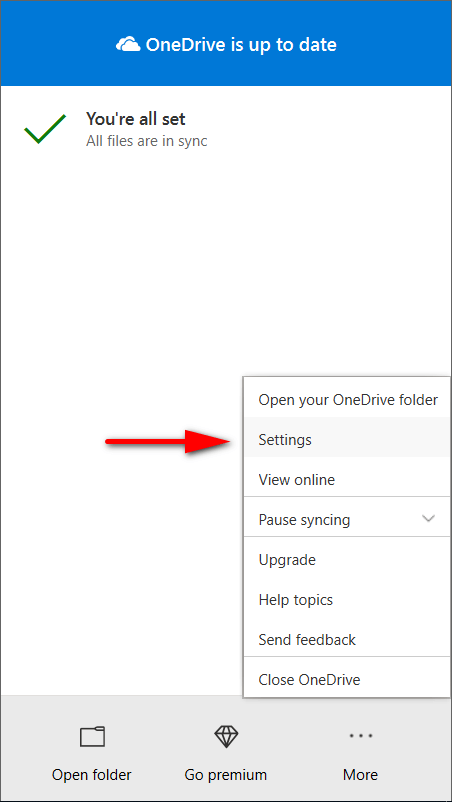
1. Right-click on the OneDrive icon that’s in the taskbar.
If you don’t see it there, then click on the arrow to the left of all icons on the notification tray to expand the rest of the notification tray and see the rest of the icons.
2. Click on the Settings link from the menu.
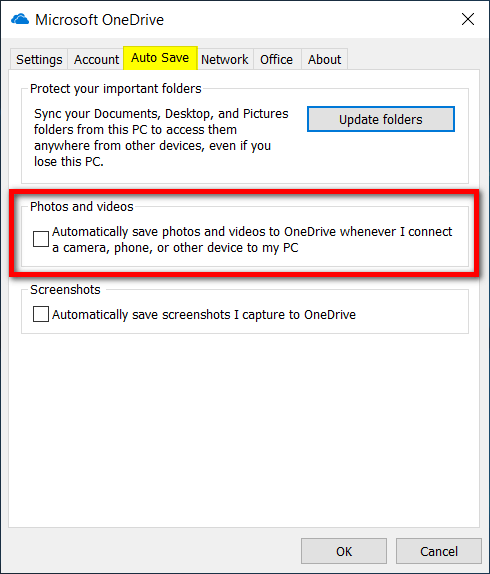
3. Select the Auto Save tab at the top of the Microsoft OneDrive dialog and then check or uncheck the Automatically save photos and videos to OneDrive whenever I connect a camera, phone, or other device to my PC option that’s available under the Photos and videos heading.
How to Turn on/off Auto Save Photos and Videos to OneDrive in AutoPlay
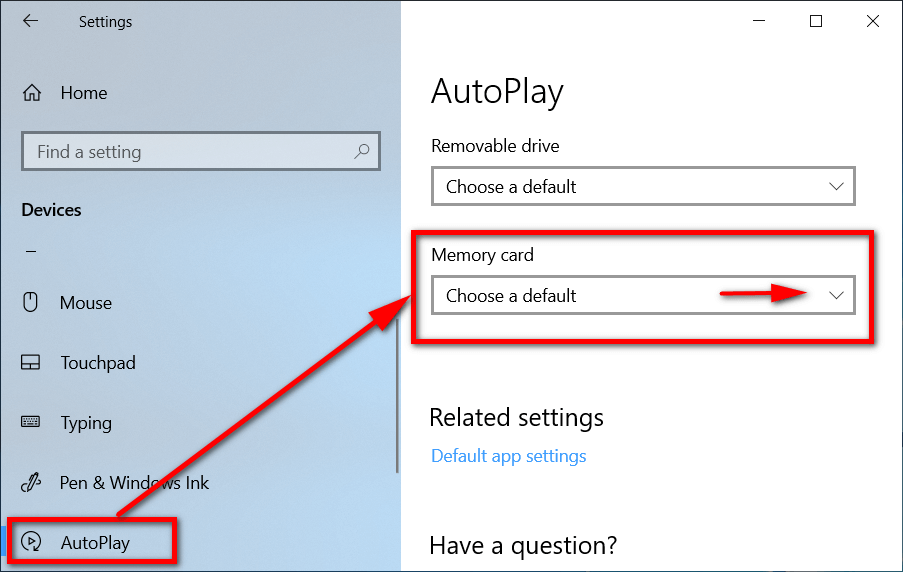
1. Open the Settings application and AutoPlay settings.
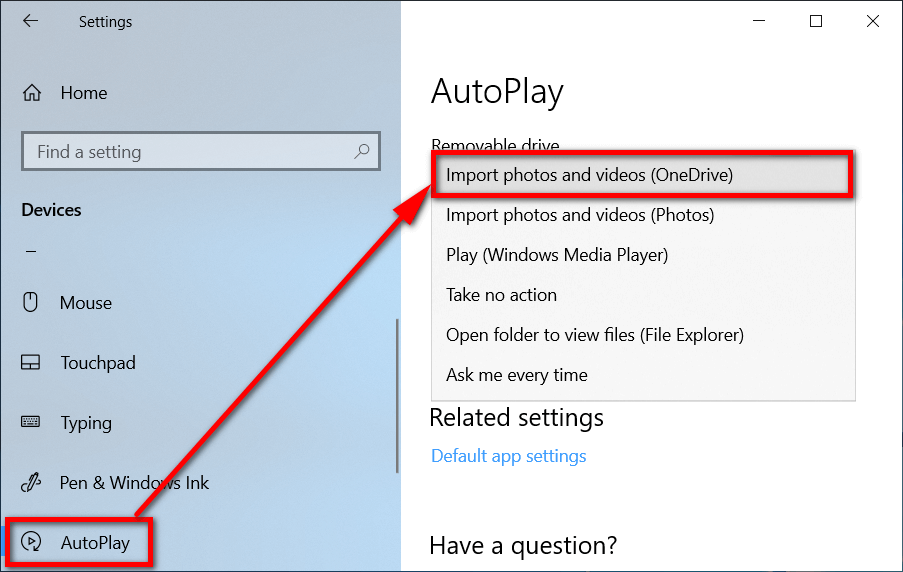
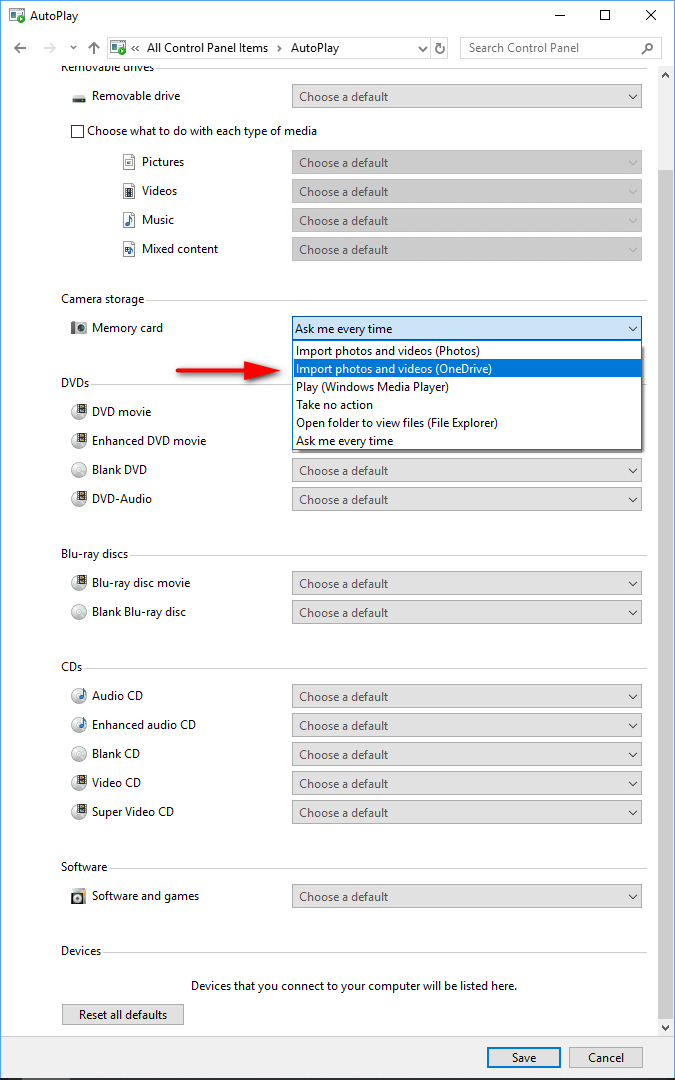
2. Under the AutoPlay heading in the right side of the window, click on the Memory card drop-down menu—or any card or device you have connected—and then click on the Import photos and video (OneDrive) option from the menu.
Alternatively, you can find the same set of options available from the Control Panel.
3. Open Control Panel so it is showing the icons view and then click on AutoPlay from the list of all Control Panel items.
4. Find the device or media and click on the drop-down menu next to it and then click on Import photos and video (OneDrive) from the menu.
That’s all.
Related Tutorials
- How to Turn On/Off AutoPlay in Windows 10
- How to Turn On/Off Notifications from Apps and Senders in Windows 10
- How to Enable/Disable Sync Your Settings in Windows 10
- How to Disable “Set Up OneDrive” Popup In Windows 10
- How to Optimize Performance Using Virtual Memory in Windows 10
- How to Enable/Disable OneDrive Running at Startup in Windows 10
- How to Turn On/Off OneDrive Cloud States for Navigation Pane in Windows 10
- How to Why Does OneDrive Keep Opening At Startup?
- How to Turn On/Off OneDrive Files On-Demand in Windows 10
- How to Add/Remove a VPN Connection in Windows 10

May 15, 2019 @ 05:26
Is this the same as backing up with OneDrive? I heard that Windows now allows backing up with OneDrive.
May 15, 2019 @ 05:30
Backing up with OneDrive is a separate feature. When it’s available for your version of Windows, you should have gotten a notification from File Explorer that looks like this:
If you’re using an update to date version of Windows, then you likely have the backup feature available.
January 30, 2019 @ 10:45
Can you do an article on the new OneDrive icons that show up from File Explorer when you sometimes see green ticks and other icons next to the files and folders?
I had OneDrive seemingly automatically start downloading onto my computer from cloud storage the other day. I wanted to keep them in cloud storage and off my hard drive because I have a good laptop but with a small hard drive. I also find the laptop’s display a bit small to properly research when something goes wrong like with what I’m experiencing now.
Once I tried to remove the photos that started downloading to my computer, it kept downloading and then uploading photos again non stop all day long whenever I had the laptop turned on. The only solution I came up with was to kill OneDrive for the time being. I’m not suggesting that Google’s cloud storage would have done things any better, but I’m also wondering where I went wrong.
January 30, 2019 @ 10:48
I think you’e referring to OneDrive Files On-demand: How to Turn On/Off OneDrive Files On-Demand in Windows 10
See also: How to Turn On/Off OneDrive Cloud States for Navigation Pane in Windows 10
January 30, 2019 @ 10:36
I think OneDrive still needs some work. I have good computers and laptops and the last time I tried transferring a bunch of images to OneDrive it took so long I gave up. I am also using a high-quality internet connection. The reality is that the problem wasn’t on my end and I would have expected the transfer to happen much smoother. It seems there is a real speed limit for non-paying OneDrive customers, or at least I would hope that paying customers are given better speed than I witnessed.
I think that the option to sync OneDrive shouldn’t be an automatic thing where Windows 10 assumes that you want to have OneDrive syncing. It should pop up on your computer’s display when you use the computer (or Microsoft account) for the first time and ask if you would like OneDrive syncing turned on. I don’t recall this option.
The settings app could do with an update also to make it easier to understand. I have no idea what Auto Play is and I wouldn’t have found this setting under the Auto Save tab without reading about it first either.