Last Updated on December 26, 2022 by Mat Diekhake
Shopping for a new computer is never easy. Most of us always want that machine that looks the nicest, and we need to work out if the closer-to-the-bottom-of-the-range version of it is going to be able to meet our needs.
The rule of thumb in today’s computing is to get yourself something with at least 8 GB of RAM to be safe. There are exceptions: some Surface laptops only come with 4 GB of RAM, and they’ll still do the job for students who are just looking to use a web browser and open up apps such as Microsoft Word. But if you want to play it safe, 8 GB is what you should be aiming for.
If you’ve brought home a nice computer but after running some programs are a bit worried that you’re using up too much RAM, you can head into the Control Panel and adjust some settings for the virtual memory.
Windows 10 gives a few basic options—let Windows choose what’s best for your computer, adjust for the best performance, adjust for the appearance—and you also get the chance to create a custom group of settings so the virtual memory settings are more precisely what you need.
Here is what you need to optimize the performance using the virtual memory performance options in a version of the Windows 10 operating system.
Optimize Performance Using Virtual Memory in Windows 10
You can optimize your performance for gaming and other things alike from the Control Panel in Windows 10.
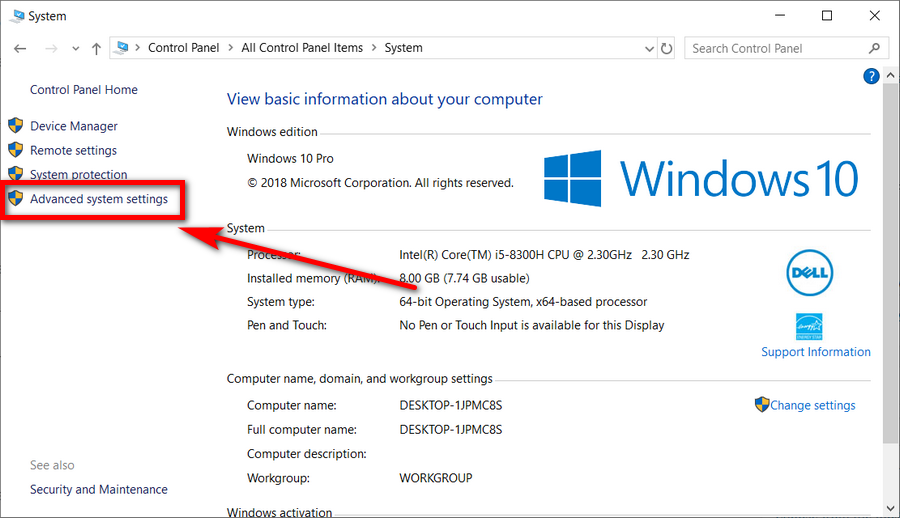
Get started by typing “Control Panel” into Cortana search in the taskbar and then click on the “Control Panel” desktop application when it appears under the Best Match section.
Click on “View by” in the top right corner of Control Panel and select the small icons. Now click on the “System” link found in the list of all Control Panel items.
Next, in the left pane click on the “Advanced system settings” link.
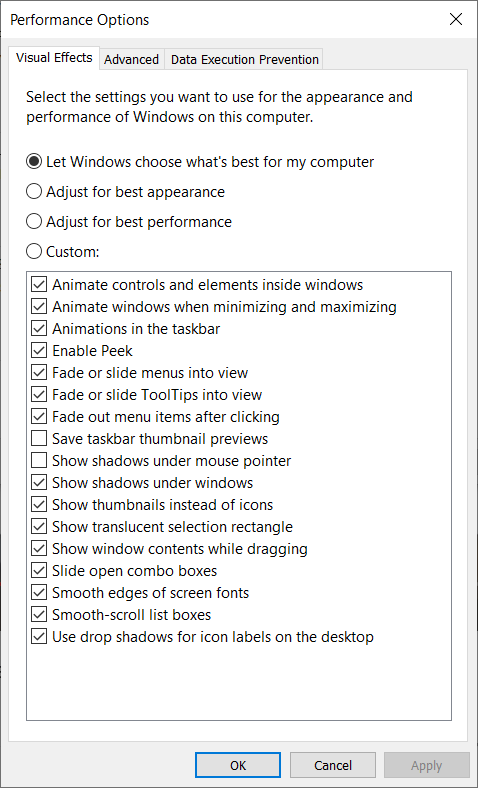
You’ll then see the Performance Options dialog.
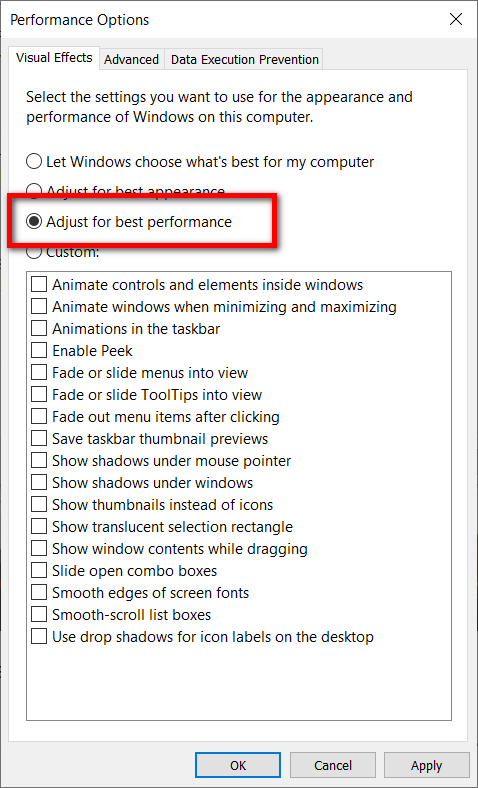
Change it from its default setting to “Adjust for best performance.”
You can also select any of the boxes down below that you think might suit your needs. Most of the boxes have been deselected now, so your computer is handling fewer requests, and thus you have more freed up resources, so you don’t want to add too many of those boxes. But you might want to add a few, so your visuals are OK.
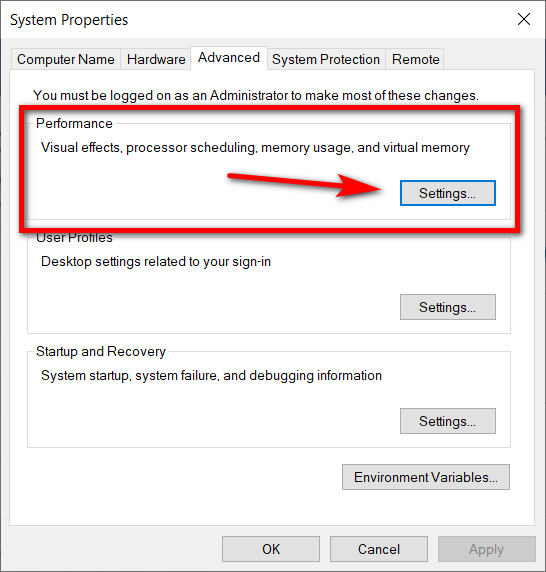
Turn your attention to the “Advanced” tab now and then click on the “Settings” button were it says Performance: Visual effects, processor scheduling, memory usage, and virtual memory.
Where it says Virtual memory, click on the “Change” button.

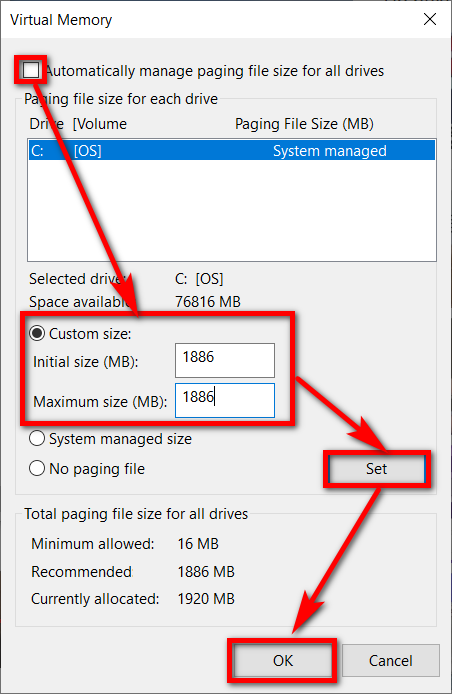
Uncheck the box where it says “Automatically manage paging file size for all drives and then select the “Custom size” checkbox and fill in the sizes with the same details that it shows below where it lists the recommended paging file size.
When you’ve done that, click on the “Set” button, followed by “OK” and then it closes the dialog and saves your settings.
You’ll probably get a message letting you know that the changes can only take effect after you’ve restarted your computer, so go ahead and do that now before you try using your additional RAM.
That’s it.
You might also be interested in:
- How to Run Windows Memory Diagnostics Tool in Windows 10
- How to Disable Telemetry and Data Collection in Windows 10
- How to Disable/Enable Secure Boot on Windows 10 PCs
- Microsoft Removes Homegroups from Windows 10 in Coming Redstone 4 Update
- Windows Hello Can Be ByPassed with Photos in Older Versions of Windows 10
- How to Connect Windows 10 PC to WiFi Network Without Entering Password
- How to Turn On/Off AutoPlay in Windows 10
- How to Fix Startup Repair Loop in Windows 7 without Reinstalling Operating System
- How to Create Bootable UEFI USB Flash Drive for Installing Windows 7, Windows 8, Windows 8.1
You can subscribe to our RSS, follow us on Twitter or like our Facebook page to keep on consuming more tech.
September 19, 2018 @ 18:28
How much memory should be used when in idle?
September 19, 2018 @ 18:34
If by idle you mean without anything open at all including web browsers then not a lot. Maybe 10%ish. However, there could also be programs running on the background so it’s hard to say. Newer versions of Windows now have stuff like antimalware and antivirus running scans for you in the background so you don’t have to do it manually. When programs like that are running it could jump up quite a lot.
I was reading an article the other day about a guy who was using a flight simulator and had about 70% memory used and thought that was an issue. Sometimes I get 70% memory usage according to task manager when I’m not doing anything but sitting here with Google Chrome open (it might be because I was also watching YouTube videos, and have a few Chrome extensions that are always active). But still, if Chrome gives me 70% usage, then I don’t think 70% will create any issues. I don’t worry about memory the same way I do CPU. If I had 70% CPU usage I would panic and do everything I could do drop it back down. But the way the computer behaves also reflects that. High CPU usage results in my fan kicking into gear. That doesn’t happen with the memory.
September 19, 2018 @ 18:11
You can also reset virtual memory apparently to help with disk usage problems.
Some people are seeing the 100% disk usage when they open up the Task Manager. If you right click on it you’ll see that disk usage is a combination of many different factors. But the fixes for the issue are relatively simple.
You can update the device drivers first and foremost. Running through a diskcheck is also advised. And then settings your virtual memory.
September 19, 2018 @ 18:18
I think it’s unlikely that adjusting virtual memory will help in this scenario. Most people adjust virtual memory to get more performance and the way they get more performance is by having the memory handle fewer things.
The most common solution for 100% disk usage is to go into the Power Options menu from Control Panel and then change the settings to high performance or the default power settings.
A lot of people change the power settings and come up with this problem. It seems usual — you’d think that Microsoft would not have a power setting that creates so much chaos. But then again Windows is just an operating system being installed on computers from other manufacturers so maybe it’s just an integration thing where things haven’t worked out perfectly. Still one can only assume that manufacturers of computers with these issues will roll out firmware updates to sort t out.