Last Updated on February 25, 2024 by Mat Diekhake
Disk quotas help administrators divvy up how much space each person has to use on the hard drive.
Administrators can choose to enforce disk quota limits or just have a warning notification when the disk quota limit is close to being/has been exceeded. You can also choose between having soft or hard disk quota limits for new users and specific users.
This is what administrators need to set disk quota limits and warning levels for a new user when you’re using the Windows 10 operating system.
How to Set Disk Quota Limit and Warning Level for New Users in Windows 10
You can set a disk quota limit and warning level for a new user in Windows 10 by using the Drive properties dialog for a particular drive from File Explorer.
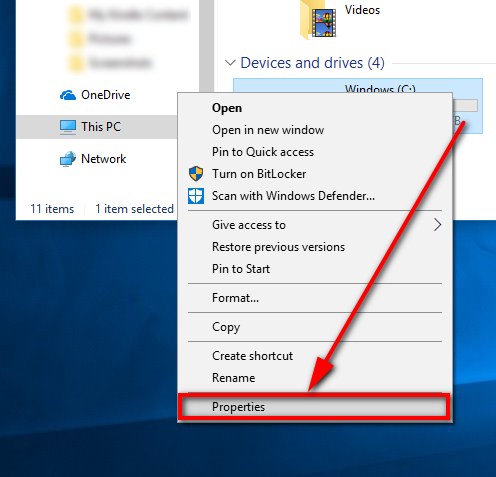
Start off by navigating to the Start menu > File Explorer > This PC from File Explorer’s navigation pane down the left side of the window and then right-click on the drive that you want and select the “Properties” link from its context menu.
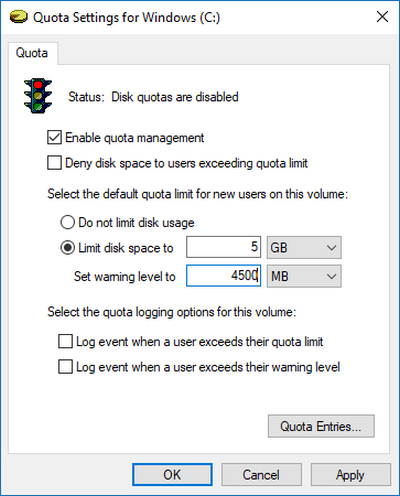
Select the “Quota” tab and then click on the “Show Quota Settings” button.

Make sure that you have the “Enable quota management” checkbox selected and then click on the “Limit disk space to” box and type in the data amount that you want to limit the disk space to (f you want to have a hard limit) and the data amount that you want to set the warning level to.
Make sure you click on the “OK” button at the bottom of the dialog to apply the changes and continue using the operating system.
How to Set Disk Quota Limit and Warning Level for New Users in Local Group Policy Editor
You may also set a disk quota limit and warning level for a new user by using the Local Group Policy Editor in Windows 10.
Start by pressing the Windows logo key + R on your keyboard to bring up the Run dialog and then type “gpedit.msc” and hit the “OK” button to open up the Local Group Policy Editor (You may need to click on its icon from the taskbar when it opens because it sits behind the browser window).
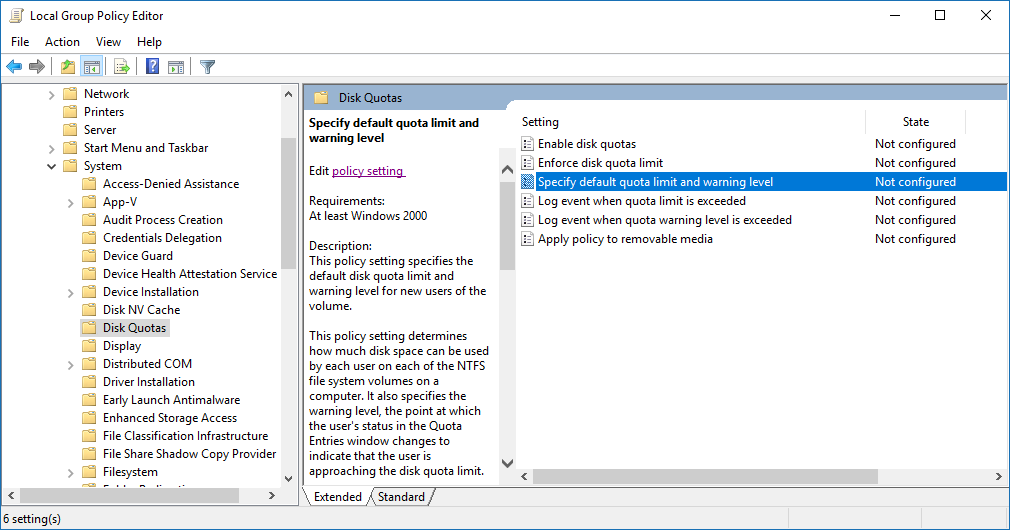
Now from within the LGPE window, use the left side pane to navigate to the Computer Configuration\Administrative Templates\System\Disk Quotas path. Click on the “Specify default quota limit and warning level” in the right side pane p Disk Quotas and then click on the “Edit policy setting” link that becomes available in the middle column.
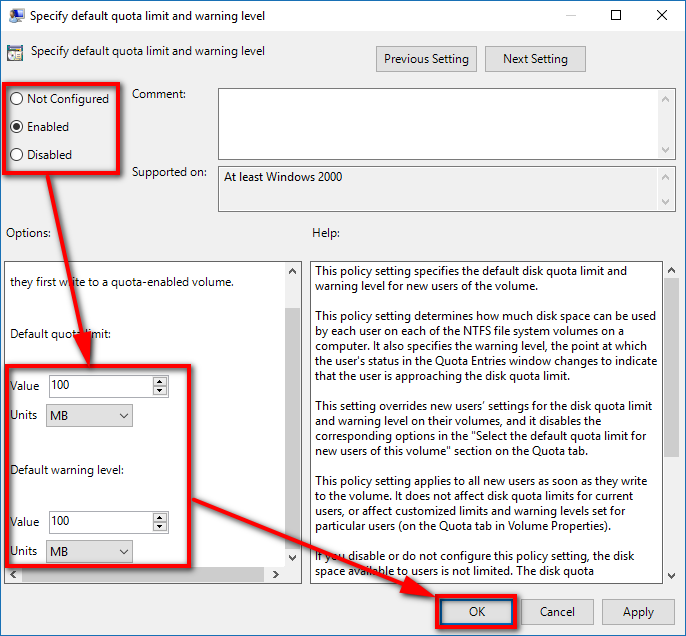
You’ll then have the Specify default quota limit and warning level policy window open. Click on the “Enabled” checkbox if you want to be able to specify the quota limit and warning and then look in the “Options” box for the chance to make your selections by using the arrows to set your limits. The first one is for setting the quota limit and then the second one is for settings the warning level.
Make sure you click on the “OK” button when you’re done making your selection so you are applying the changes and closing the policy window at the same time.
The quota limit can be whatever you want it to be—it can be well above the warning level or not far away from it at all. It’s always best to give people in top positions of a company some leeway between the warning level and the hard limit, so they are still able to perform important tasks.
You might also be interested in:
- How to Roll Back Driver to Previous Version in Windows 10
- How to Change Maximum Processor Frequency in Windows 10
- How to Determine File System of Drive in Windows 10
- How to Enable/Disable Touch by Finger in Windows 10
You can subscribe to our RSS, follow us on Twitter or like our Facebook page to keep on consuming more tech.