Last Updated on December 26, 2022 by Mat Diekhake
The central processing unit (CPU) is a complicated bit of hardware that would take a while to get to know if you wanted to learn about its inner workings. For example, you can’t tell how good a CPU is just by assessing its frequency.
That said, the frequency is still important. The Windows 10 operating system does not limit the frequency that your CPU can run at, meaning there are no limitations for the CPU to do what is being asked of it by the operating system and all of its processes.
Most modern-day CPUs can handle that, not a problem, but there might be times when you would rather limit the frequency of the CPU instead so that it simply can’t get to the point of ever overheating. That way you won’t ever put too much strain on it.
Before going any further, I should mention that strain on a CPU isn’t necessarily a bad thing like some people might assume. Usually logic tells us the less we use something, the longer it’ll last. But there is also something out there called a CPU stress test which many a geek often do on their computer’s hardware without a second thought. The only real issue most professionals see when working the CPU is you don’t want it to get over a certain temperature (and the exact number can vary depending on the CPU).
It’s unlikely that using the Windows 10 operating system and its applications will cause your CPU to get too hot, but if you want t play it safe, Microsoft does allow for you to change the CPU frequency so you never have to worry about overworking it.
How to Change Maximum Processor Frequency in Power Options
You can change the Maximum processor frequency by using the Power Options in Windows 10.
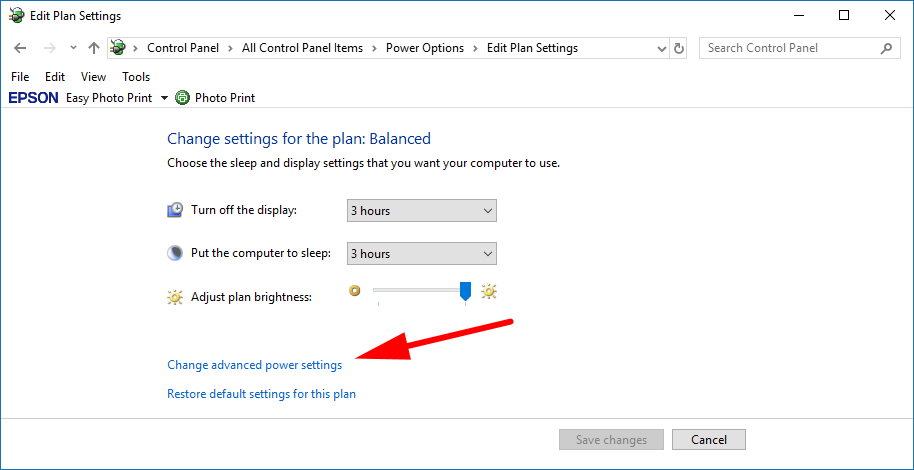
Get started by navigating to the Control Panel > Power Options > Change plan settings > Change advanced power settings. You’ll then have the Power Options dialog open with the list of advanced settings at your disposal.
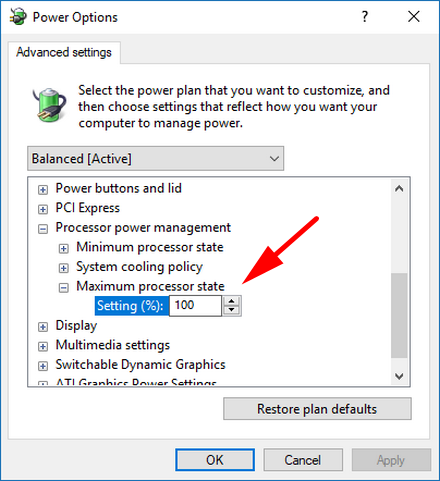
Scroll down the list until you find the “Processor power management” entry and click on it to expand it. You’ll now see the maximum processor frequency option that you can set.
How to Change Maximum Processor Frequency in Command Prompt
You can change the maximum processor frequency setting in the Command Prompt in Windows 10 as well if you like.
To do it this way, get started by typing “CMD” into the Cortana search and then click to open the “Command Prompt” desktop application when it shows up under the best match section.
For when your device is on battery:
Type the powercfg -setdcvalueindex SCHEME_CURRENT 54533251-82be-4824-96c1-47b60b740d00 75b0ae3f-bce0-45a7-8c89-c9611c25e100 (MHz) command into the command line and substitute where it says (MHz) for the real MHz value that you want, i.e., powercfg -setdcvalueindex SCHEME_CURRENT 54533251-82be-4824-96c1-47b60b740d00 75b0ae3f-bce0-45a7-8c89-c9611c25e100 95.
For when your device is plugged into the power cable:
Type the powercfg -setacvalueindex SCHEME_CURRENT 54533251-82be-4824-96c1-47b60b740d00 75b0ae3f-bce0-45a7-8c89-c9611c25e100 (MHz) command and hit the “Enter” key on your keyboard to execute it.
The maximum frequency for the processor has now been changed. Most computers will be fine leaving it on the default setting for this, but if you know you have a weak processor or an aging computer, then it might be something to consider.
You might also be interested in:
- How to Turn On/Off Autocorrect for Hardware Keyboard in Windows 10
- How to Turn On/Off Text Suggestions for Hardware Keyboard in Windows 10
- How to Determine File System of Drive in Windows 10
- How to Enable/Disable Touch by Finger in Windows 10
You can subscribe to our RSS, follow us on Twitter or like our Facebook page to keep on consuming more tech.