Last Updated on February 25, 2024 by Mat Diekhake
There are some applications that you may try to run from the Windows 10 operating system that will give you an “Access Denied” or “No Permission” message if you aren’t running them as the administrator.
This is because some apps require the full administrator access token before they can run. some apps require the full administrator access token before they can run.
Since running elevated apps can pose more of a security risk, you may also find User Account Control prompting you before you can run certain apps with the full admin token on the computer.
Notes
- You can only run desktop apps with administrative permissions; the Windows apps, aka the modern apps, don’t have this feature yet.
- You must be signed in to your computer with an administrator account or provide a password of a member of a local administrators group before you can run an application as an administrator. The apps that require administrative permissions will not automatically run with them just because you’re signed into an admin account. For security reasons, you still need to choose to run them as an administrator instead, as well as go through User Account Control. (Those who are logged in with standard user accounts or with User Account Control set always to require credentials can enter the credentials when prompted or log out and back in to an administrator’s account.)
The following tutorial demonstrates how to run as an administrator when you’re using a version of the Windows 10 operating system.
Method One: How to Run as Administrator from Context Menu
Here’s how you can run as an administrator from the context menu of the file:
1. Right-click on any application that allows for it to be run with admin permissions and then click on Run as administrator from its context menu.

Method Two: How to Run as Administrator from Run Dialog
Here’s how you can run as an administrator from the Run dialog box:
1. Right-press the Start menu icon and click Run, or press the Windows logo + R keys to bring up the Run dialog box.
2. Press the CTRL + Shift + Enter or CTRL + Shift key combinations before clicking on OK.

Method Three: How to Run as Administrator with Task Scheduler
Here’s how you can run as an administrator from the Task Scheduler:
1. To find out how, visit how to Create Elevated Shortcut without UAC Prompt.
Method Four: How to Run as Administrator from Start Menu
Here’s how you can run as an administrator from the Start menu:
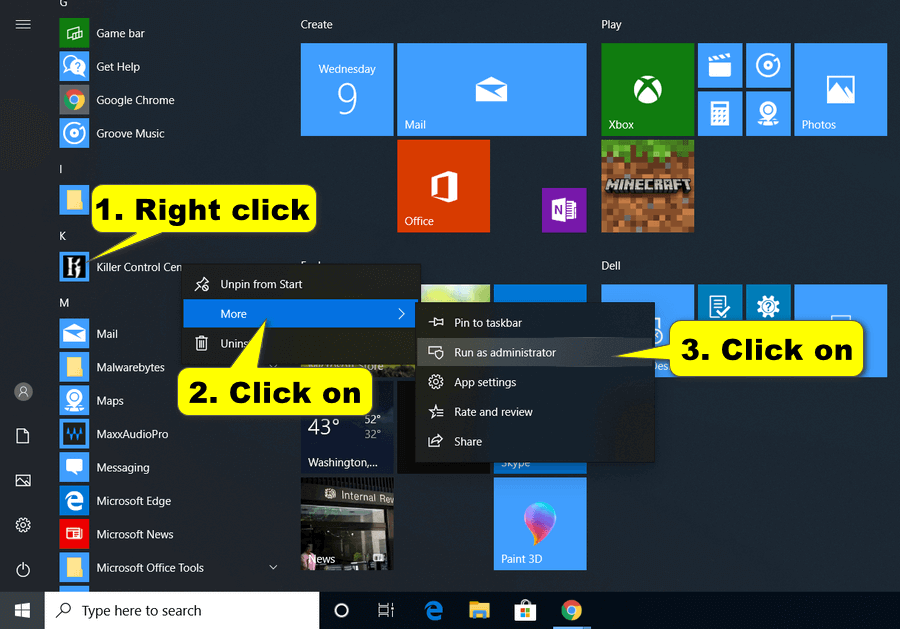
1. Find the app you want to run as an admin from the list of All Apps in the Start menu, right-click on it, hover over the More link and then select Run as administrator from the secondary menu. (click to enlarge screenshot below)
Method Five: How to Run as Administrator from File Explorer Ribbon
Here’s how you can run as an administrator from the File Explorer ribbon:
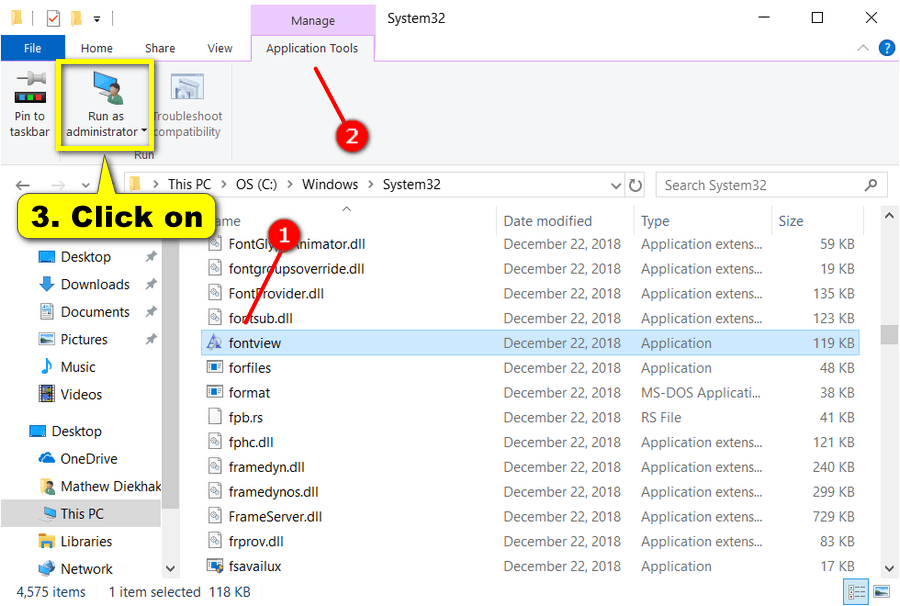
1 a. With File Explorer open, highlight the app you want to run as an admin by clicking on it once, and then select the Manage Application Tools tab and click on the Run as administrator button. (click to enlarge screenshot below)
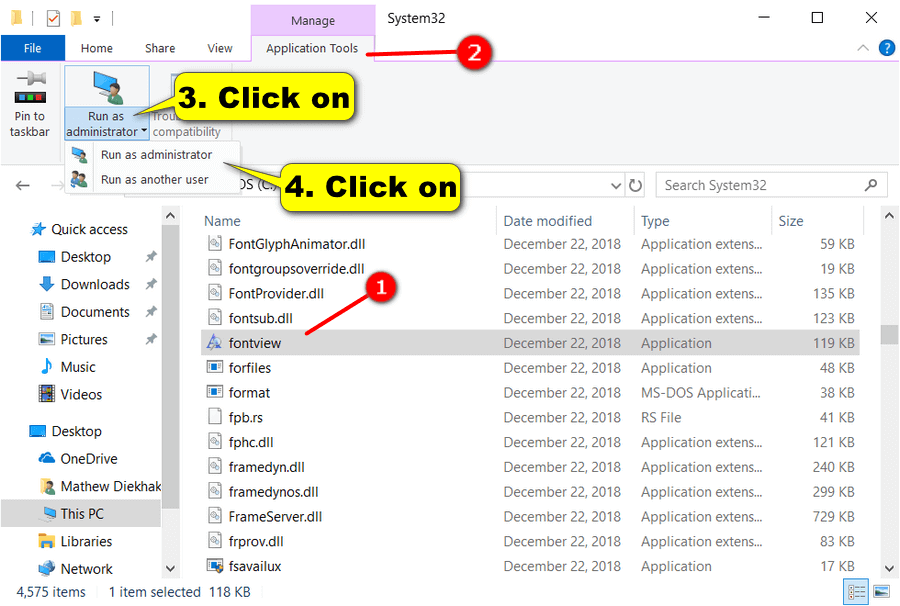
1 b. The same Run as administrator button has two separate parts to it. The top half of the button will automatically run as an administrator while clicking on the bottom half will present you with the option to choose between running as an administrator or running as another user. (click to enlarge screenshot below)
Method Six: How to Run as Administrator from Taskbar
Here’s how you can run as an administrator from the taskbar:
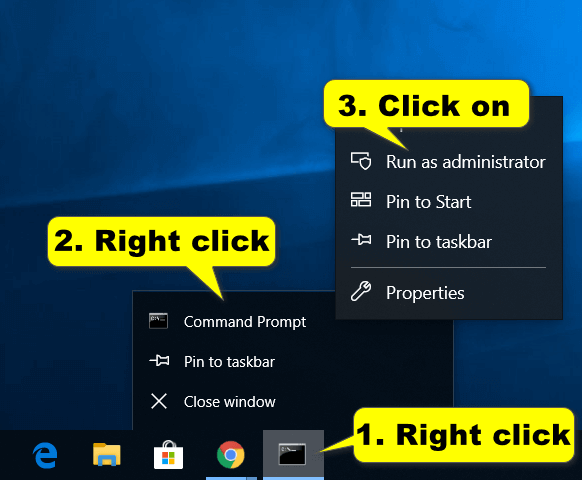
1. With the application that you want to run as an admin open, right-click on the app icon in the taskbar to open its jump list, right-click on the app’s name from the jump list, and then click on the Run as administrator link from the secondary menu. (click to enlarge screenshot below)
Method Seven: How to Run as Administrator in Task Manager
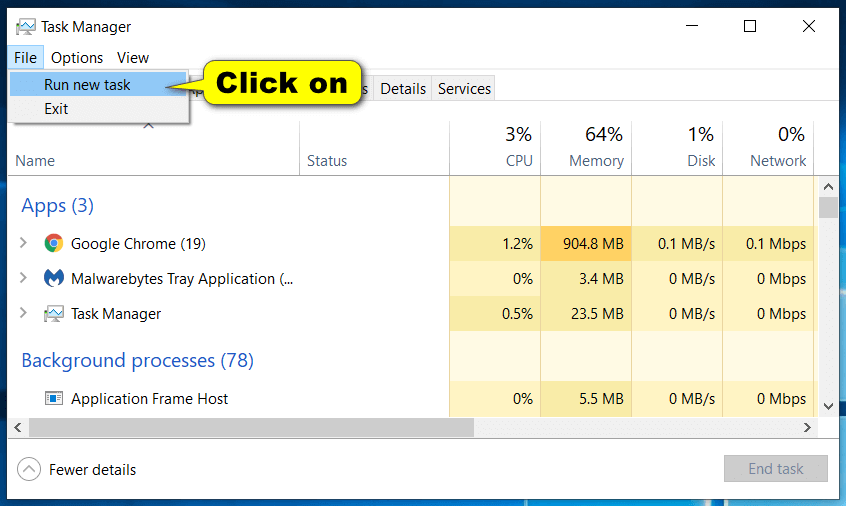
Here’s how you can run as an administrator from the Task Manager:
1. Open the Task Manager and expand the window so you see it in the More details view.
2. From the Task Manager’s menu, click on File and then select Run new task from the menu. (click to enlarge screenshot below)
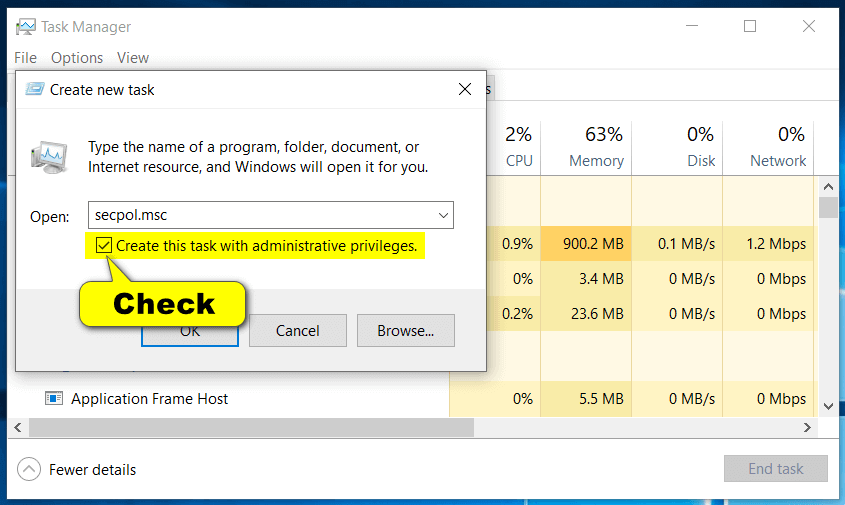
3. Type the name if the application’s executable file (.exe file) and then check the box next to where it says Create this task with administrative privileges before clicking on the OK button. (click to enlarge screenshot below)
Method Eight: How to Always Run as Administrator in Shortcut Advanced Properties
Here’s how you can run as an administrator from a shortcut’s Advanced Properties dialog:
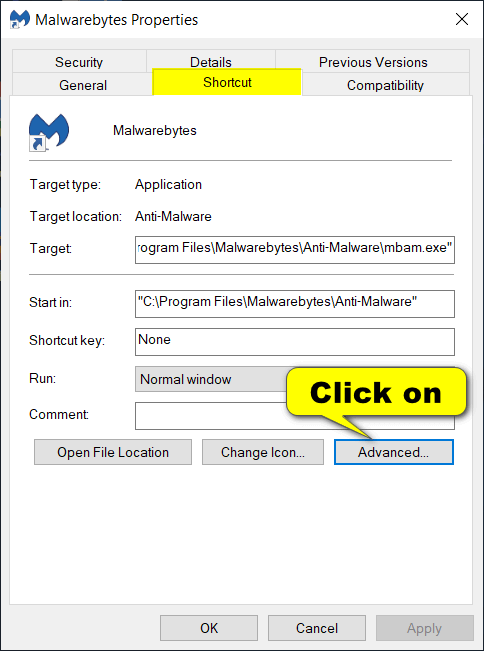
1. Right-click on an application’s shortcut on the desktop and then click on Properties from its context menu. In this example, we are using the Malwarebytes app.
2. Select the Shortcut tab from the top of the app’s Properties dialog and then click on the Advanced button.
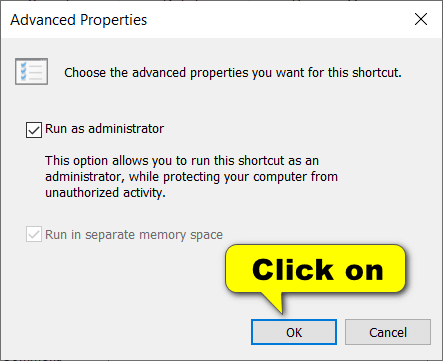
3. From the Advanced Properties dialog, check the box next to where it says Run as administrator.
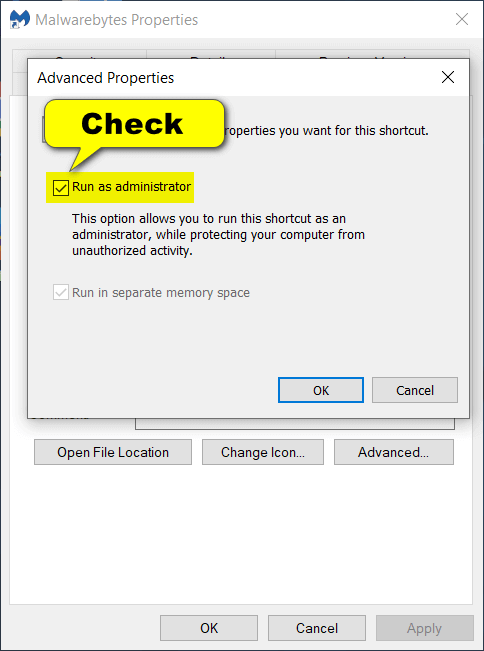
4. Click on the OK button to close the Advanced Properties window.
Method Nine: How to Always Run as Administrator in Compatibility Properties
Here’s how you can run as an administrator from the Compatability dialog:
1. Right-click on an application’s shortcut on the desktop and then click on “Properties” from its context menu. In this example, I’m using the Malwarebytes app.
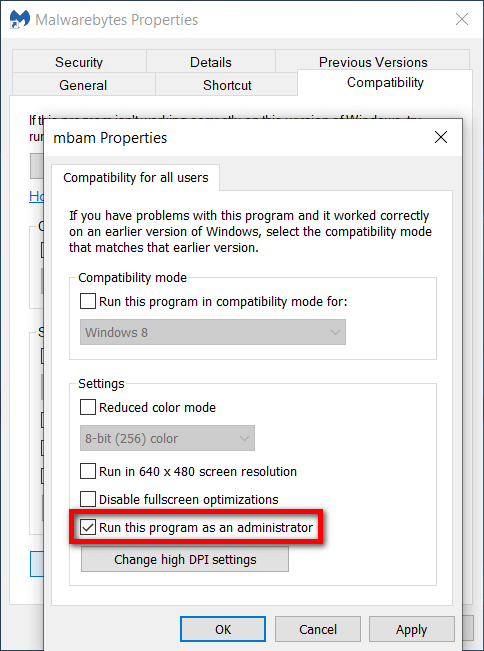
2 a. Select the “Compatibility” tab from the top of the app’s Properties dialog and then check the box next to where it says Run this program as an administrator.

You can click on the OK button to close the dialog or continue if the Run this program as an administrator box is grayed out.
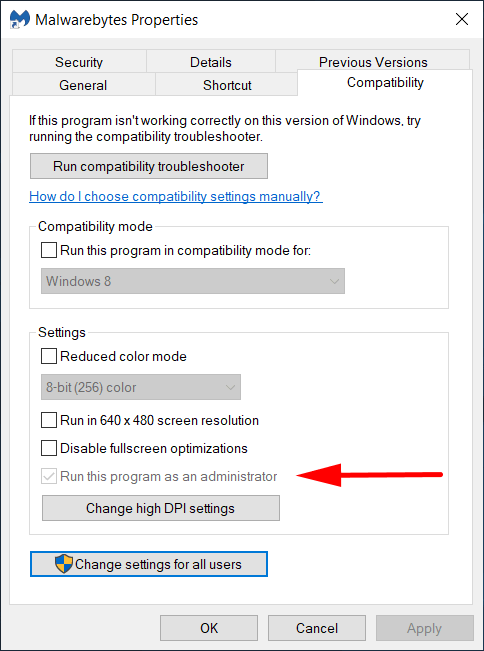
2 b. Note: If the option to Run this program as an administrator is grayed out, then you need to set the Run as administrator privilege level for the application for all users first. To do that, click on the Change settings for all users button directly beneath the checkbox in the previous step.

2 c. From the Compatibility for all users tab, check the box next to where it says Run this program as an administrator and then click on the OK button at the bottom of the dialog.
2 d. Note: If you checked the Run this program as an administrator checkbox in the previous step, then you’ll now see the Run this program as an administrator (for the individual user) checkbox grayed out.
Method Ten: How to Always Run as Administrator in Registry Editor
Here’s how you can run as an administrator from the Registry Editor application:
1. Open the Registry Editor app by pressing the Windows logo + R keys to open Run and then typing regedit and clicking OK, or by typing regedit into Search.
2. If prompted by User Account Control and asked “Do you want to allow this app to make changes to this device?,” click on the Yes button.
3. In the console tree of the snap-in, navigate to one of the following paths:
To Apply to Current User: HKEY_CURRENT_USER\Software\Microsoft\Windows NT\CurrentVersion\AppCompatFlags\Layers
To Apply to All Users: HKEY_LOCAL_MACHINE\SOFTWARE\Microsoft\Windows NT\CurrentVersion\AppCompatFlags\Layers
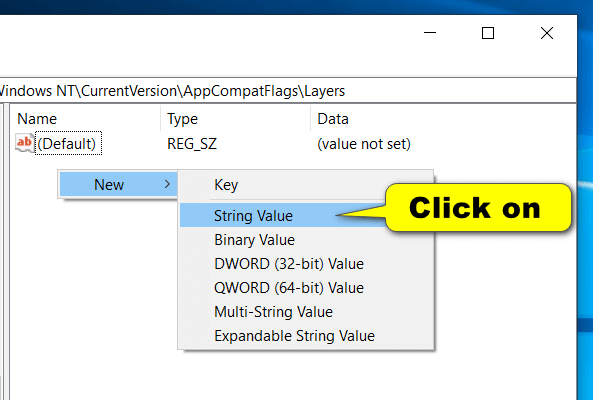
4. With Layers expanded, right-click on the right side window and click New, followed by String value.
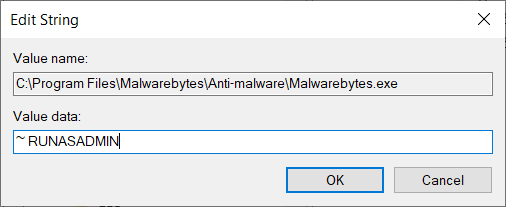
5. For the name, type in the full path of where the application’s executable file lies on the hard drive—for instance, my Malwarebytes application is located at the C:\Programs Files\Malwarebytes\Anti-malware\Malwarebytes.exe location—and then click out of it so the name saves. (click to enlarge screenshot below)

6. Double-click on the new value you created to edit the string. Where it offers the chance to input a Value data, type ~ RUNASADMIN and then click on the OK button.
You can close the Registry Editor now and continue using your computer if you like.
That’s it.
Related Tutorials
- How to Find Windows Media Player and Set as Default in Windows 10
- How to Open Windows PowerShell in Windows 10
- How to Mark OneDrive Files as ‘Always keep on this device’ in Windows 10
- How to Restore Windows Photo Viewer in Windows 10
- How to Sign In or Sign Out of Cortana in Windows 10
- How to Turn Windows Features On/Off in Windows 10