Last Updated on December 24, 2022 by Mathew Diekhake
Windows operating systems have a system restore feature that allows you to essentially turn back time and reload an older version of the operating system. When you perform this action it will mean that the current state of your operating system is lost and what was on your computer back on that day that you are choosing to restore will be back on your computer. So, to clarify: by turning back time with system restore, you will lose any data that you installed after the date you’re restoring to; however, you will gain all the data that was on your computer at the specific time that you’re restoring to.
Windows’ system restore is a fantastic solution for those who need to restore data. For most people, there is limited downside to this feature: they will notice a problem not long after it was created; thus, there isn’t much new information they can’t do without. Moreover, you always have the chance of backing up what is on your computer at the moment before you perform the system restore, and thus you don’t have to lose the data you have now just because you’re restoring the computer to a previous time; nothing is stopping you from putting the new data on a USB stick, for example, and then keeping it stored on the USB stick until after the system restore is completed.
System restore works by creating restore points. When performing the system restore, you can only choose from one of the restore points that has previously been created. The earliest restore point is the earliest time you can restore the computer to. The exact time you see given on the restore point is the time the computer will be restored to.
Warning: If you dual boot into Windows XP, then all the system restore points that you had in Windows Vista get deleted. To find out how to stop this, see: How to Stop XP Dual Boot Deleting System Restore Points
The following tutorial demonstrates how to perform a system restore in Windows Vista.
Method One: How to Perform a System Restore in Vista via System Protection
1. Click on the Start button in the taskbar to open the Start menu.
2. Navigate through to All Programs > Accessories > System Tools > System Restore.
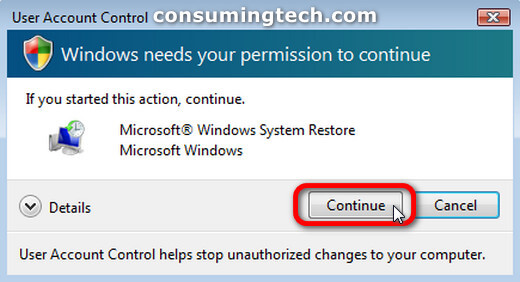
3. If prompted by User Account Control regarding Microsoft Windows System Restore, click on the Continue button. (Click to enlarge the screenshot below.)
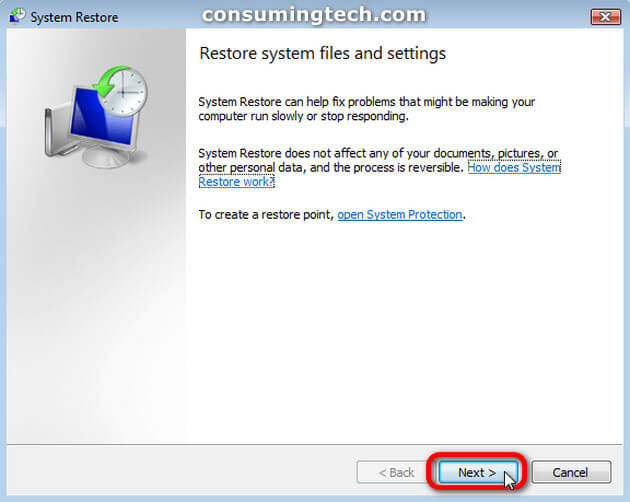
4. From the Restore system files and settings screen, click on the Next button. (Click to enlarge the screenshot below.)
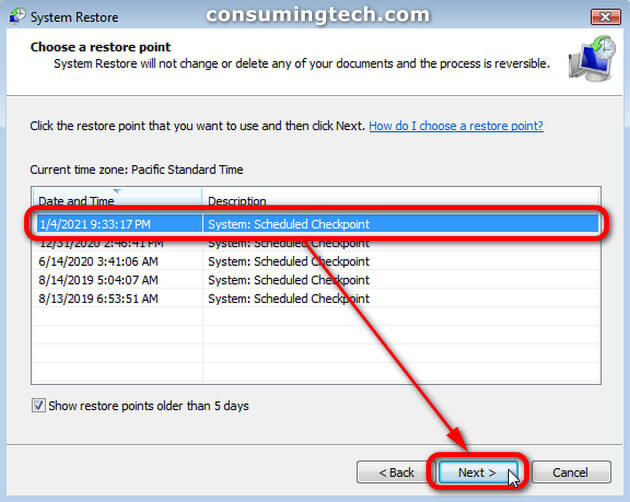
5. Check the box next to where it says Show restore points older than 5 days, and then click on one of the restore points based on their date and time. If you don’t see a restore point there, then you need to click on the Back button, and then from the previous screen click on the link where it says To create a restore point, open System Protection. (Click to enlarge the screenshot below.)
6. Once you have chosen a restore point, click on the Next button. (Click to enlarge the screenshot below.)
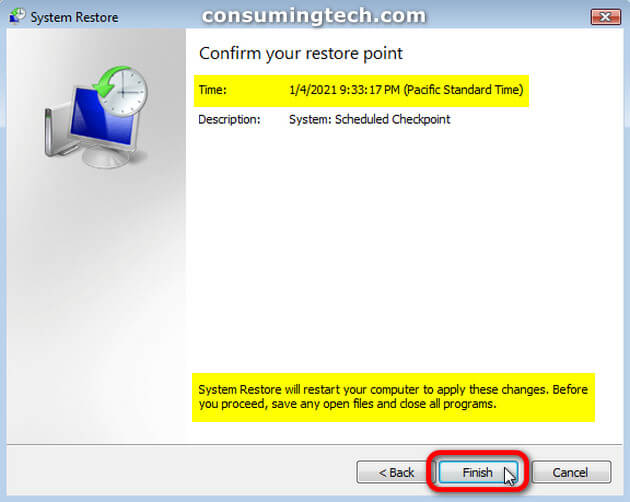
7. Confirm your restore point by checking that the date and time are correct, and then click on the Finish button. (Click to enlarge the screenshot below.)
Method Two: How to Perform a System Restore in Vista via System Recovery Options at Boot
1. Boot the Windows Vista operating system either from the retail Vista installation disc or by creating a Vista repair disc in the System Recovery Options screen.
2. From the System Recovery Options screen, click on the System Restore option.
3. Follow the rest of the on-screen instructions to complete the rest.
That’s all.
Related Tutorials
- How to Troubleshoot Using Reliability and Performance Monitor in Windows Vista [Tutorial]
- How to Change Menu Show Delay Time in Windows Vista [Tutorial]
- How to Open Elevated Command Prompt in Windows Vista [Tutorial]
- How to Setup Event Viewer to Send Email Notifications in Windows Vista [Tutorial]
- How to Fix Cannot Delete a File or Folder Due to Corrupt Recycling Bin [Tutorial]
- How to Switch Windows Media Player to 64 Bit in Windows Vista [Tutorial]
- How to Change Internet Time Synchronization Update Interval in Windows Vista [Tutorial]
- How to Restore Default File Type Associations in Windows Vista [Tutorial]
- How to Stop XP Dual Boot Deleting System Restore Points [Tutorial]
- How to Adjust Cookie Preferences in Internet Explorer in Windows Vista [Tutorial]
- How to View Boot Information at Startup in Windows Vista [Tutorial]
- How to Change Recycle Bin Storage Size in Windows Vista [Tutorial]


