Last Updated on December 24, 2022 by Mat Diekhake
Oftentimes people delete files accidentally or that they later wish that hadn’t. Wishing you still had something you threw in the bin in real life isn’t a huge deal because bins only get collected once per week for most people. Since deleting everything straight away would be a bit harsh in the virtual world, Microsoft has offered a recycling bin which collects your rubbish but also allows you to restore it again later.
All files that get collected in the recycling bin use up your hard drive space as if they were still on the computer. Once they get deleted from the recycling bin, the computer gets its free space back. You can right-click on the recycling bin and empty it whenever you want to free up space on your hard drive. What’s more, the recycling bin will automatically delete files that have been stored in it for a period of time.
Additionally, you can set a default maximum storage size for the recycling bin. This means any files that are added to the recycling bin once the maximum storage size is used up will be automatically deleted. The other files already in the recycling bin will continue to be removed once they have used up their allocated time period for being recycled.
The following tutorial demonstrates how to change the recycling bin’s maximum storage size when you are using a version of the Windows Vista operating system.
How to Change Recycle Bin Storage Size in Windows Vista
You can change the maximum storage size for the recycling bin from the recycling bin properties dialog. Here is how you can open the recycling bin properties and then change the size:
1. Right-click the mouse on the recycling bin on the desktop and then click on Properties from the menu. (Click to enlarge the screenshot below.)
Note: If your computer has several hard drives, then each hard drive you use will have a separate recycling bin. You will need to select the recycling bin that corresponds with your hard drive. If you do not know whether your computer has multiple hard drives, then it likely just has the one so you do not need to worry.

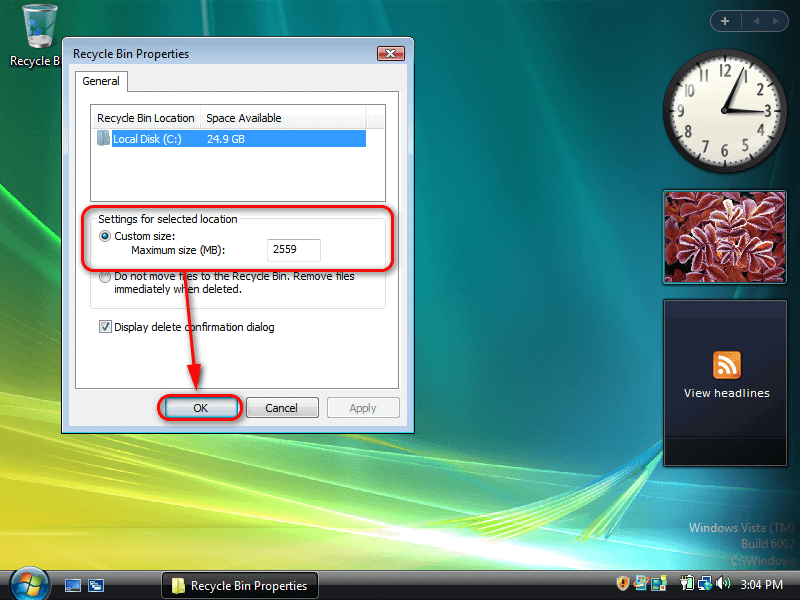
2. From the General tab in the recycling bin look under the Settings for selected location heading and then adjust the number where it says custom: maximum size and click on OK at the bottom of the Properties dialog to save the changes. (Click to enlarge the screenshot below.)
You can now continue using your computer if you like.
That’s all.
Related Tutorials
- How to View Boot Information at Startup in Windows Vista [Tutorial]
- How to Change Internet Time Synchronization Update Interval in Windows Vista [Tutorial]
- How to Fix Program Installation Errors in Windows Vista [Tutorial]
- How to Open Elevated Command Prompt in Windows Vista [Tutorial]
- How to Change Menu Show Delay Time in Windows Vista [Tutorial]
- How to Switch Windows Media Player to 64 Bit in Windows Vista [Tutorial]
- How to Troubleshoot Using Reliability and Performance Monitor in Windows Vista [Tutorial]
- How to Setup Event Viewer to Send Email Notifications in Windows Vista [Tutorial]