Last Updated on December 26, 2022 by Mat Diekhake
Windows operating systems have often taken a lot of flak in the past from not-so-technical-minded people for being a bit too high maintenance, or not looking after itself well enough. One of the things you might remember having to do is use the disk defragmenter to help optimize the performance of your computers Solid State Drive.
That old disk defragmenter feature has been renamed in Windows 10 to Optimize Drives to help make the understanding of it a little easier. It’s also not something that you need to worry about anymore either now that all Windows 10 editions are set up to maintain this optimization automatically, running once a week.
One a week is typically all the average user will ever need to keep the computer from running relatively well all the time, but if you were to check every so often yourself, you still might find that your drives could do with some optimizing at the exact time of your check. You can manually choose to optimize your devices whenever you want even though it’s set to run once a week automatically.
Is Defragmenting PCs Still Required?
Over the years one of the common techniques to increase drive performance was to run the disk defragmenter manually. These days just the fact that your modern laptop is probably already equipped with an SSD drive is enough to help eek out more performance, but Windows 10 also comes with some other features that’ll help you get more out of drives such as the ability to remove programs from start-up with the startup program manager, and it even comes with a new fast startup feature.
With the fast startup feature turned on, your computer won’t shut all the way down, thus giving it the chance to boot back up quicker. And that’s OK with computers these days because they don’t need to be shut down completely to keep them healthy for a long time. The startup program manager is also useful for removing applications and programs that have added themselves to your computer so they startup automatically. But outside of owning a computer that comes with Solid State Storage, neither of those features is technically boosting the performance of a drive.
So, should you still be resorting to using the disk defragmenter option in Windows 10 that is now masked under the Optimize Drives heading? The short answer is no—not if you’re using a computer with Solid State Drive (SSD), which must of us now are. If you’re buying a computer these days, it’s going to come with some type of SSD storage. The base model of the Dell XPS 15 9570, for instance, comes with 256GB M.2 2280 PCIe Solid State Drive—yes, a fancier “PCIe” version, but it’s still an SSD drive. And Microsoft employees have publicly come out and spoken about how its own disk defragmenter feature isn’t really doing you any favors if you have one.
Windows 7 will disable disk defragmentation on SSD system drives. Because SSDs perform extremely well on random read operations, defragmenting files isn’t helpful enough to warrant the added disk writing defragmentation produces…
….the automatic scheduling of defragmentation will exclude partitions on devices that declare themselves as SSDs.
Even since Windows 7, Microsoft has been saying that its defrag feature won’t run if it detects that your computer is using an SSD drive. You can expect Microsoft to be still doing that today if you’re running Windows 10. In other words, if you do have a computer that uses SSD storage, you shouldn’t have any need to follow the guide below. It isn’t a huge deal if you defrag your drive, but as I’ve explained before, giving your computer unnecessary writes is going to limit the life of the SSD. Windows operating systems are programmed to now automatically detect what hardware your computer has, and it’ll decide for you if it thinks your computer needs defragmenting and then run those scans for you, so you don’t have to do anything. But if you don’t have a Solid State Storage drive and wish to run the Optimize Drivers feature in Windows 10 yourself, the guide below is what you should follow.
There’s No Harm in Trying Windows 10’s Optimize Drives Feature, Regardless of Your Drive
Even if you do have a certain type of SSD and you are none the wiser about its existence, there is no harm in using the Optimize Drives feature that will optimize and defrag your hard drive. The reason is that, before it goes ahead with any optimizations, it first checks whether your computer hardware needs to be optimized. Should it happen to be a drive of the Solid State nature, Windows will automatically detect this and subsequently not go ahead with the scan and instead let you know that it doesn’t need optimizing. It’s as simple as that.
The following guide shows you how you can defragment drives in Windows 10 by using the new Optimize Drives feature that the operating system has.
How to Optimize and Defragment Drives in Windows 10
You can defragment drives in Windows 10 from the File Explorer in Windows 10. To get started, head to the taskbar > File Explorer icon and then click on the “This PC” link from File Explorer’s navigation pane along the left side of the window. You should now see the Devices and drives heading toward the bottom of the right side pane. Directly beneath it is your c: drive, the drive that stores just about everything that you have installed on the computer. Right-click on it and the click on the “Properties” link from the context menu.
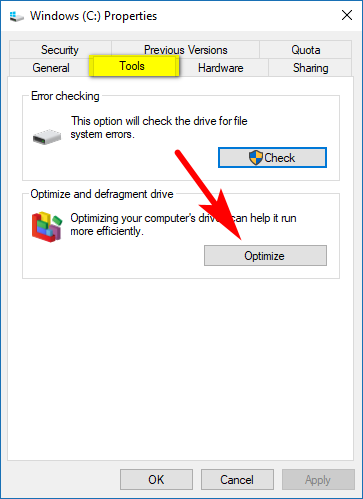
You’ll now have the Windows C: drive Properties dialog box open. The box has several tabs at the top, one of which is the “Tools” tab that you need to click on to find the option for optimizing and defragmenting the drives. Then all you need to do is click on the “Optimize” button that you can see on the right side of the box.
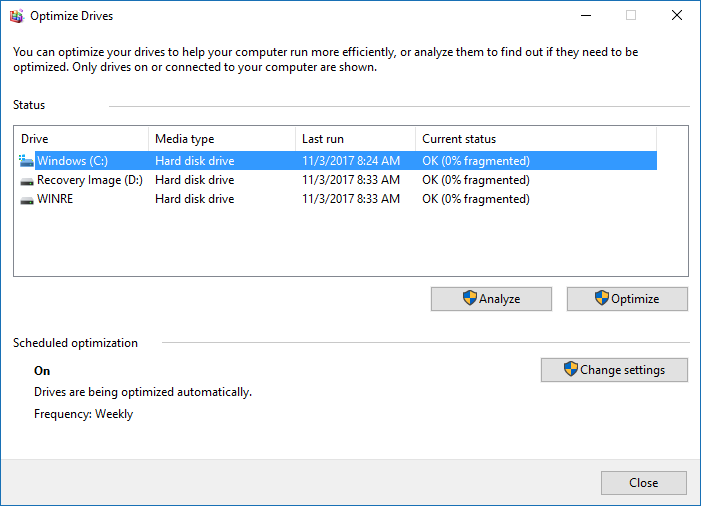
Under the Status heading is the area that shows you all the different drives that are connected to the computer. Ours doesn’t have anything apart from the usual recovery image and the standard C: drive, but if you were to have more, say another F: drive that’s a hard disk drive to go along with your usual C: drive solid state drive, then you would also find it showing up under this section. Choose the drive you want to optimize by clicking on it once. When it’s highlighted, you then get the option to either analyze it or optimize it.
Should you choose to analyze it first, you’ll see the progress under the Current status heading. Wait for it to finish by getting all the way to 100% and then it will let you know the results of the analyzation that occurred within the same area.
If you don’t want to wait around for the analyzing to complete, you can minimize the Optimize Drives window and continue on using the computer for other things like using a web browser for checking out websites. If you do, then you’ll just need to click on the Optimize Drives icon from the taskbar.
If the status you can see says “OK” then there is no optimizing that needs doing. However, if you were to see it say “Needs optimization” within the same area, then that’s when you can then click on the “Optimize” button and get it optimized. When it’s finished, you should see the status change to “OK” like all the rest. Then you just need to click on the “OK” button at the bottom of the Optimize Drives window and close it to continue using the computer once again.
There are plenty of third-party tools out there trying to make a buck from people by claiming that their tools can certainly help your computer get optimized more than what it already is, but if you want our opinion, your computer doesn’t need any more optimizing than what it already is getting from Windows’ built-in tools. A Solid State Drive or a hard disk drive isn’t as prone to issues as they used to be. There are very few reasons to worry about wear and tear nowadays, and the optimizing side of things is taken care of automatically by the default settings. The only time you really want to perhaps check manually by using the steps in the guide above would be if you’ve really used your computer a lot over the week—far more than the average individual would have—and you wanted to make sure it was in perfect shape heading into the new busy week where you wanted to make sure it was going to be reliable for you.
You might also be interested in:
- How to Delete Old Drivers from Disk Cleanup in Windows 10
- How to Run System Maintenance Troubleshooter in Windows 10
- How to Enable or Disable Scheduled System Maintenance in Windows 10
- How to Fix Startup Repair Loop in Windows 7 without Reinstalling Operating System
You can subscribe to our RSS, follow us on Twitter or like our Facebook page to keep on consuming more tech.


