Last Updated on December 26, 2022 by Mat Diekhake
Some people hate how Windows operating systems change so much between versions, and other people appreciate the changes. From all my years of experience as a writer, it’s tough to do things without fault the first time, so I sympathize with Windows developers who get criticism for not getting things right the first time. But I also believe it’s highly unlikely things can’t be bettered on other operating systems that chose not to change from the current layout for the sake of familiarity. Devices themselves change dramatically over time, so it only makes sense that the operating system should as well.
Windows 8 got a bad wrap for being a terrible operating system, but the idea behind it was sound: give people an operating system that’s suitable for mobile usage as well as desktop usage. We thought Windows 8 did that pretty well by giving people the option of clicking a button and switching to the old style of Windows where you get the desktop view. However, by making people click that one button and giving them something different (the metro look tiles) by default, all hell broke loose, partially because many people didn’t understand there was a button available for switching it over to the old desktop style and partially because clicking one button is too much effort for a lot of people who want things delivered perfectly and quickly like most things are expected to be in today’s online world.
Windows 10 has acted on that by giving people what they want when they first turn on the computer and begin using the operating system. Gone now is the option of clicking a button for varying from tablet or desktop mode, and now you have the traditional desktop mode with the Start menu. Just that one move alone has changed people’s attitude enough for the masses to start liking Windows again, but Windows developers can’t give all features that are used quickly. You’re going to need to slow down, take in some information and get to know the rest of the functions that require you digging a little deeper to use. There are plenty of these advantages to a Windows operating system lying around the place, and the Folder Options is one example.
Folder Options, otherwise known as File Explorer Options, has been around in Windows for a long time. You still have many of the old features available that Folder Options has always given, but there are new features available at your disposal in Windows 10 now as well. It’ll take you some time to flick through them all and find which ones are useful to you, but you shouldn’t close the article without at least checking them out as many are beneficial to different people, like the option to change the number of clicks required to open folder if you have arthritis, for example.
The following tutorial demonstrates how to open and configure the Folder Options dialog when you’re using a version of the Windows 10 operating system.
How to Open File Explorer Options in Windows 10
The Windows 10 operating system gives you a few different ways to get to the Folder Options so you can then configure it to suit your needs. Navigating to the Folder Options from the Control Panel has been around for many Windows versions, and it’s available for Windows 10, too. You can also get the Folder Options open directly from File Explorer as well which is the quickest way of going about it if you already have the File Explorer open.
From Control Panel
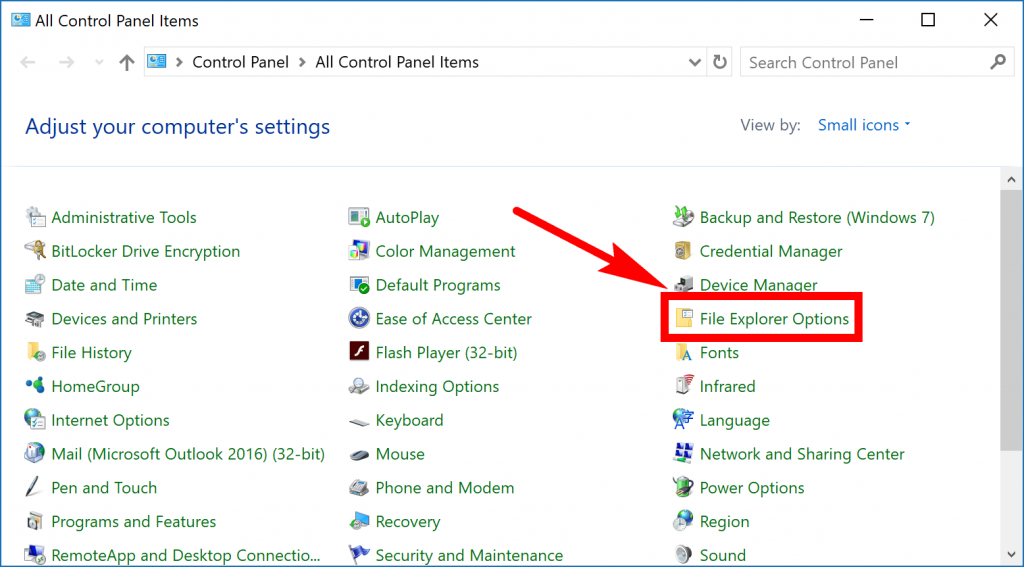
Here is how you can open File Explorer Options (which is the same as folder Options, just named differently) from the Control Panel in Windows 10:
You can open the Folder Options from the Control Panel in Windows 10. To do it this way, open the Control Panel so that it is showing the classic view with the smaller icons and then click on the File Explorer Options link from the main menu.
From File Explorer Ribbon
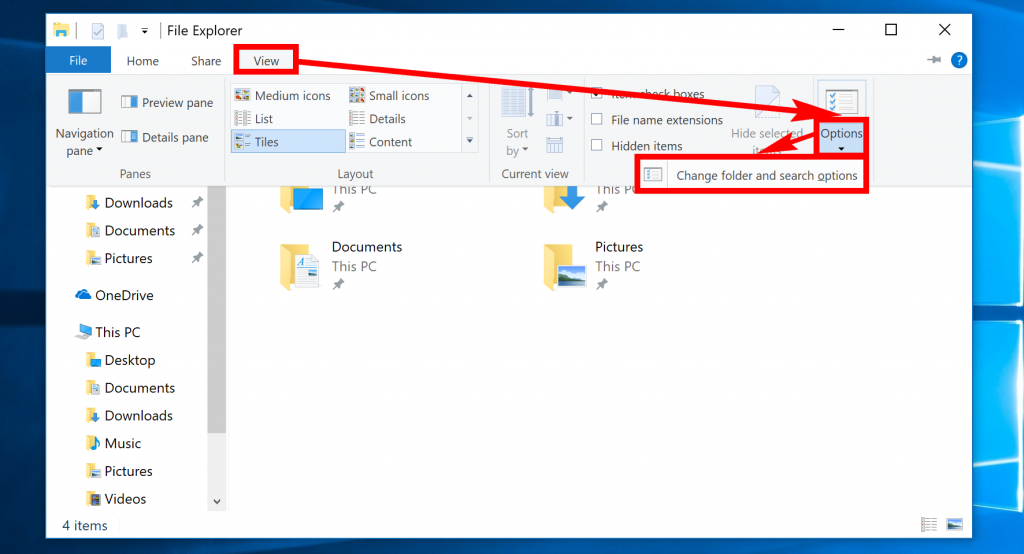
Here is how you can open Folder Options from the File Explorer ribbon in Windows 10:
You can also open the Folder Options and check out its configurations from the File Explorer ribbon. To get there, head to the Start menu > File Explorer in the left pane > View > Options > Change folder and search options.
File Explorer Menu
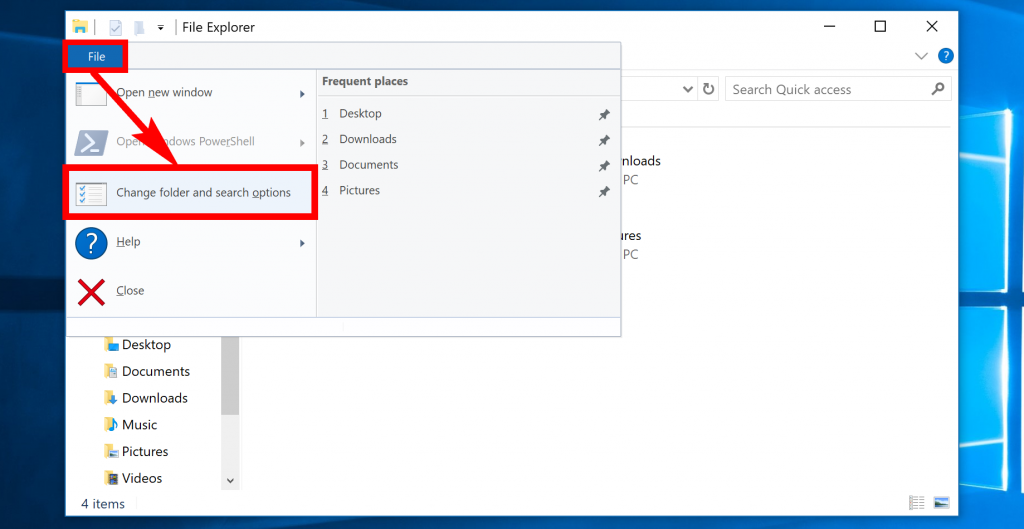
Here is how you can open Folder Options from the File Explorer menu in Windows 10:
You can open the Folder Options directly from the File Explorer’s File menu as well by heading to the Start menu > File Explorer > File > Change folder and search options.
Now that you’ve managed to get Folder Options open, here is how you can configure it:
Folder Options: General Tab
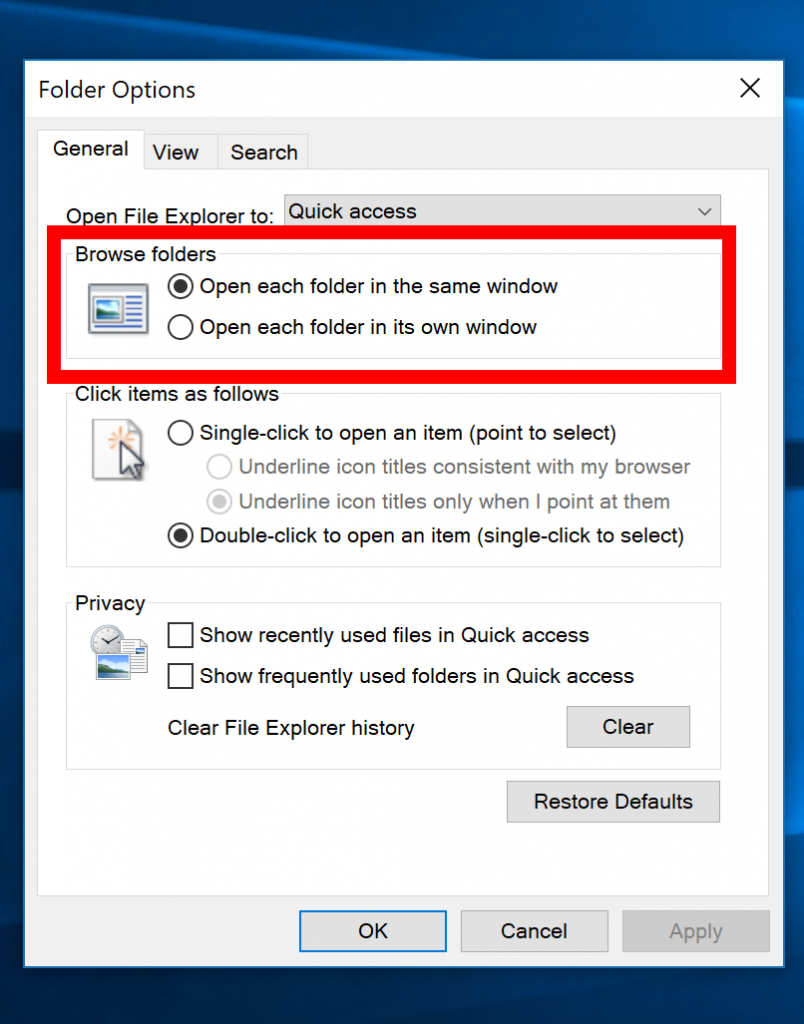
The General tab is the first tab that the Folder Options opens up with, and there are some important things from this tab that are worth a look. The first is the Browse folders heading, and it’s here where you can choose to have the folders open in a new window or open in the same window. When a folder opens in the same window, it’s like using a website in a web browser, and you lose the page you were just viewing when you click through to the next link, only this time you are clicking through to sub folders. There aren’t too many reasons for wanting to open the sub folders in a new window because most people don’t need to have two folders open at the same time, but if you do, then you can change that here. There will be plenty of times when it makes sense for at least some people to do this, depending on your folder contents and what you do with your folders. I always have links on this website opening up in a new window because I feel that’s important for an informative site to do that. If you have lots of informative stuff in your folders and you think you might continually be better off with both folders open that you had opened, then you should give the option for opening each folder in its own window a try and see what you think.
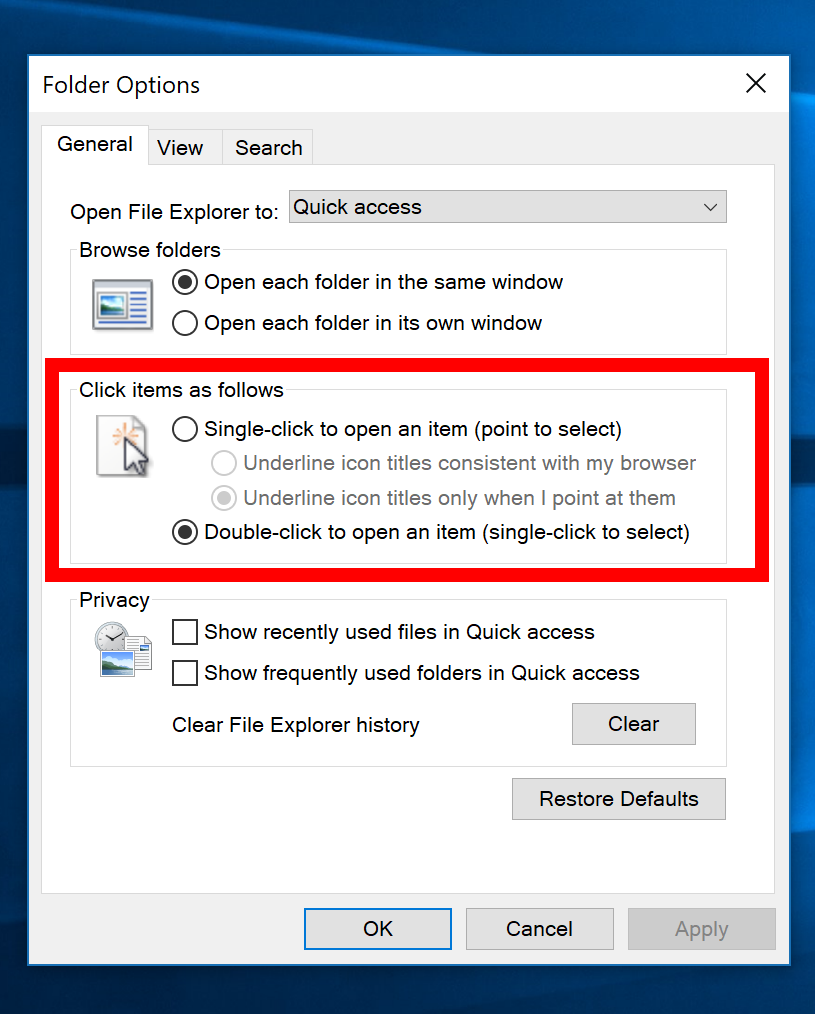
The next heading from the General tab is Click items as follows and it’s here where you can change the items to open when you click them once instead of having to double-click them. The good old double-click method to open an item has been a part of Windows operating systems for a long time, and most people are very familiar with it. It is the ideal way to use Windows so that you highlight an item with one click and then open the item with the double-click. However, if you have a problem with your hands or you just want to reduce the amount of times you are using your hands when on the computer, then you might be interested in changing this from the default setting so that items get opened with just the one click and get highlighted with a hover. It’ll take some getting used to but can dramatically reduce the amount of work your hands need to do when using Windows.
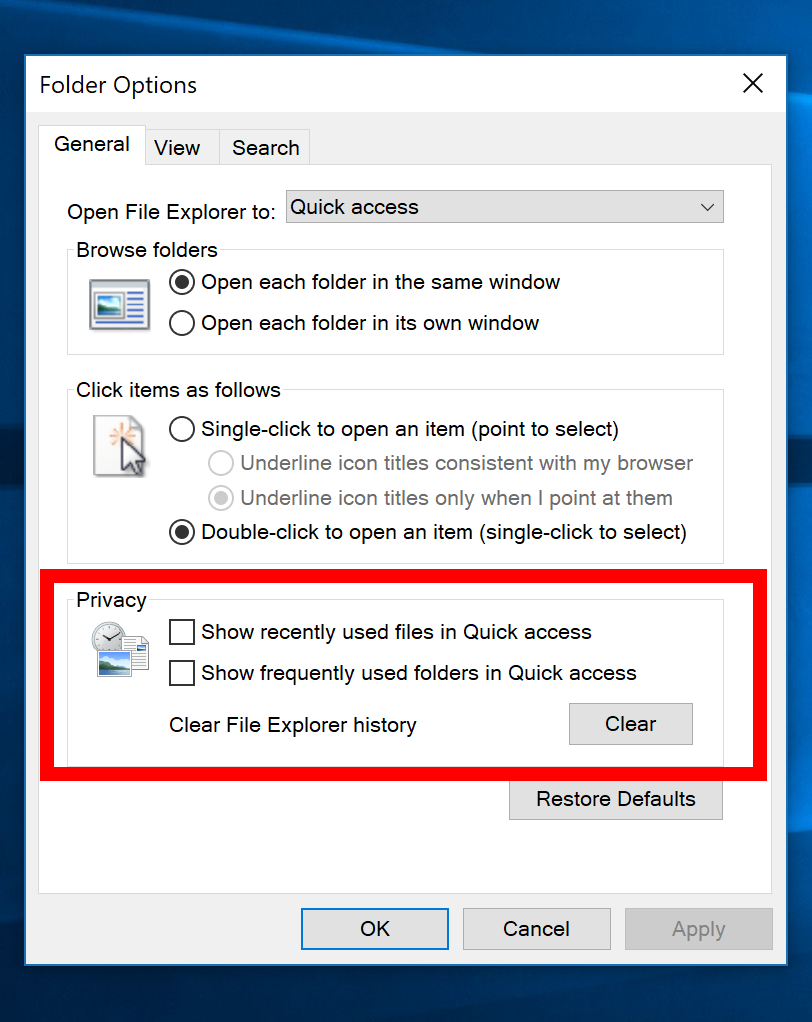
One of the new features that you get in the Windows 10 version of the File Explorer is a new Quick Access menu designed to show you the stuff you have either recently used or frequently use. It’s just another way Windows tries to make your time with the operating system more efficient. Some people love it because it does save them time and others hate it because it means stuff they wish remained private is now being displayed in the left pane of the File Explorer (not ideal if you share a user account or have other people around you when you use the computer.) If you want either of those two things to not show up in the left pane of File Explorer, then you check the boxes for those options here.
Folder Options: View Tab
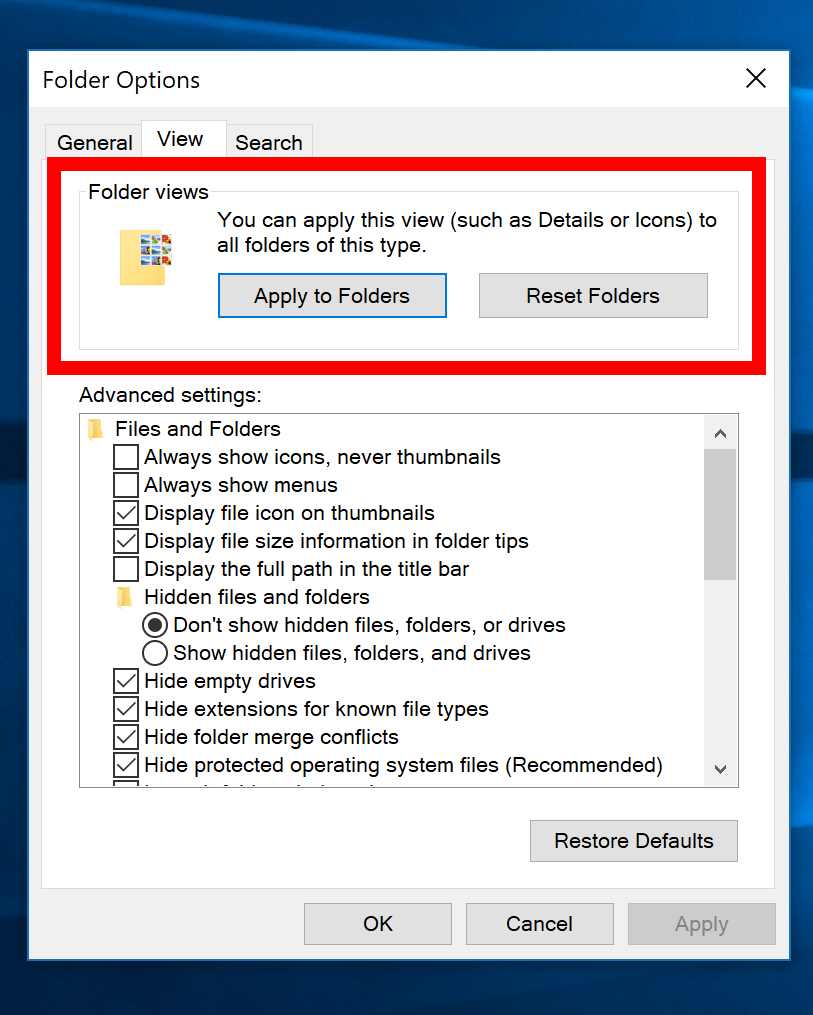
If you switch over to the View tab, you’ll find heaps of things you can customize—some stuff that has been available for many years and other stuff that has only become available with Windows 10. The very top heading in the View tab is Folder views, and it has to do with the new Sharing Wizard feature that is new in Windows 10. You can pick and choose what shows up in the left pane of the File Explorer from here and what folders you want to apply the changes to.
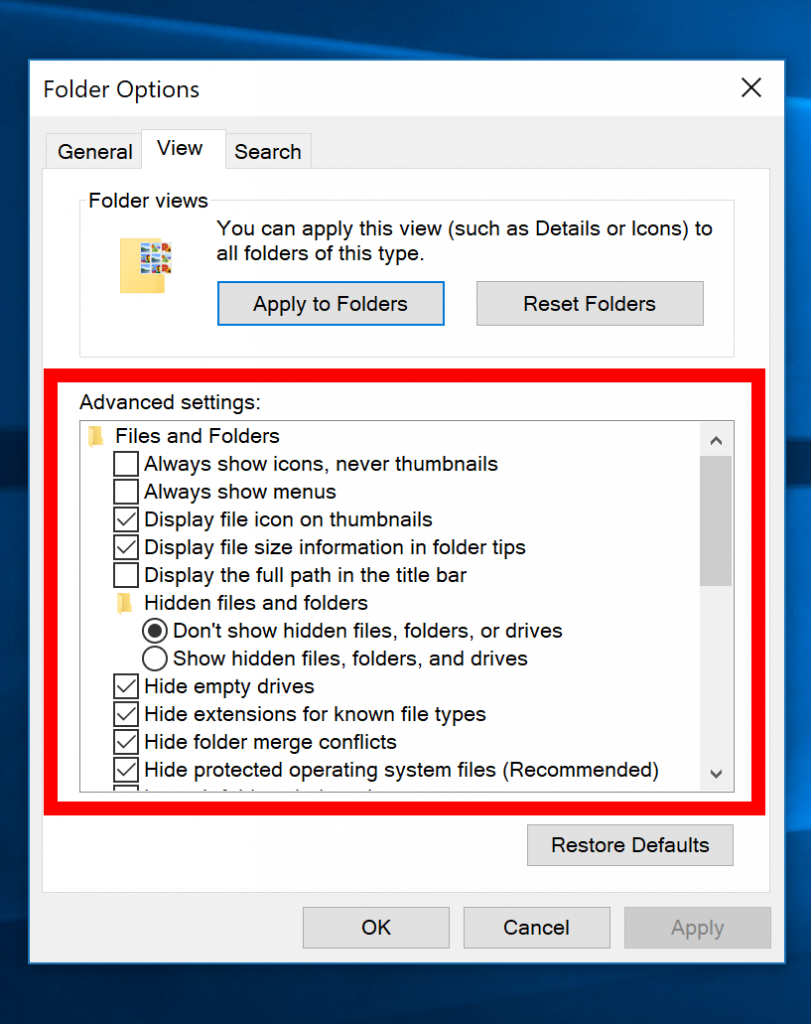
The next heading down the tab is Advanced settings, and it’s here where you get most of the customizing opportunities. All the boxes checked in the picture below are the default settings, but you can change any of them that you like. There’s one new one, in particular, that is fresh to Windows 10 called Use Sharing Wizard. It’s already on by default and Microsoft recommends you keep it that way because it is helping keep your computer free from viruses.
Folder Options: Search Tab
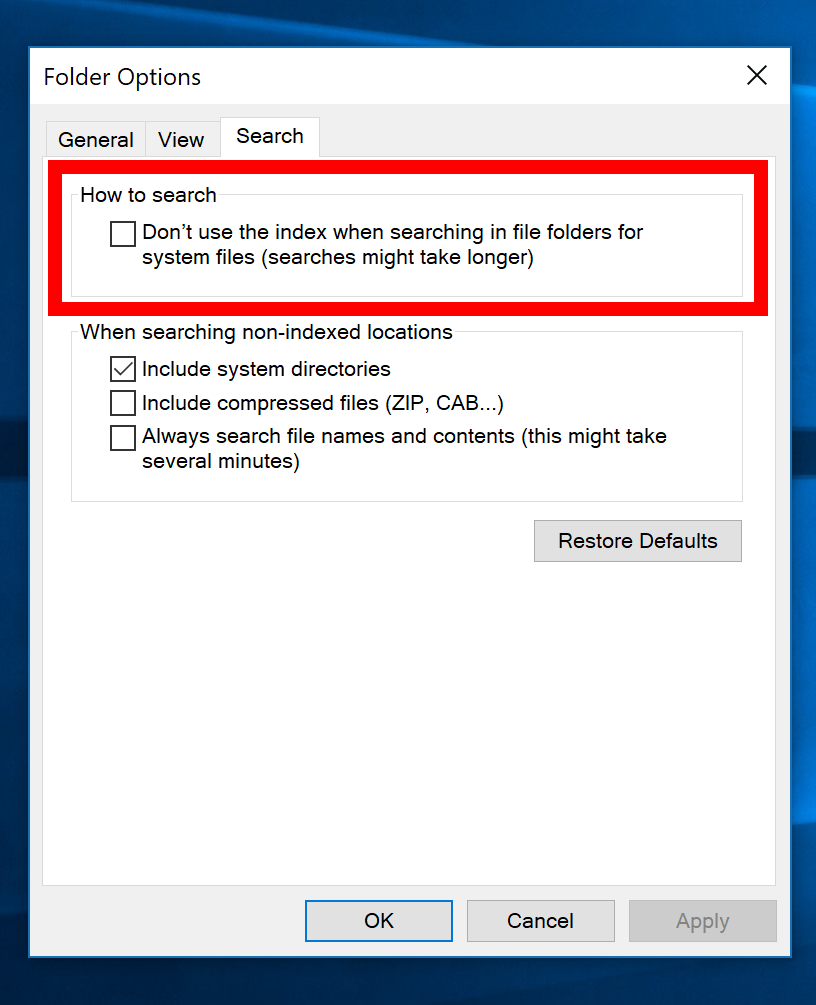
The Search tab in Folder Options lets you customize the way you search the computer. The top heading of How to search lets you choose to use the index no longer when searching in file folders for system files. We recommended not checking this option because the search index creates a snapshot of everything available from search every so often which then allows for you to use the search index much quicker. Some people swear by disabling this because they feel it’s better for the hard drive, but we’ve gone over this before and how writing to your hard disk isn’t a problem and disabling the search index means you’ll be doing other things instead like using more CPU which can be a problem.
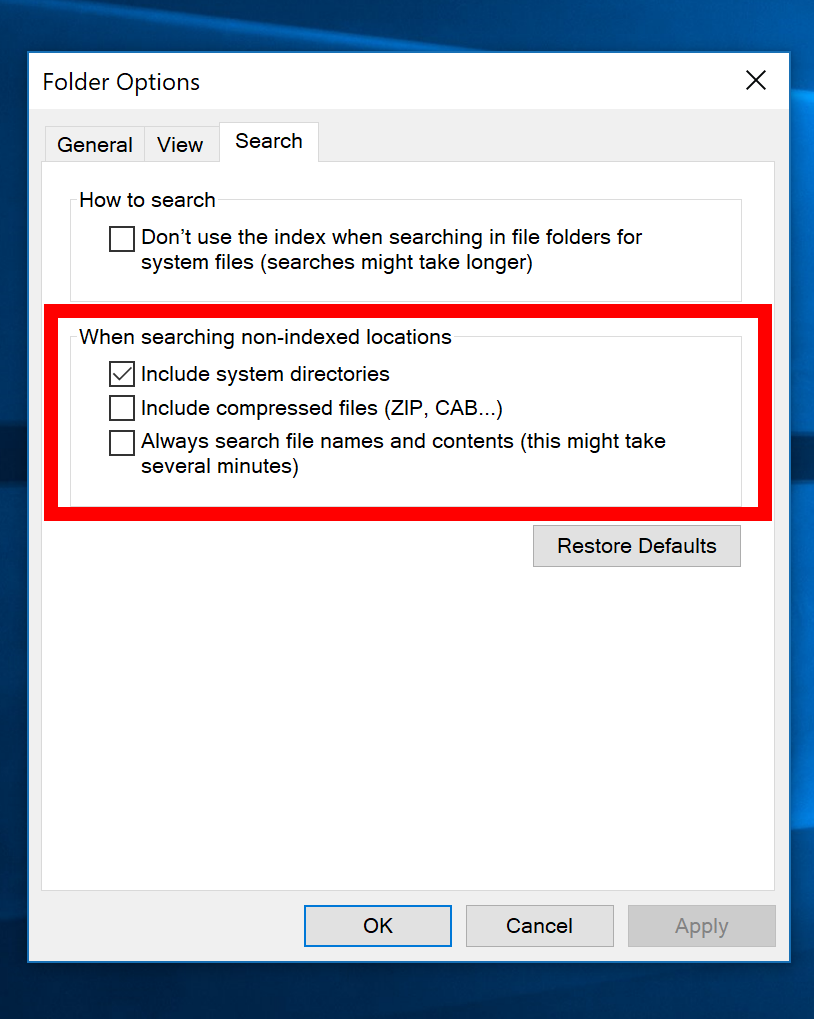
The other option you get from the Search tab is what you want to be included in search results for non-indexed locations. By default, only the one option of Include system directories is turned on, but you can also choose to include zip files and other things alike if you prefer. Some people download a lot of stuff, so including zip files would create a mess, but for other people who don’t download a lot, this could be a good option to turn on.
Windows 10 has had a lot of thought gone into it and the settings that it offers its users by default are subsequently pretty good. That shouldn’t stop you from checking out what they are and changing some of them if you think you can personally be better off with a different combination of settings. The Folder Options in File Explorer is one of those places in Windows that offers a variety of settings that can be tweaked to suit an individual better. You just need to take a few minutes to have a read and adjust them accordingly. The Folder Options also comes with a button that allows you to reset everything you did and bring up the default settings again, so you don’t need to remember the changes you had made if you ever want to use it the way Windows offered it out of the box again.
This article was last updated on February 19, 2020.
Related Tutorials

