Last Updated on May 13, 2023 by Mathew Diekhake
If you have had the displeasure of trying to install an application on your Android and it would not run without root permissions, then you would have a slight idea what people without root access are missing out on during their day to day existence. That one app that you tried to install and just wouldn’t work is just one of thousands of excellent apps that would otherwise be available to you to run if you were a root user.
There are often a few ways to get root access on a mobile device, and it doesn’t matter which way you prefer because they all lead to the same thing which is you having the ability to install all of the apps that require root access. No one working rooting method enabled more apps than the other. The reason for that is because when you root the device, you are opening up the operating system so that apps can get access to the root of the system which is the thing that many apps need.
Usually, the root apps that need root access are powerful apps that can do amazing things like change the design, add more features, give your device a total automation experience and even modify the sounds that you hear coming from the headphones when they are connected to your mobile device. There is no way that these apps could do what is being asked of them with the standard level of permissions that Android gives each app when you first open a device out of the box.
Notes:
Chainfire was running on the MMB29M.A500KKTU1CPH2 firmware build number when he made the CF-Auto-Root tool found in this guide, but it does not mean you need to be running the same firmware as him. You can be running on any firmware as long as it is part of the Android 6.0.1 Marshmallow software updates then this guide should work for you.
We create our rooting guides based on versions of Android because sometimes new Android versions can bring new bootloaders with them and when that happens the rooting files can need updating before they work again. If you find that your device is not booting after flashing the rooting file or the flashing is not working then you need to let Chainfire know about it by leaving a message on the CF-Auto-Root thread made at the XDA-Developers website. Chainfire will see the messages you leave. He asks for you to link the recovery image file from the firmware you are running on your post on the forum because he uses it to update the file so that it starts working again.
Download Samsung Galaxy A5 SM-A500K CF-Auto-Root and Drivers
- Download the CF-Auto-Root tool for the Samsung Galaxy A5 SM-A500K running on Android 6.0.1 Marshmallow software updates.
- Download the Samsung USB Drivers for the Windows operating system on the computer.
Rooting the Samsung Galaxy A5 SM-A500K on Android 6.0.1 Marshmallow Using CF-Auto-Root
1. Unlock the Developer Options menu on the Samsung Galaxy A5 smartphone so you can use the USB Debugging Mode options located inside.
2. Turn on the USB Debugging Mode from the Developer Options menu so the Android software will allow for you to make changes to it during the rooting process.
3. Run the Samsung USB Drivers on the computer so when you do connect the Samsung Galaxy A5 smartphone to the computer with the USB cable the Odin flashing tool can detect your device and then allow for the flashing.
4. Extract the rooting file to the Downloads folder on the computer so you can use the rooting file and the Odin flashing tool becomes available.
5. Open the Downloads folder where you just extracted the rooting package and then click to open the Odin flashing tool executable file and the flashing tool user interface opens on the computer.
6. Boot the Samsung Galaxy A5 SM-A500K smartphone into the Download Mode and then connect it to the computer with the USB cable.
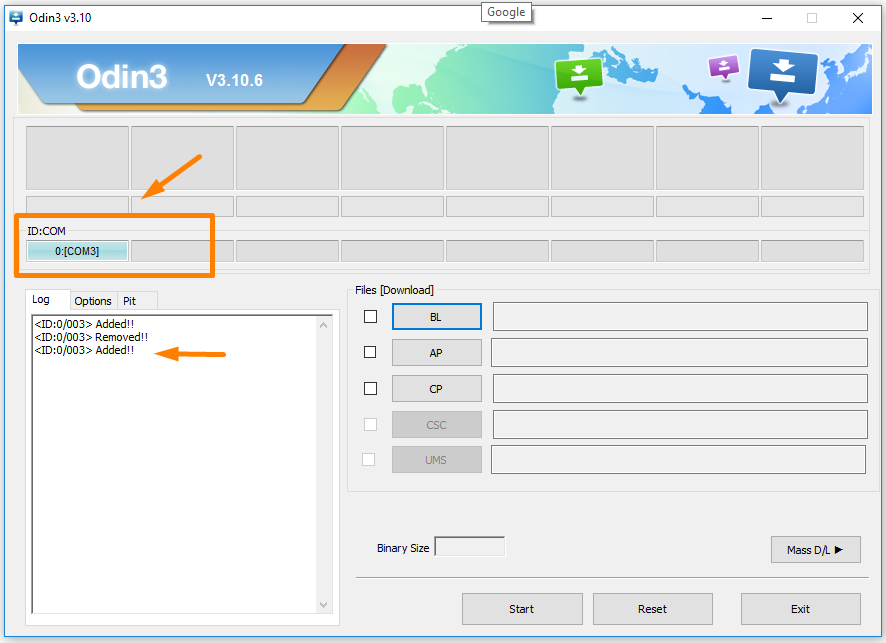
7. Check that the ID: COM port is blue or yellow and that you can see the added message available from the log so that you know your Samsung USB Drivers are working at the Samsung Galaxy A5 smartphone is connected correctly.
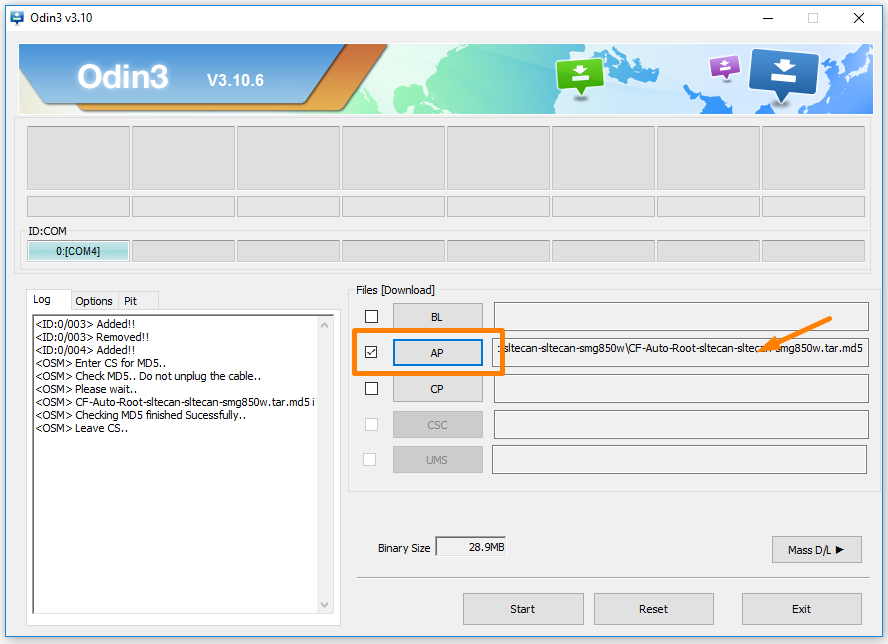
8. Click on the AP button and then browse through to the Downloads folder and find the Md5 rooting file that you extracted earlier. (Note that your file extension will look different from the example).
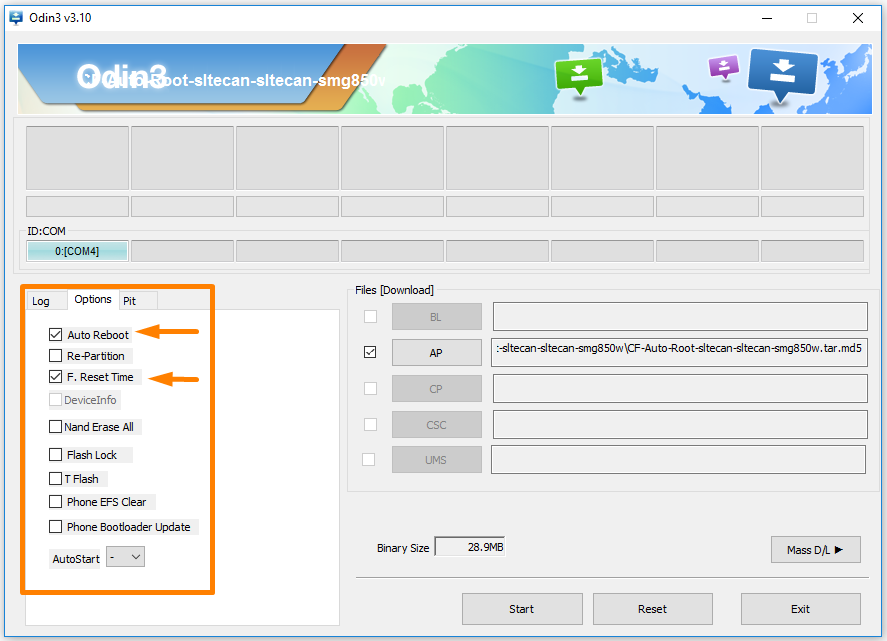
9. Click on the Options tab and then check that the settings in your Odin are the same as the settings in the screenshot below. You should see the Auto Reboot and the F. Reset Time boxes checked, and everything else left empty.
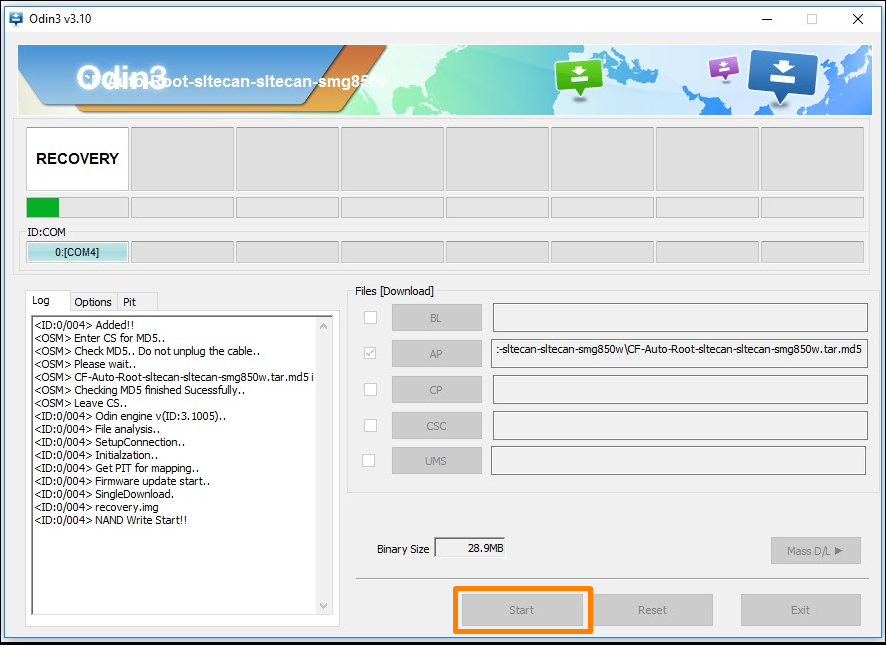
10. Click on the Start button and the rooting begins. It’s typical to see the box change between Cache and Recovery because it is getting a new and modified cache and recovery installed when is what allows for the SuperSU to be installed and enabled.
11. The Samsung Galaxy A5 smartphone is now going to reboot when you get a reset message appearing in the box.
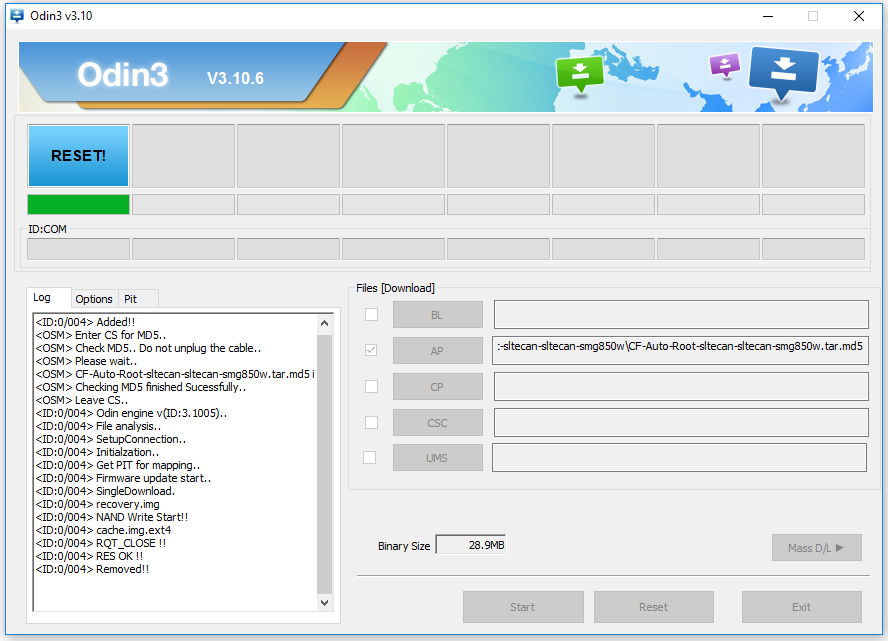
12. It then changes to a pass message with a green box when the rooting is complete, and the smartphone has reset.
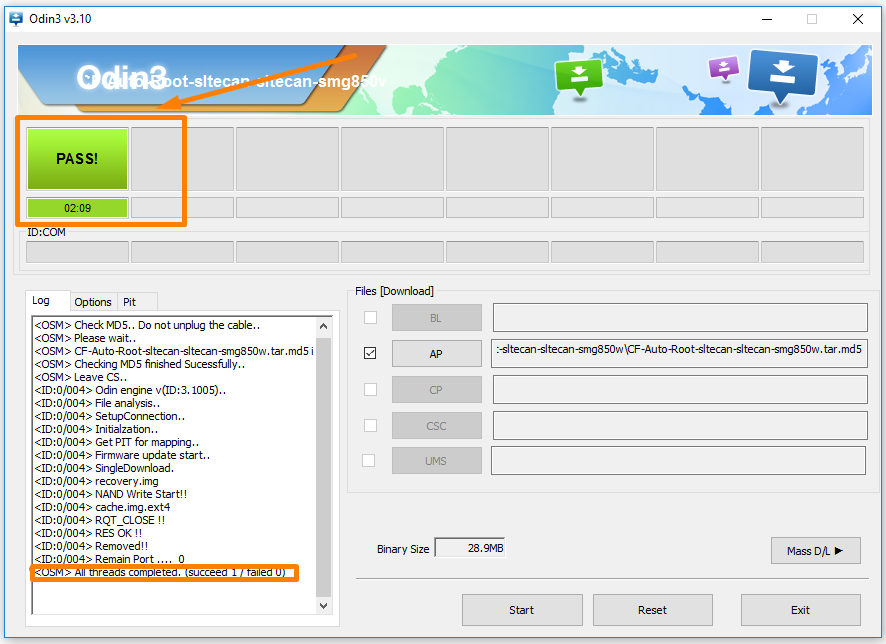
In conclusion, that is how to root the Samsung Galaxy A5 SM-A500K smartphone running on the Android 6.0.1 Marshmallow software updates by using the CF-Auto-Root one-click rooting tool developed by Chainfire.
You now have a few options at your helm from this point forth. First, we always recommend installing the root checker application from your Google Play Store so that you can check that your root status is correct before you attempt to start installing any of the root apps.
If you need to troubleshoot your version of the CF-Auto-Root tool you can let Chainfire know that the tool isn’t working the way it should by leaving a message on the CF-Auto-Root tool thread that is available from the XDA-Developers web forum. Otherwise, you might want to try installing one of the other versions of the Odin flashing application on the computer and then follow the same guide using the same file and see if it works. Sometimes all it takes is a different version of the flashing tool and then suddenly it decides to flash the way it should. There is no version of the Odin flashing tool that is not suitable for your device—or any other device for that matter. A general rule of thumb is to use one of the latest versions because it has been updated to work for more devices, but sometimes the latest isn’t the most popular and using one of the older versions is the one that works for a device through reasons out of anyone’s calculations.
Those of you who are interested in further reading can check out all the things that can be done with a rooted Android operating system, and apply the same rules for the Samsung Galaxy A5 smartphone.
Once you know what it is that you want to do with your Samsung Galaxy A5 smartphone with root access, you can work out what applications are available to help you do those things. There are a significant amount of root applications that can help you get the jobs done that you want to be done. You just need to find out what they are first so you can install them. Our article that goes through an extensive list of what we think are many of the best root applications for you to install helps you with that. You can find the download links for the applications available from the same page also.
Related Tutorials
- How to Root Nexus 5 on Android 6.0 Marshmallow Developer Preview 3 (MPA44G)
- How to Root Nexus 9 on Android 6.0 Marshmallow Developer Preview 3 (MPA44G)
- How to Root Nexus 6 on Android M MPZ79M (Developer Preview 2)
- How to Root Nexus 6 on Android M Developer Preview with SuperSU and Despair Kernel
- How to Root Android N Developer Preview on Nexus Devices
- How to Root Google Nexus 6 on Android 6.0.1 MMB29X Marshmallow
- How to Root Google Nexus 6P on Android 7.1
- How to Root LG Nexus 5 on Android 6.0 Marshmallow
- How to Root LG Nexus 4 on Android 6.0 Marshmallow
- How to Root Google Nexus 5X with Encryption Disabled
