Last Updated on May 13, 2023 by Mathew Diekhake
If you want to have full control over what is installed and uninstalled on the Samsung Galaxy A5 smartphone, then you need to work out how to become the root user on the device. Being the root user is referring to gaining control over the root user account which is the person who is the administrator. When we use a computer that runs Windows the person who creates an account and sets up the computer is given the administrator account. However, when we buy a phone or tablet that runs Android nobody is is control of that administrators account until they decide to follow a guide that teaches them how to root the device like we have here.
Our mobile devices are great because there are millions of apps that we can install on them. If you browse the Google Play Store or just online for long enough, you will inevitably come across some apps that you can download but will not run without root access. These are the root apps that you need to have root access on the device before they work.
One of the root applications that you can install as soon as you complete the steps below is the Root Firewall. If you are trying to save money and have a knack for using up too much cellular data on the mobile device, the Root Firewall is an excellent way to try to change all of that. You might think that other people using up your data are the main issue with data disappearing, but in fact, the apps that you have installed on the device can steal it too—and behind your back without you even realizing. By installing and running the Root Firewall app, you can limit what apps are allowed to use the data and so forth.
Notes:
- Chainfire was running on the MMB29M.A500HXXU1CPH2 firmware build number when he developed the version of the rooting tool that is available in this article. It doesn’t mean you need to be running on the same firmware version as him. All it means is that you can use that information as an indicator if you need it in the future. The guide should work for all versions of the Android 6.0.1 Marshmallow updates regardless of the firmware build number because there are a lot of them. All you need to do is make sure you are running Android 6.0.1, and you have the right model number.
- The rooting file should continue to work for all of the Android 6.0.1 Marshmallow updates because the main times when the rooting file is prone to temporarily going down is when a new version of Android brings a new bootloader with it. Still, if you have tried the rooting guide and your device is not booting or not flashing then you need to let Chainfire know because those are two things that happen when a new bootloader is present, and the rooting file needs updating. You need to leave a message with the recovery image from the firmware version you are running in a new post on the CF-Auto-Root tool thread made at the XDA-Developers website.
Download Samsung Galaxy A5 SM-A500H CF-Auto-Root and Drivers
- Download the CF-Auto-Root tool for the Samsung Galaxy A5 SM-A500H smartphone running on Android 6.0.1 Marshmallow software updates.
- Download the Samsung USB Drivers for the computer this running on a version of the Windows operating system.
How to Root Samsung Galaxy A5 SM-A500H on Android 6.0.1 Marshmallow Software Updates Using CF-Auto-Root
1. Unlock the Developer Options menu on the Samsung Galaxy A5 smartphone so you can turn on the USB Debugging Mode that is available on the menu.
2. Enable the USB Debugging Mode from the Developer Options menu so you can make changes to the Android software when attempting to root the device during the guide.
3. Run the Samsung USB Drivers on the computer so that the Odin flashing tool can detect your Samsung Galaxy A5 smartphone after you connect it to the computer with the USB cable.
4. Extract the CF-Auto-Root file to the Downloads folder so you can use the rooting file and also so that you can use the Odin flashing tool that is now available from the Downloads folder.
5. Click and run the Odin flashing tool executable file from the Downloads folder so that the flashing tool user interface is open.
6. Boot the Samsung Galaxy A5 SM-A500H smartphone into the Download Mode and then connect it to the computer with the USB cable.
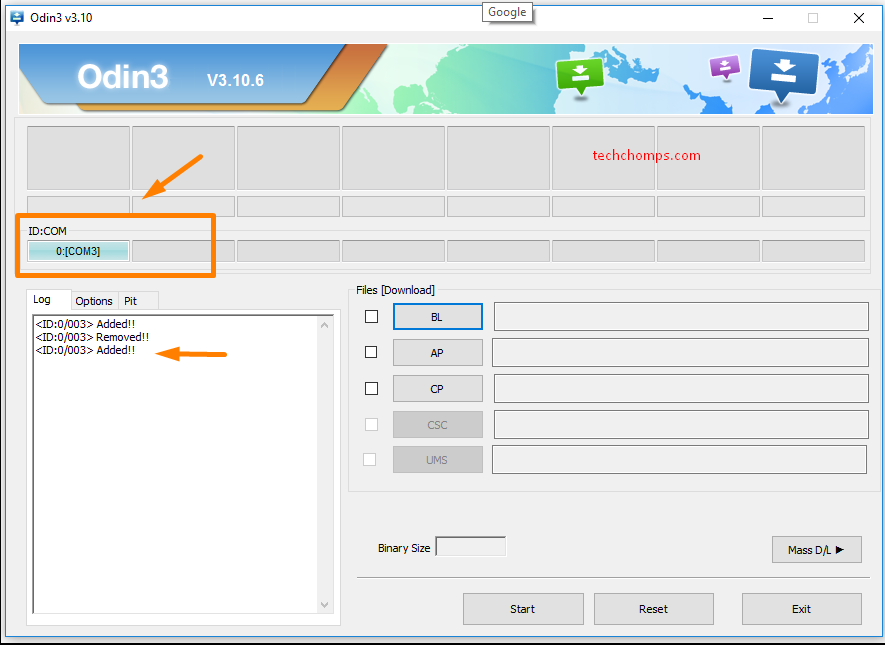
7. Doing so should result in the blue or yellow ID; COM port lighting up and the added message appearing from the Log entry. (Keep your eyes on that Log entry if you are interested to learn what is happening because it is going to continue showing you everything that is going on during the rooting phases. The smartphone display also has valuable text rolling down the screen after you begin the rooting).
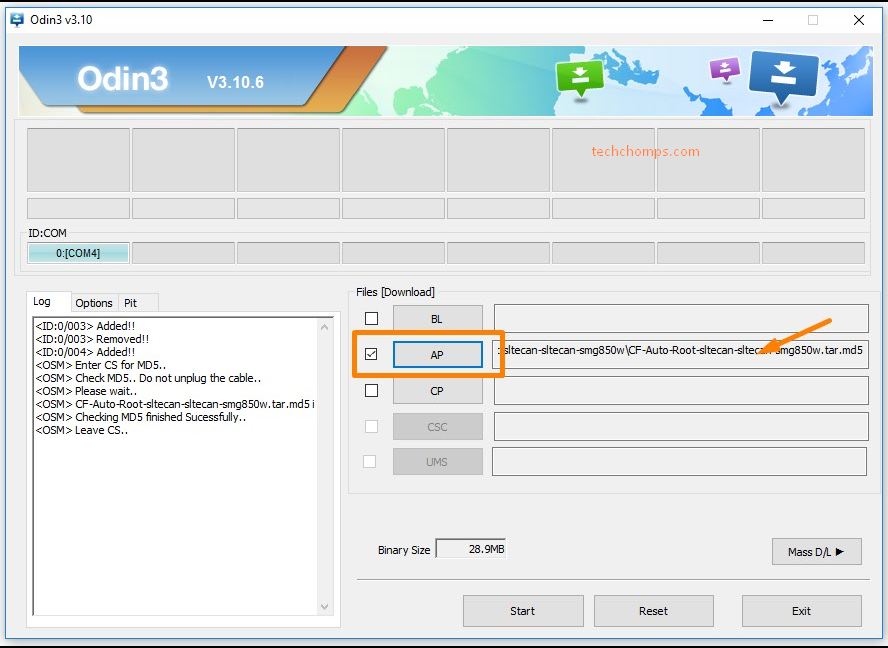
8. Click on the AP button that all of the latest versions of Odin have and then browse through to the Downloads folder where the rooting file is and select the MD5 file to upload to this location in the Odin flashing tool.
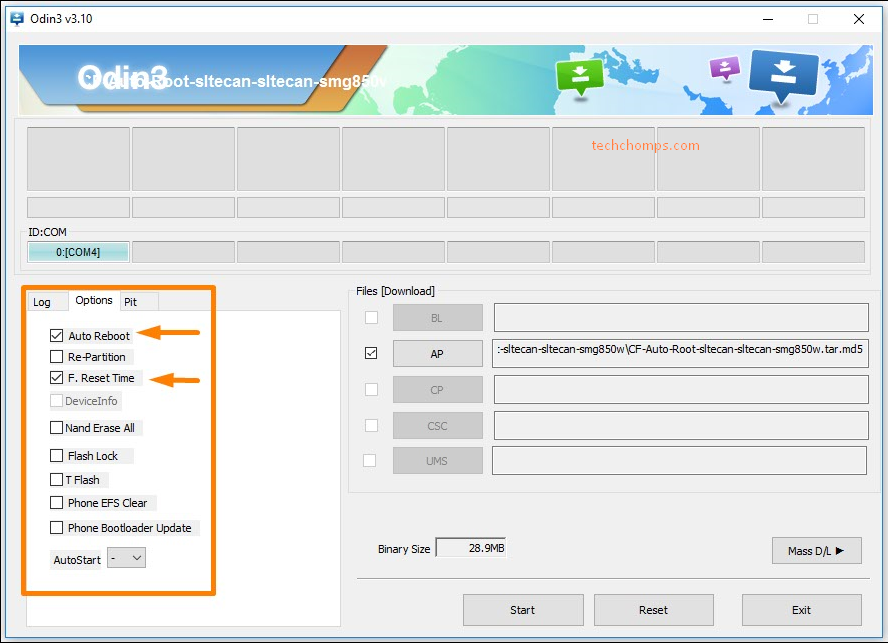
9. Click the Options tab available next to the Log tab and check that you still have the same default options turned on and off including the Auto Reboot and F. Reset Time boxes the only one’s turned on for the rooting process.
10. Click on the Start button once you know you have Odin set with the correct default settings and the rooting then begins. It’s normal to see the box at the top show the words “cache” and “recovery” when those two things are being installed on your device. You can also read the Log entries to see what’s happening or pick up your phone and check out what Chainfire has programmed to roll down the display.
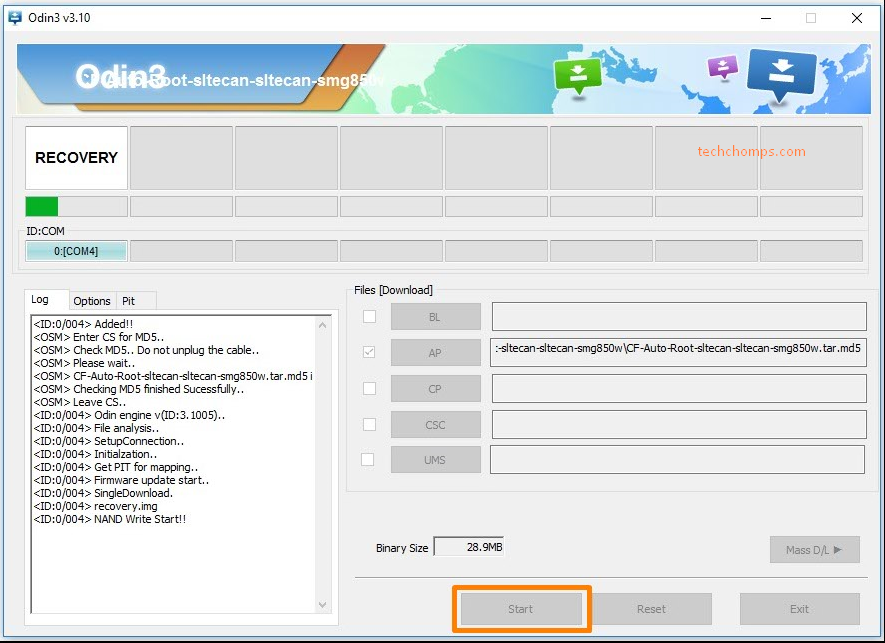
11. After the modified cache and recovery are both temporarily installed the box then changes to show “reset” just in time for when your Samsung Galaxy A5 smartphone reboots.
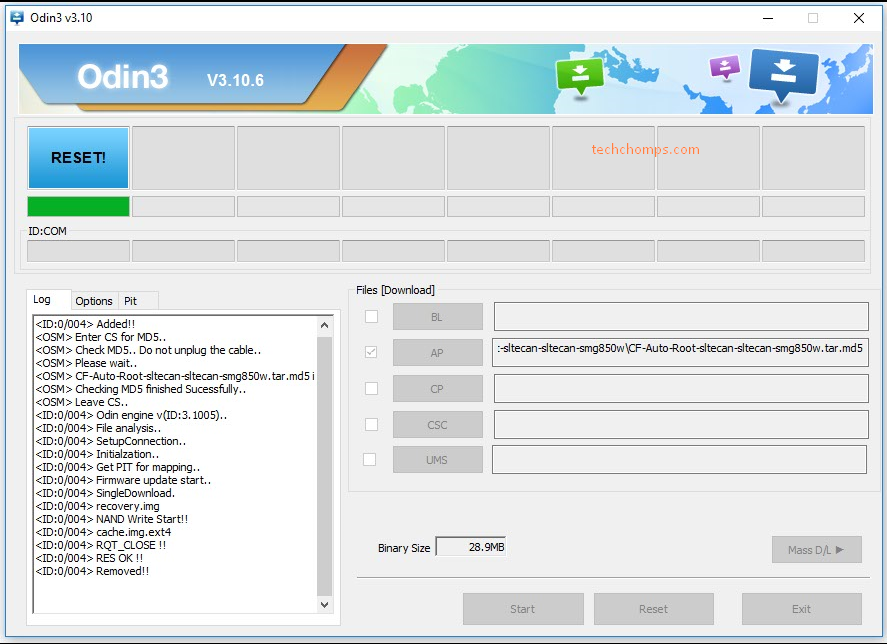
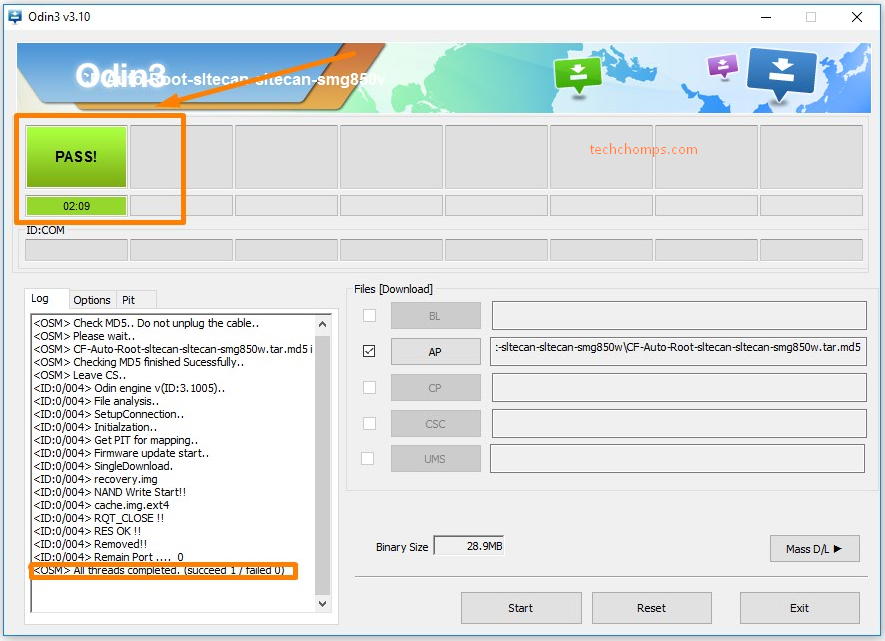
12. Once the phone reboots, the Odin box then shows the “pass” message inside a green box, and that is when you know the rooting is finished, and you can unplug from the computer.
In conclusion, that is how to root the Samsung Galaxy A5 SM-A500H running on the Android 6.0.1 Marshmallow software updates by using Chainfire’s CF-Auto-Root one-click rooting tool.
Related Tutorials
- How to Root Nexus 5 on Android 6.0 Marshmallow Developer Preview 3 (MPA44G)
- How to Root Nexus 9 on Android 6.0 Marshmallow Developer Preview 3 (MPA44G)
- How to Root Nexus 6 on Android M MPZ79M (Developer Preview 2)
- How to Root Nexus 6 on Android M Developer Preview with SuperSU and Despair Kernel
- How to Root Android N Developer Preview on Nexus Devices
- How to Root Google Nexus 6 on Android 6.0.1 MMB29X Marshmallow
- How to Root Google Nexus 6P on Android 7.1
- How to Root LG Nexus 5 on Android 6.0 Marshmallow
- How to Root LG Nexus 4 on Android 6.0 Marshmallow
- How to Root Google Nexus 5X with Encryption Disabled
