Last Updated on December 24, 2022 by Mathew Diekhake
When learning to become a Microsoft Windows technician, one of the most valuable tricks you can learn is how to boot the computer into safe mode. In safe mode, you can run an antivirus scan to remove malware from your computer; without safe mode, this is not always possible as the malware could be purposefully preventing you from being able to use the computer. The safe mode is labeled as such because no malware will be able to prevent you from booting into it, regardless of how badly the malware would like to prevent you from being able to use it. This is because safe mode is a completely separate part of the operating system compared to where your got the malware.
There are several ways you can get into safe mode. You may need to know them all just in case the malware is preventing you from using one of the ways. The most common method for getting into safe mode is by booting into it rather than getting access to it with the operating system already booted up, but you can boot into it with the operating system already loaded as well if you should so desire.
The following tutorial demonstrates how to get Windows Vista into safe mode so you can go about removing the malware from your computer.
Method One: How to Get Windows Vista Into Safe Mode Via Advanced Boot Options Menu
If you have malware on your computer and it is not allowing your computer to load the operating system at all without it causing your computer problems, you will need to get access to safe mode via the Advanced Boot Options menu. This is the methods computer technicians use to fix your computers when you cannot get them to load; Advanced Boot Options will always load regardless of what malware you have on your computer because it’s a separate part of the PC that the malware cannot access.
Most Valuable Method
1. Boot the computer into the Advanced Boot Options menu by restarting the computer and pressing F8 key continually until you get to the Advanced Boot Options menu.
Notes:
- If the Windows logo appears that means the operating system is officially loading already and you will need to reboot the computer and try again. The Advanced Boot Options will load always before the operating system itself. Be sure to be pressing the F8 key before the OS loads and closer to the very beginning of the reboot.
- If you boot more than one operating system (aka, if you dual boot the computer), when you get to the the Windows Boot Manager screen, first select the operating system you plan on loading and then begin pressing the F8 key before it does load.
2. Using the arrow keys, select either Safe Mode, Safe Mode with networking, or Safe Mode with command prompt, and then press the Enter key on your keyboard.
Note: While the term “safe mode” is one the you always hear, you probably want to select Safe Mode with Networking instead as it will mean you get access to your internet connection as well. The internet connection is going to allow you to “Google” your problems so you can solve them. In particular, you may need to learn how to get access to your antivirus software and run an antivirus scan if you do not know already. This is what is likely going to solve your malware problems. On the other hand, if it is not a malware problem, you may want to get access to the command line by selecting Safe Mode with command prompt instead.
3. Once you are finished with your tasks in safe mode, restart your computer to get it booting back up in its normal mode.
Method Two: How to Get Windows Vista Into Safe Mode Via Through System Configuration (msconfig)
If you are able to still use the computer and you want to conveniently boot it into safe mode, you can do that by using msconfig which opens up the System Configuration settings. Here you can select how you want the computer to boot, which means you can get safe mode to boot without having to try to perfectly time your F8 pressing before the operating system loads. This method via msconfig is the most convenient way of getting the PC to boot into safe mode. Note that you will have to select “Network” from the checkboxes in the System Configuration menu if you want the computer to boot with safe mode with networking aka if you want to use an internet connection when you are in safe mode.
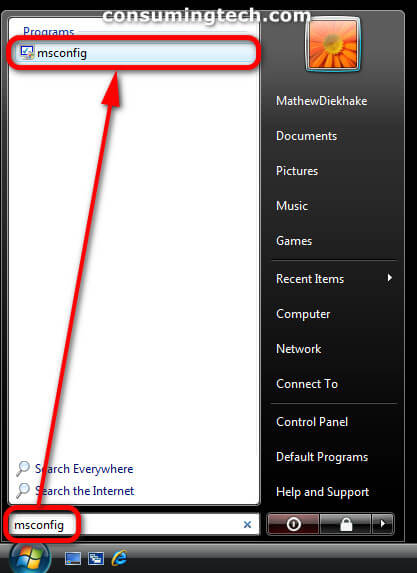
1. Click on the Start button, type msconfig into the available search field at the bottom of the Start menu, and then click on msconfig under the list of Programs. (Click to enlarge the screenshot below.)
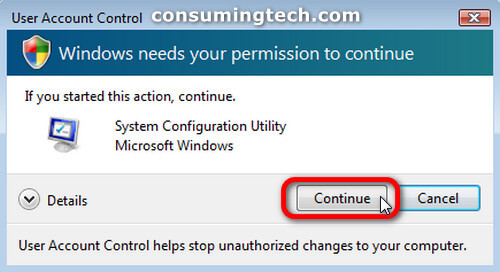
2. If you are prompted by User Account Control with regards to the System Configuration Utility, click on the Continue button. (Click to enlarge the screenshot below.)
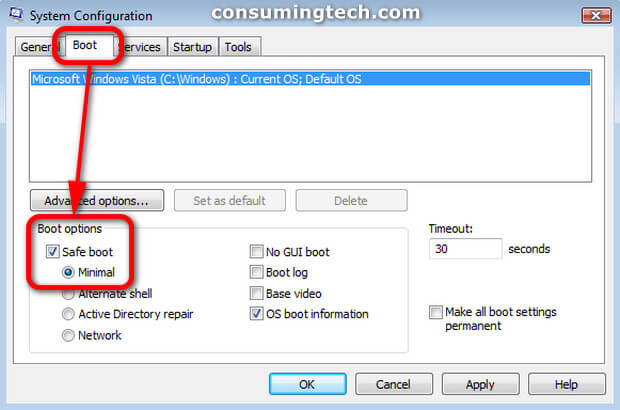
3. From the System Configuration settings window, click on the Boot tab, and then under the Boot options heading, check the box for Safe boot (which is your safe mode), and click on the Ok button to save the changes. (Click to enlarge the screenshot below.)
Note: In addition to selecting Safe boot, you need to choose the kind of boot you want along with it. Keep in mind that though the wording is different, Safe boot is just different terminology for safe mode; likewise, the other options such as networking is meaning it will boot you into safe mode with networking.
Important
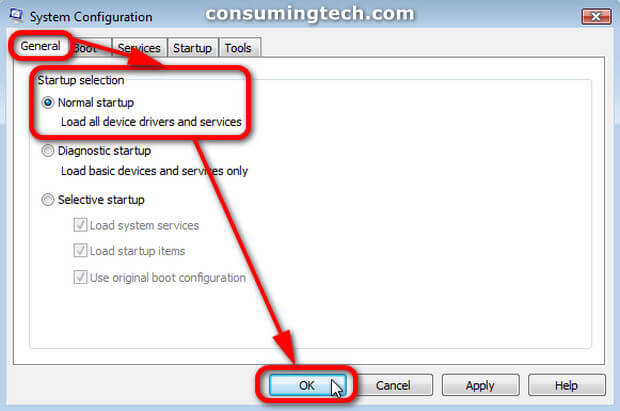
If you do use this method via System Configuration to get into safe mode, you will also need to open the same System Configuration settings to change the settings back to normal mode when you are done otherwise it will continue to boot into safe mode. In other words, the changes you make here will stay until you change them accordingly once again. Thankfully, it is not difficult to get access to the System Configuration settings, nor is it difficult to switch between safe and normal modes. here is how you can get it back into the normal mode once you are done with safe mode:
4. From the General tab, select the checkbox for Normal startup under the Startup selection heading, and then click on the OK button at the bottom of the System Configuration window to save all of your changes and get the computer to boot into the safe mode you desire. (Click to enlarge the screenshot below.)
Method Three: How to Get Windows Vista Into Safe Mode Via Using BCDEDIT Command in a Command Prompt
You can also use the BCDEDIT command from the command line with administrative permissions if you like. Note that this method only works if you are using the elevated command prompt window, aka the command prompt with admin permissions.
1. Open the elevated command prompt window. This tutorial shows you all the different ways in which you can open the elevated command
prompt in Windows Vista: How to Open Elevated Command Prompt in Windows Vista
2. In the command prompt window via the available command line, type the following command and then press the Enter key to execute it:
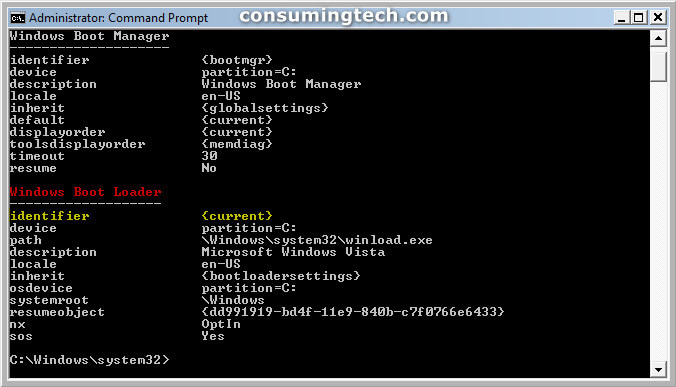
bcdedit
3. Under the Windows Boot Loader heading, note the identifier (in the screenshot example below it is {current}).
4. Do steps, 5 or 6 depending on what version of safe mode you are looking to run.
5. In the next available command line, type the following command: (Click to enlarge the screenshot below.)
bcdedit /set {identifier} safeboot minimal
Note: Be sure to change where it says identifier for the name of the actual identifier that was listed when you ran the previous BCDEDIT command. In our example, this would mean you change it to current, like so:
bcdedit /set {current} safeboot minimal
6. In the next available command line, type the following command:
bcdedit /set {identifier} safeboot network
Note: Be sure to change where it says identifier for the name of the actual identifier that was listed when you ran the previous BCDEDIT command. In our example, this would mean you change it to current, like so:
bcdedit /set {current} safeboot network
Important
Like with the System Configuration settings in method two, you will need to change it back to normal mode yourself when using this method otherwise the computer will continue to boot into safe mode. In this instance, this means opening the elevated command prompt once again, and running another command. Here is the command you will need:
7. In the next available command line, type the following command:
bcdedit /deletevalue {identifier} safeboot
Note: Be sure to change where it says identifier for the name of the actual identifier that was listed when you ran the previous BCDEDIT command. In our example, this would mean you change it to current, like so:
bcdedit /deletevalue {current} safeboot
That’s all.
Related Tutorials
- How to Setup Event Viewer to Send Email Notifications in Windows Vista
- How to Adjust Cookie Preferences in Internet Explorer in Windows Vista
- How to Fix Cannot Delete a File or Folder Due to Corrupt Recycling Bin
- How to Change Menu Show Delay Time in Windows Vista
- How to Switch Windows Media Player to 64 Bit in Windows Vista
- How to Fix Program Installation Errors in Windows Vista
- How to View Boot Information at Startup in Windows Vista
- How to Troubleshoot Using Reliability and Performance Monitor in Windows Vista
- How to Change Internet Time Synchronization Update Interval in Windows Vista
- How to Change Recycle Bin Storage Size in Windows Vista

