Last Updated on December 26, 2022 by Mat Diekhake
The release of the Windows 10 operating system coincides with a time when some devices were also getting touchscreens, so you no longer had to use a mouse to navigate the operating system. Microsoft makes one of the best touchscreen computers out there with their release of the Microsoft Surface Book. The Surface Book—along with many other touchscreen devices—comes with the option to use a pen with it that you can use to draw on the screen for your art tasks.
Windows Ink is a program that comes native in versions of the Windows 10 operating system to help that pen of yours get to work. There are a few things in Windows 10 that people commonly use with Windows Ink Workspace. Most notably is the new Sticky Notes app that people can use for creating notes and reminders using Cortana. A couple of other popular choices are the Sketchpad or Screen sketch apps that allow people to doodle over plain canvases or screenshots from things that appeared on the operating system.
If you own a Microsoft Surface Book, you have probably seen the Windows Ink Workspace window open on the computer before by accident because the icon is already available there in the taskbar. However, other devices are running on Windows 10 Home that do not come with the Windows Ink Workspace icon available from the taskbar, and thus many of those people have no idea what it even is that we are talking about.
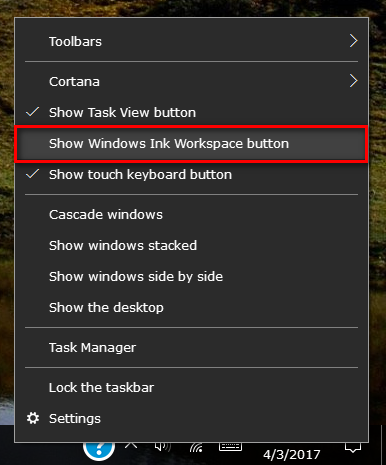
To get things started, you need to turn on the Windows Ink Workspace, so there is an icon appearing in the taskbar if that is not the case on your computer already. To do that, just right-click on the taskbar and then click on the mouse or the touchpad on the link that says “Show Windows Ink Workspace button” so that it now has a tick next to it.
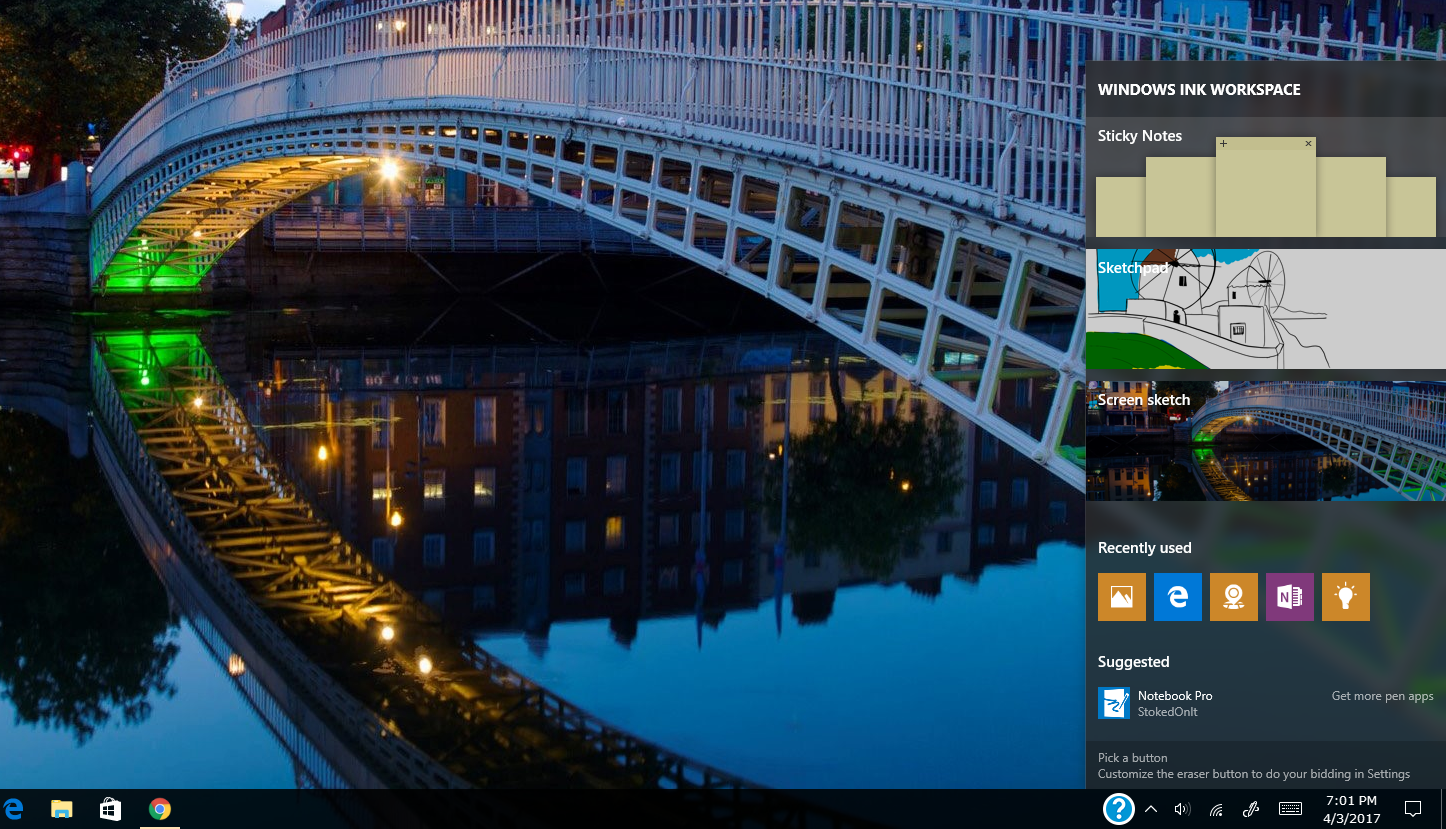
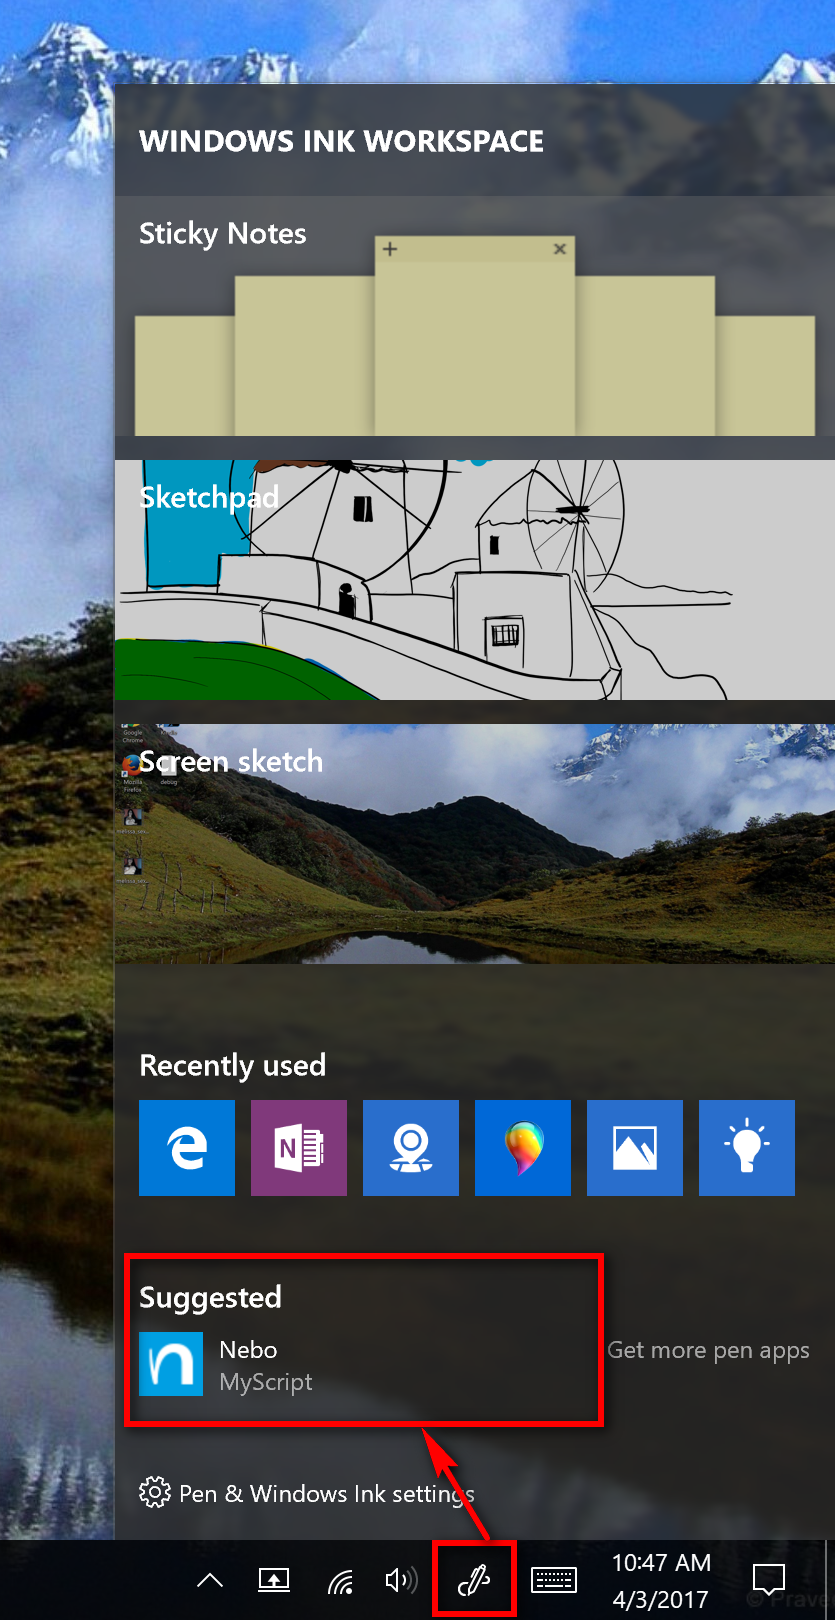
Once you have enabled the Windows Ink Workspace, you can see the icon available from the taskbar as shown in the screenshot below. It’s always there close to the middle of the system tray by default.
If you click on the icon, you then get the Windows Ink Workspace opening up from the right side pane. It gives you instant access to the three most popular apps that people use a pen for the Sticky Notes, Sketchpad and Screen sketch links.
The part that shows the advertisements in this window is down the bottom where it says “Suggested” and to the right side of it where it gives a link to the Windows Store where you can shop for other related applications for the pen. To get access to those, you need to click on the “Get more pen apps” link. Those suggested links are the links we are going to be demonstrating how you can get them away using multiple methods.
Enable or Disable Windows Ink Workspace Suggested Apps using the Settings
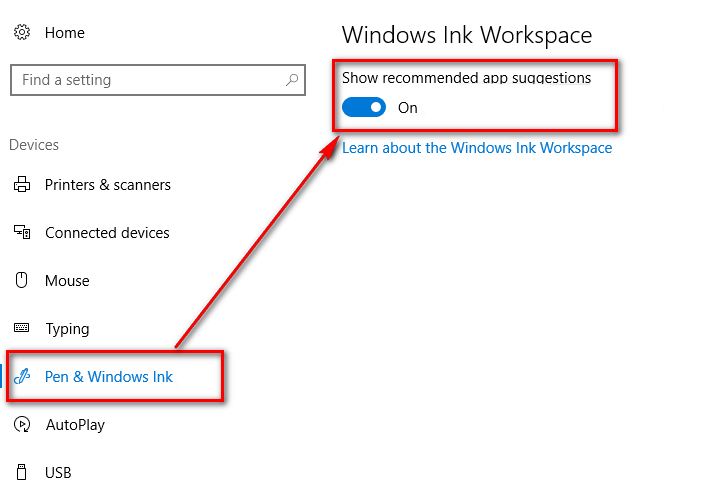
The simplest way to turn on or off the Windows Ink Workspace is from the Settings menu. To get here, you need to click on the Settings gear icon from the Start menu and then click on “Devices” and “Pen & Windows Ink” links. From there, the “Show recommendation app suggestions” toggle switch is available for you to turn on and off.
Enable or Disable Suggested Apps in Windows Ink Workspace for Current User using a REG file
If there isn’t a way you do something from the Windows 10 settings or the registry, then you might find developers out there who have created a method to get it done by using a .reg file. REG files can often change the way the features of the operating system work. All you need to do is install them and then let them work their magic.
In this particular instance, there are two types of .reg files that you can install. The first option here will enable or disable the suggested apps in the Windows Ink Workspace only for the user account that you are currently logged into. If you know that everyone who uses the computer wants the same ads gone, then you can just download the other .reg file below from the section that works for all users instead to save you the time of going around and installing this same file for every user account manually (though you can do it that way if you wish.)
Download: Enable_Windows_Ink_Workspace_app_suggestions_for_current_user.reg
Download: Disable_Windows_Ink_Workspace_app_suggestions_for_current_user.reg
Installing these .reg files is simple: just download the file and then save it to the desktop. Double-click on the file and then click on the “Run” button and press “OK” if you are prompted to approve of the merge. Doing so will make the necessary adjustments from the Windows 10 operating system.
Enable or Disable Suggested Apps in Windows Ink Workspace for All Users using a REG file
If the computer you are using that is running on a version of the Windows 10 operating system has multiple users, and none of you want to ever see the ads from the Windows Ink Workspace, then you can opt to install one of these .reg files instead.
Download: Enable_suggested_apps_in_Windows_Ink_Workspace_for_all_users.reg
Download: Disable_suggested_apps_in_Windows_Ink_Workspace_for_all_users.reg
Enable or Disable Suggested Apps in Windows Ink Workspace for All Users using Group Policy
Note: You’ll need to be using a Windows 10 Pro, Education or Enterprise edition of Windows 10 for this guide to work. You can’t make policy changes in the Local Group Policy Editor using the Windows 10 Home. You can upgrade from Windows 10 Home to Windows 10 Pro by heading to the Settings application if you want to be able to make changes to group policies.
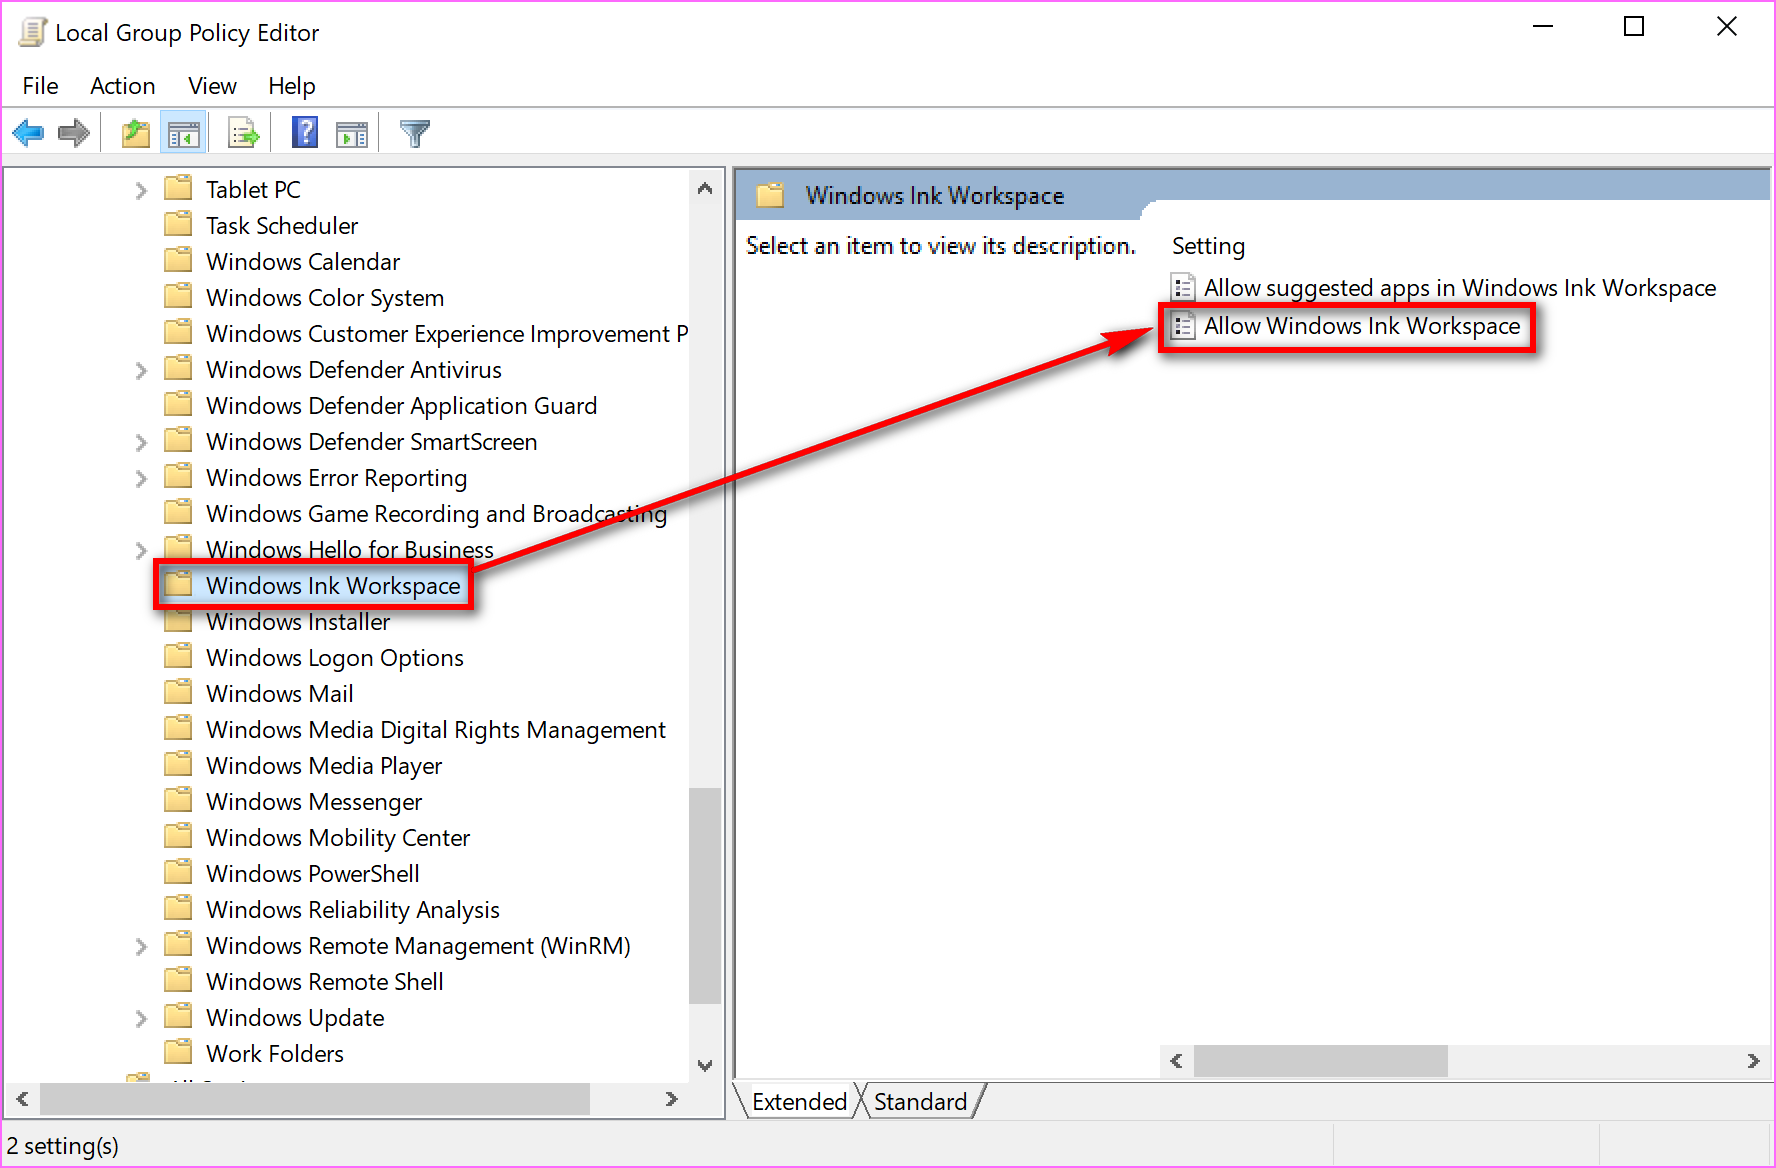
Open up the Local Group Policy Editor.
Click on the “Computer Configuration” option in the left side pane.
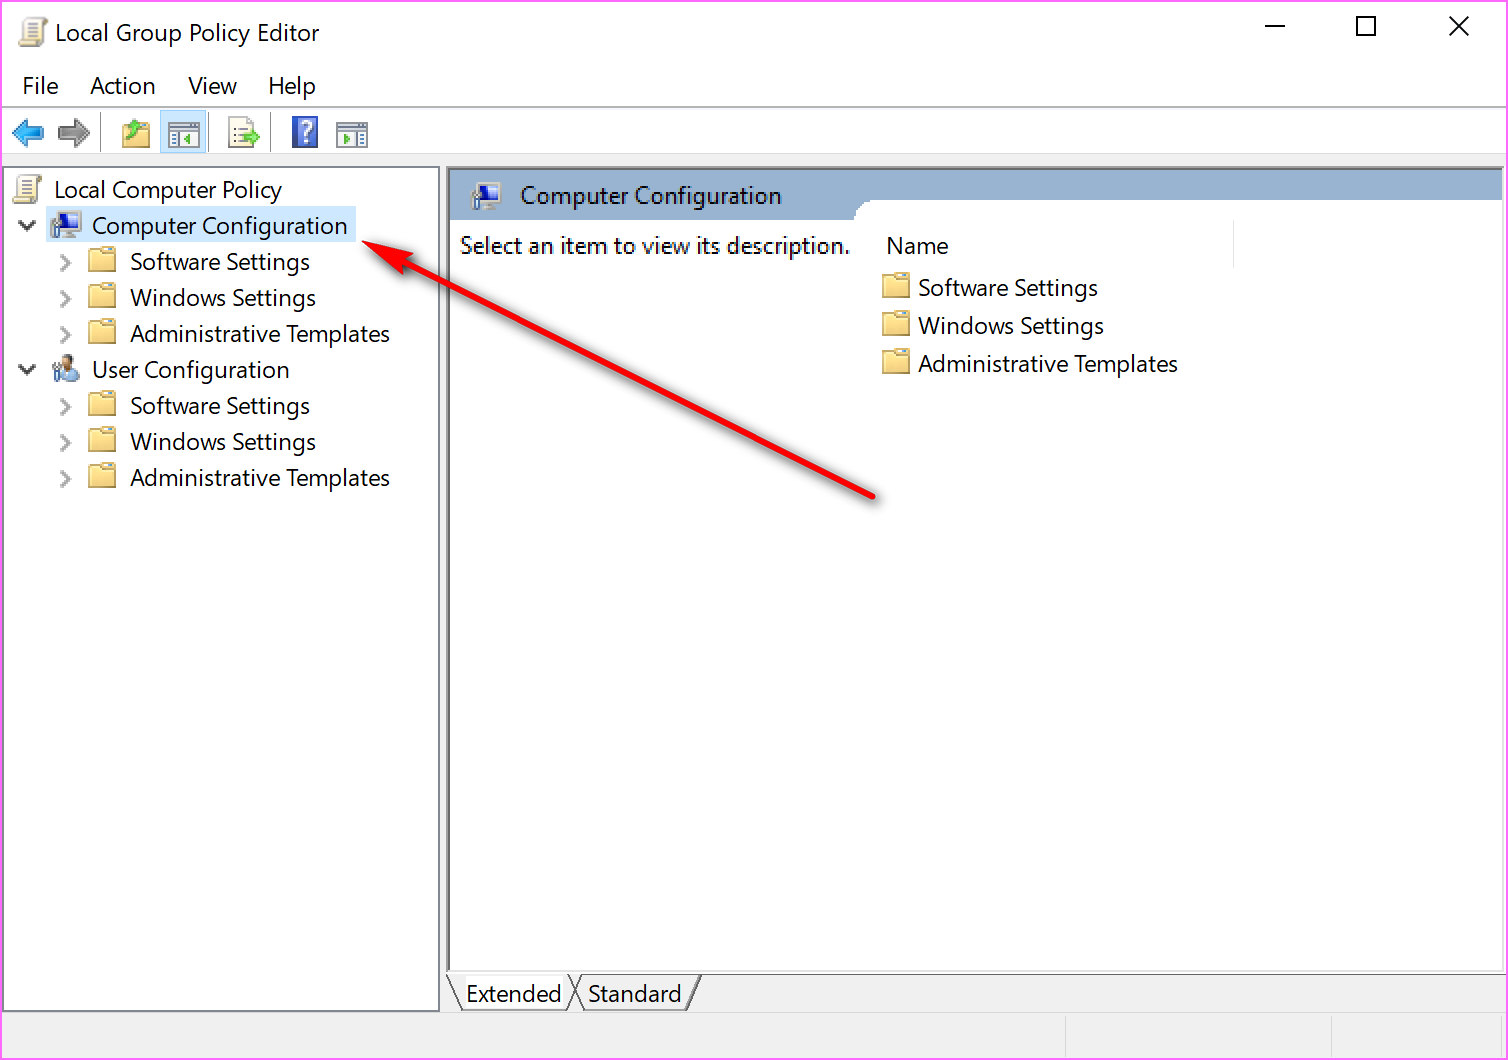 Click on the “Administrative Templates” folder to expand it.
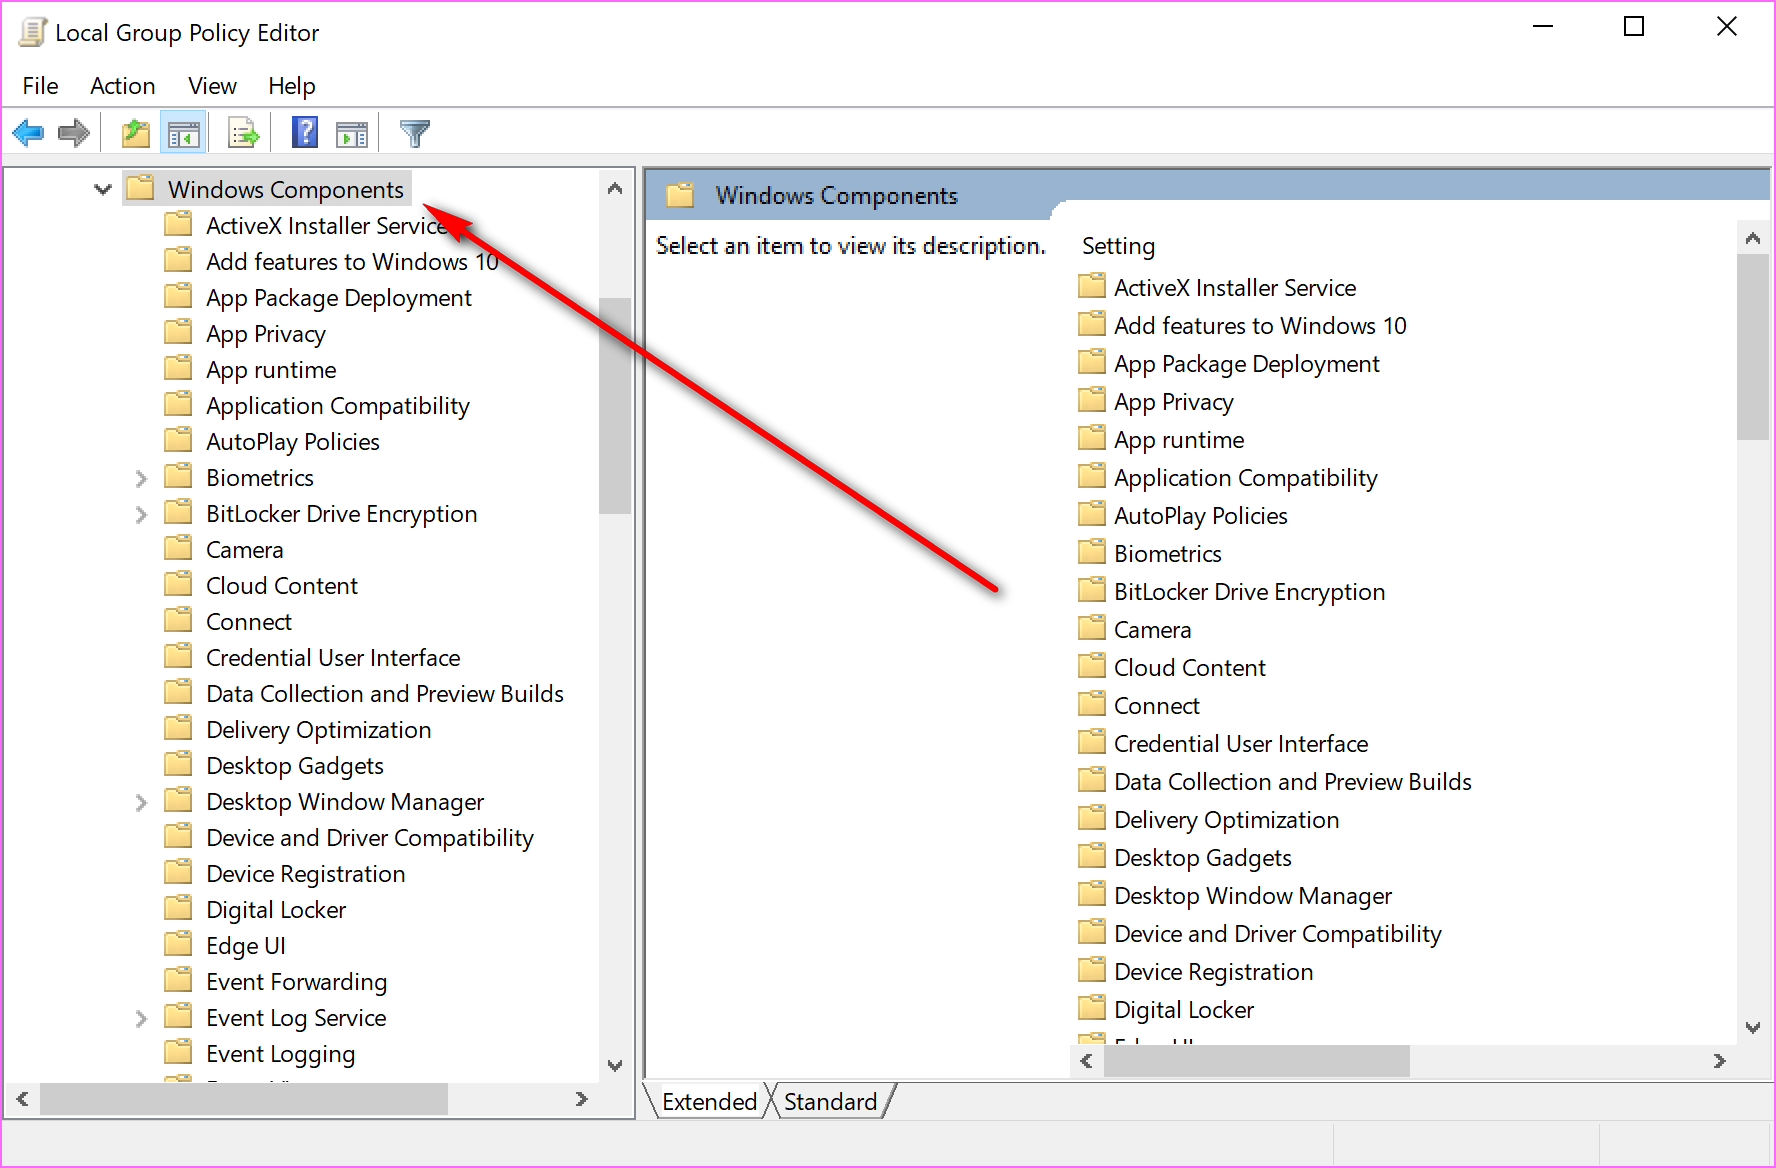
 Click on the Windows Components” folder to expand it.
Click on the “Windows Ink Workspace” folder to expand it.
Note: sometimes users are finding two entries available for the “Windows Ink Workspace” folder in the left pane. If you see two folders for this in your Local Group Policy Editor, then you need to click and open up the second one (directly beneath the top one.) The first entry does not work.
Double-click on the “Allow Windows Ink Workspace” link available in the right side pane.
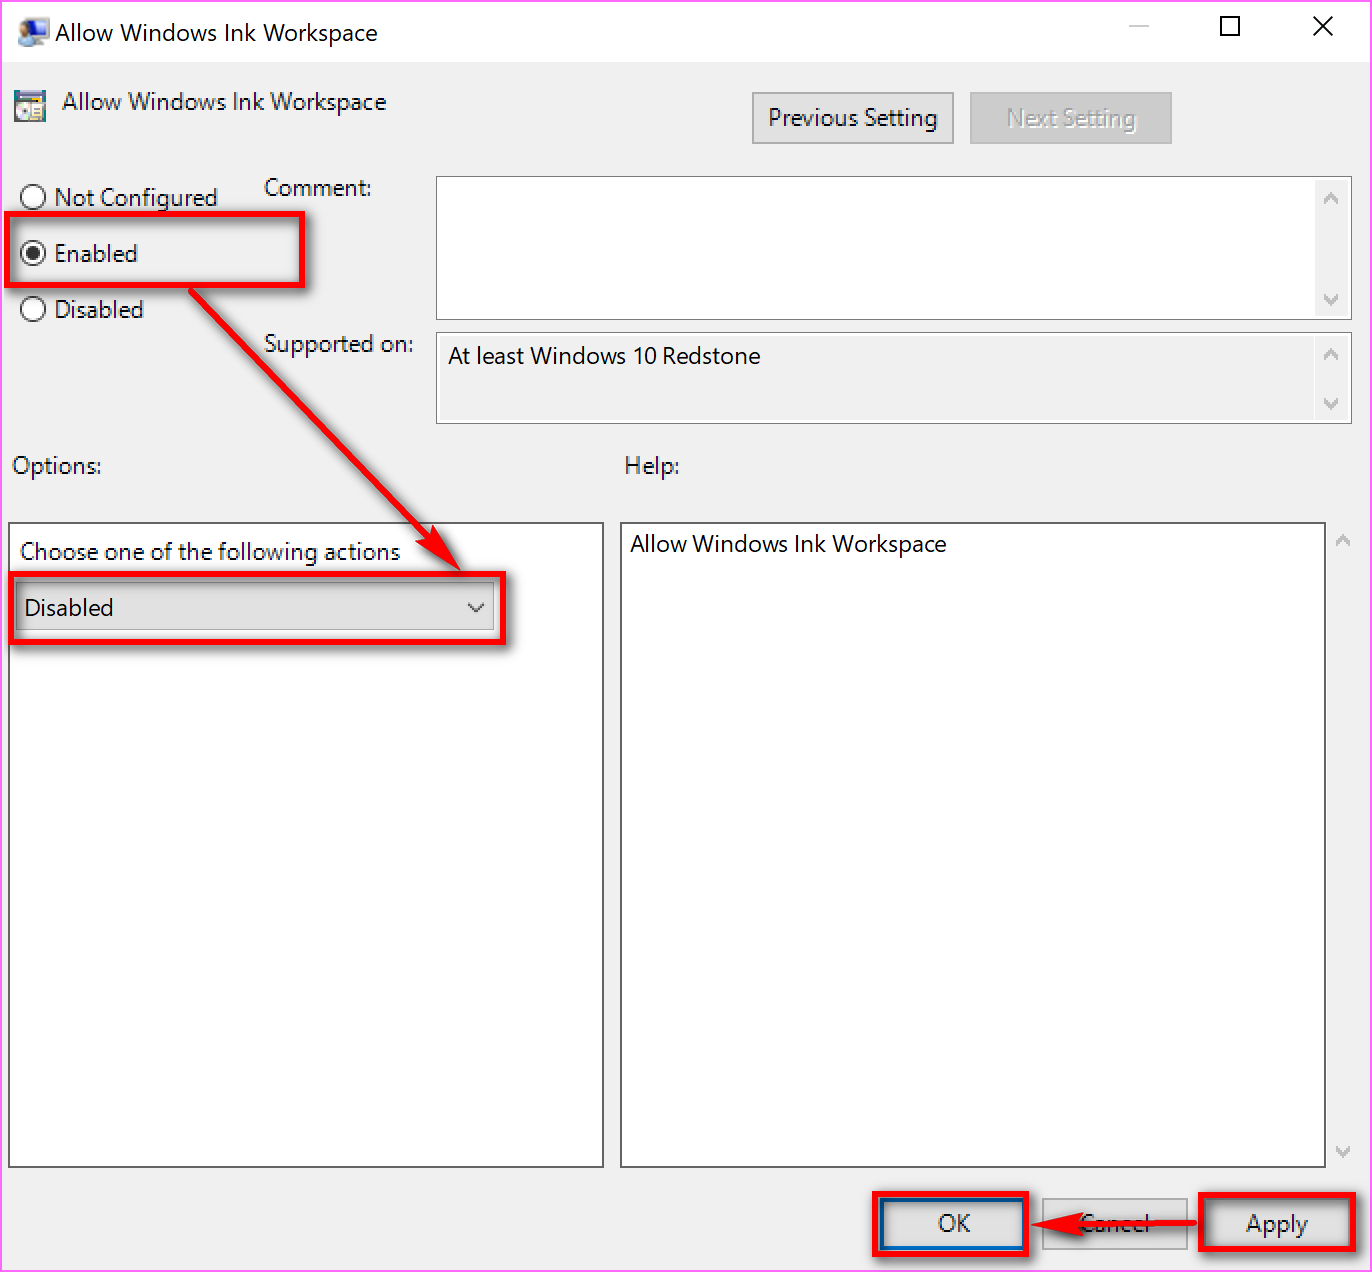
By default, you will see that the checkmark is in the “Not configured” box. You need to swap that over to the “Enabled” box. After you do that, you then need to click on the drop-down menu that is available beneath it and change the setting over to the “Disabled” option.
Click on the “Apply” button and then the “OK” button to make the changes.
You can see the icon is now looking different in the system tray now that it has been disabled. If you were to have taken it away from the system tray by turning it off before you made the change in the Local Group Policy Editor, then you wouldn’t see this icon available here at the moment. It’s there because you had it enabled. If you would like for it to be gone, then go back into the Local Group Policy Editor and change it back to the way it was before you disabled the Windows Ink and then right-click on the taskbar and click on the “Show Windows Ink Workspace” button, so there is no longer a tick next to it.
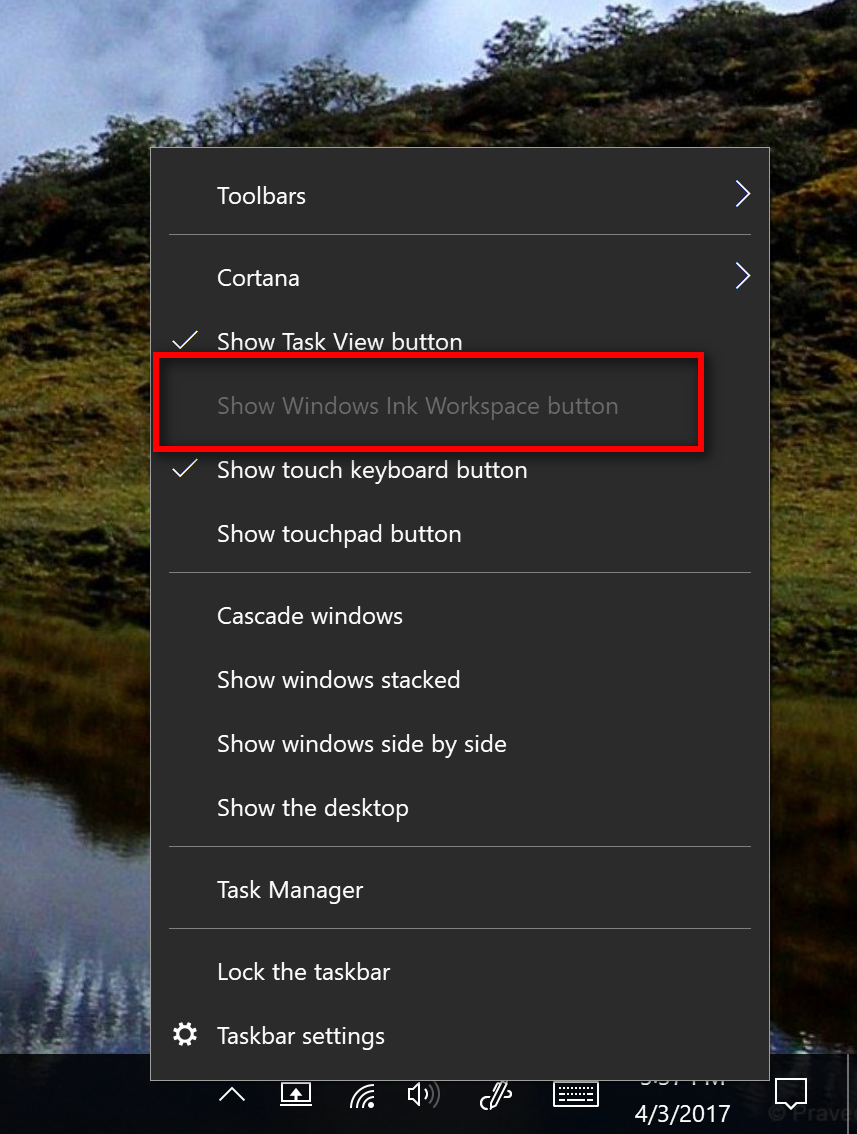
If you do right-click on the taskbar after making the change in the Local Group Policy Editor to disable the function from the “Allow Windows Workspace” dialog box, you will now see the option grayed out entirely from the menu.
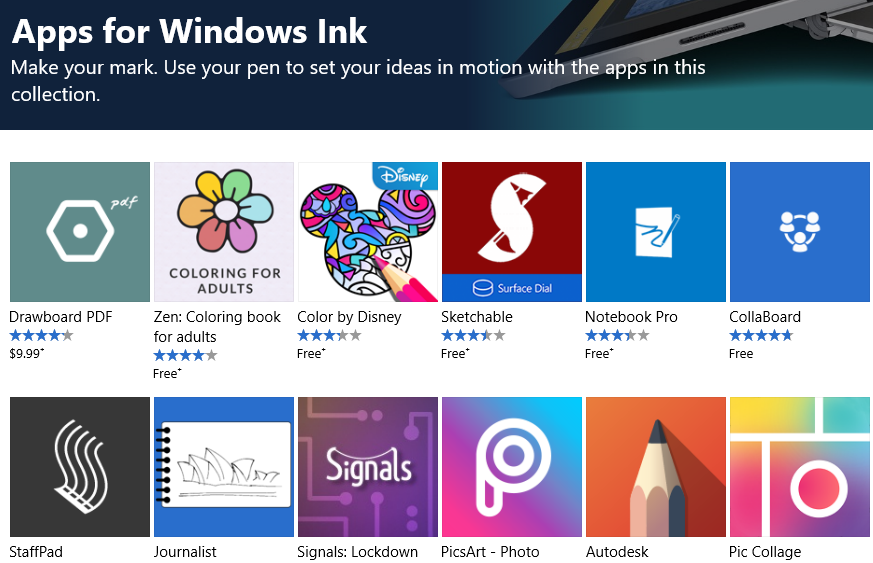
Before you disable the suggested links for the Windows Ink Workspace, you should look at these apps as more of helpful apps for your drawing instead of annoying ads that are creating Microsoft revenue. You might want to check out what other apps are available from the “Get more pen apps” link directly to the right of the suggested apps link.
If you remove the suggested ads from this page, the option to get more pen applications moves over to the position that the recommended app’s ad was originally in so you can always still click it to visit the Windows Store.
You can download tons of decent apps to help make your experience with the pen more worthwhile. It’s assumed that the apps you see here are not paid by Windows to appear via the Windows Ink Workspace pane, and these are more likely just apps that the Windows Store has deemed as appropriate choices for you to install.
The suggested Windows Ink Workspace ads can be helpful for many users to learn more about compatible applications that work with Ink Workspace in case they are not already experts in using the pen, but sometimes people prefer seeing no advertisements when possible. If you are one of those individuals who takes offense to the ads being in the Ink Workspace pane, you now know how to remove them.
You might also be interested in:
- How to Turn Off the “Suggested Apps” Ads in the Share Flyout in Windows 10
- How to Disable the Advertising Ads in Windows 10
- How to Turn Off the Windows Spotlight Ads on the Lock Screen
- How to Turn On or Off Showing the App Suggestions on the Start Menu in Windows 10
- How to Uninstall the Desktop Apps and the Windows Apps
You can subscribe to our RSS, follow us on Twitter or like our Facebook page to keep on consuming more tech.

