Last Updated on February 25, 2024 by Mat Diekhake
Most people working in the enterprise world don’t need anywhere near as much space as they would when they are back at home and with the family.
You might have someone you know (often female) who keeps running out of space because they have taken another 1,000 pictures and they need to be stored somewhere but the hard drive isn’t having anything of it because they already have 10,000 pictures and it’s maxed out, green has turned to red, alarm bells are going off: please don’t put anything else on me. This type of a problem doesn’t typically exist in the enterprise because you shouldn’t be uploading pictures very often and other storage killers like videos aren’t typically part of the job either.
When the vast majority of your data is just text and documents, then the amount of space one needs on the hard drive is far less than if it were to be pictures, music or video. This whole website you’re reading now, for example, as of today, uses up about 20 GB’s of a hard drive and I’ve got about another 28 GB’s up my sleeve before I have to start paying more money for more space.
Administrators are typically aware that most employees don’t need much space so they play it casual and just allow all the employees that they’re managing to share the hard drive space collectively as a team because they do the math and it appears as though everything should work out just fine. But then as more time passes, it turns out that a few employees decided that they would start using some of that hard drive space for movies and music and then all of a sudden that company has a big problem because now the server is crashing or people aren’t able to use any storage space because it seems to have run out for everybody.
That scenario has played out many times before and it’s the reason why Microsoft created disk quotas. The disk quotas will allow administrators to set an amount of space that the users can have in a folder on a shared network. So if that one user runs out of space, then it isn’t affecting anybody else in the company, and they still get to keep theirs. It results in a bit more fiddling around, but it’s worth it in the long run.
You can choose between setting up a hard disk quota or a soft disk quota. The hard disk quota means that if the person uses up all of their allocated space, there is nothing that can be done about it; they’ll just need to either delete some of the stuff that was already using up existing space, or take a trip to the system administrators office and inform them about the issue. The soft quota, however, will actually offer some flexibility and allow the person to continue using up more space but give them warning notifications that they are going over the expected storage amount and then hopefully they slow down.
Most administrators will offer soft limits to management and people in higher positions in the company, as to not piss them off, and then put the hard limits on the lower levels of employment so they don’t break down the server. Most of the time the people in the higher levels of employment within a company will be “switched on” enough to notice the warning notifications and act on them appropriately, while appreciating the fact that they can still upload the extra data that they need.
How to Enable or Disable Disk Quotas for Single NTFS Drive in File Explorer
You can use the File Explorer to enable and disable the disk quotas for an individual drive. You can apply the same trick to as many drives as you want, but you’ll need to enter the drive properties manually for each drive that you want.
Open the File Explorer by navigating to the Start menu > File Explorer in the Start menu’s left side pane and then click on “This PC” from the navigation pane down the left side of the File Explorer window.
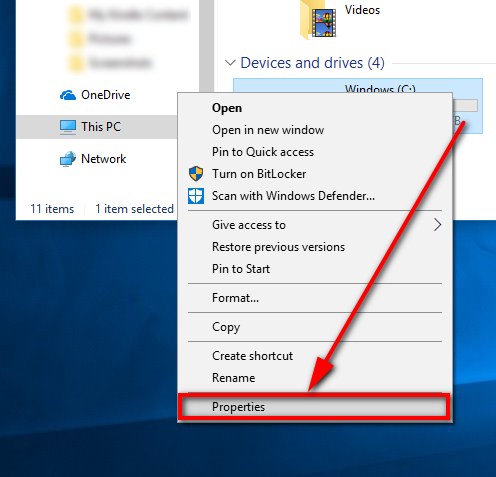
When you’ve found the drive you want disk quotas for, right-click on it and then select “Properties” from the menu to bring up the Drive Properties dialog box.
Make sure you select the “Quota” tab at the top of the dialog box and then click on the “Show Quota Settings” button.

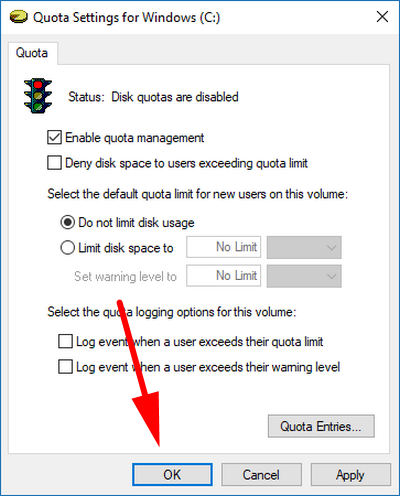
The first thing you’ll see is a traffic light giving you the disk quotas status. By default this is going to be disabled if you haven’t turned it on before, so click in the checkbox to apply the checkmark.

And then click on the “OK” button at the bottom of the window to apply the changes.
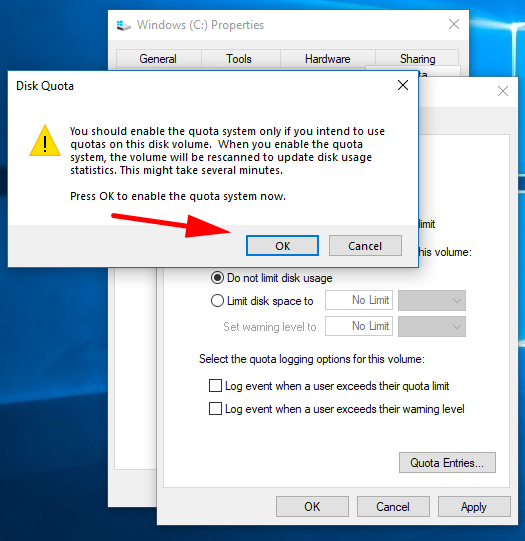
You’ll get a Disk Quota message making you confirm that you want to enable the quota system now. Click on the “OK” button.
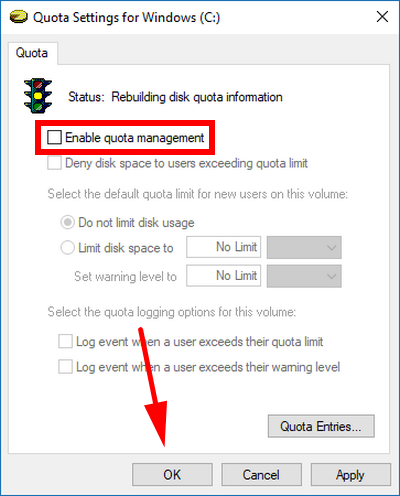
If you want to disable the quota management instead, then you just head back to the File Explorer > Right-click on Drive > Properties> Quota tab > Show Quota Settings button and then deselect the checkbox where it says “Enable quota management” and click on the “OK” button at the bottom of the Quota Settings for Windows dialog to save the changes. You’ll be prompted with another message that you’ll need to accept before the changes are made.
How to Enable or Disable Disk Quotas for All NTFS Drives in Local Group Policy Editor
If you want to enable or disk quotas for all the NTFS drives on the computer at the one time, it’ll be quicker to do that from the Local Group Policy Editor instead.
Open the Local Group Policy Editor by pressing the Windows logo key + R on your keyboards to bring up the Run dialog and then type “gpedit.msc” and hit the “OK” button—you’ll then find that the Local Group Policy Editor window will be open in the background; click on its icon from the taskbar to bring it up over the top of your web browser.
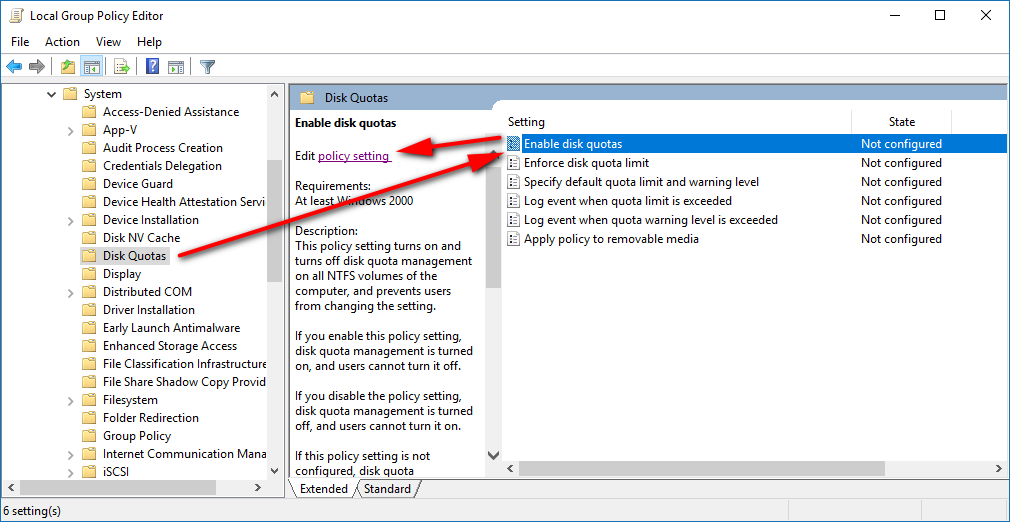
Navigate to the Computer Configuration\Administrative Templates\System\Disk Quotas path using the left side pane and then click once on the “Enable disk quotas” in the right side pane once and then click on the “Edit policy setting” link from the middle column when it appears.
The disk quotas setting is turned off by default, so if you leave it set to not configured it will be off. You need to change it over to the “Enabled” position when you want to turn it on and then click on the “OK” button at the bottom of the Enable disk quotas policy window when you want to apply the changes.
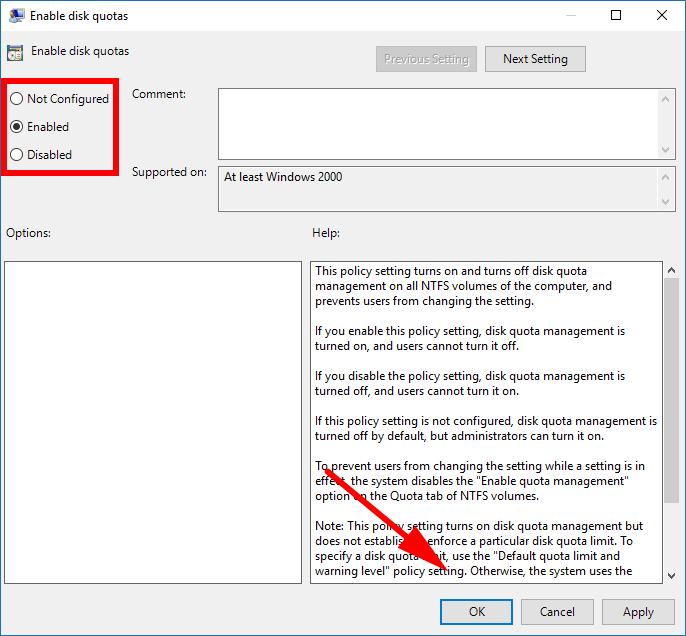
When you want to turn the disk quotas off again, you can open up the same policy window again and set it to “disabled” if you always want it to be disabled or “not configured” if you want it turned off now and then left up to Microsoft how they want to handle it in the future. Don’t forget to click on the “OK” button at the bottom of the policy window to save your changes.

How to Enable or Disable Disk Quotas for Single NTFS Drive in Command Prompt
You can also use the Command Prompt to enable and disable the disk quotas for an individual NTFS drive. You can apply this to as many drives as you like but you need to enter the Drive Properties manually for each drive that you want.
Start by opening the elevated Command Prompt window that has the administrative permissions assigned to it and then type the fsutil quota track (drive letter) command if you want to enable the disk quota for that drive, or the fsutil quota disable command if you want to disable the disk quota for that drive.
Enabling and disabling disk quotas for NTFS drives is pretty easy in Windows 10. Just remember that when you do it from File Explorer, it is only applying the changes to the drive that you clicked on and not all the drives. If you want to do all the drives at once, then you should enter the Local Group Policy Editor.
You might also be interested in:
- How to Enable or Disable to Enforce Disk Quota Limits in Windows
- How to Set Disk Quota Limit and Warning Level for Specific Users in Windows 10
- How to Set Disk Quota Limit and Warning Level for New Users in Windows 10
- How to Roll Back Driver to Previous Version in Windows 10
You can subscribe to our RSS, follow us on Twitter or like our Facebook page to keep on consuming more tech.