Last Updated on December 24, 2022 by Mathew Diekhake
I want the recent applications and general search history to show up in the search results when using Search from the taskbar in Windows 10 so I get quick access to my most-used apps and websites. I would prefer them always being available from Search so I don’t have to manually navigate to their locations, which would take more clicks since their locations are further away. However, I would also like to ensure Windows offers me the chance to disable this feature just in case sometimes I would prefer keeping my privacy so that others using my computer don’t know the apps and sites I visit the most. Resolution:
Starting from Windows 10 Build 20236, Windows is changing the experience of searching the operating system slightly, to now include your list of recent searches in the search pane once you begin searching. The search pane is only visible after you click on the search field in the taskbar to begin your search.
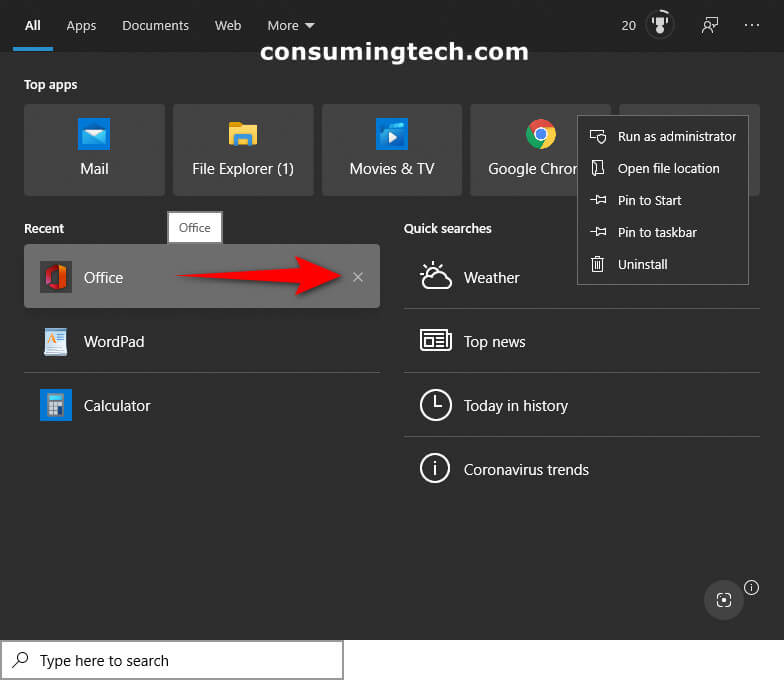
An example of the new Recent Items list that appears in Search:
The following tutorial demonstrates how to enable and disable recent items in Search in Windows 10.
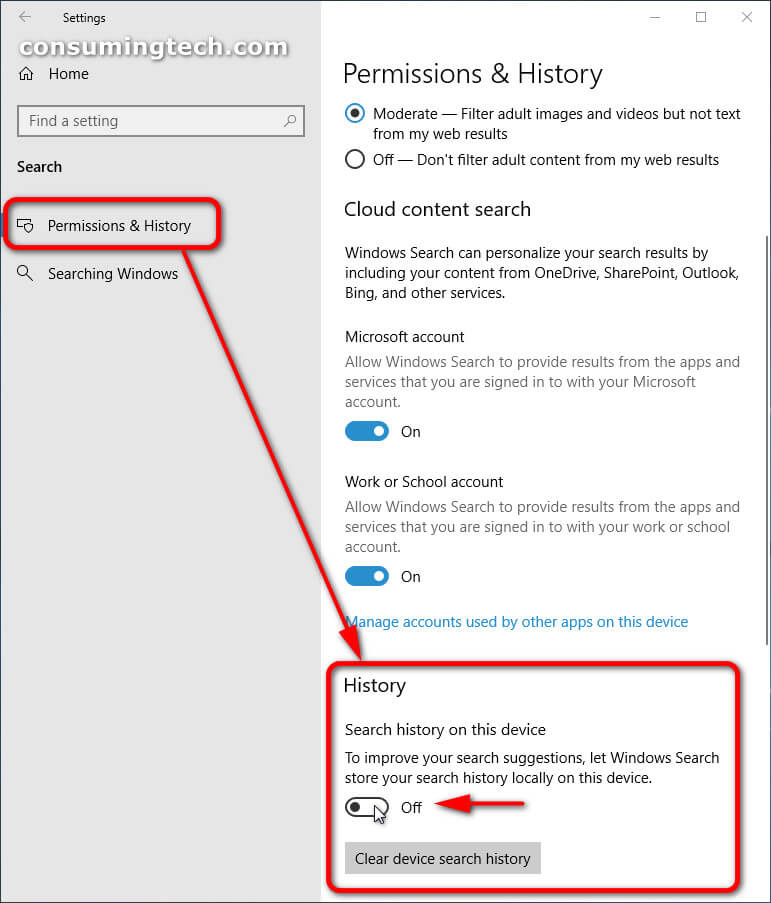
How to Disable Search History via Settings App in Windows 10
The search history is enabled by default in all versions of Windows 10 starting from Windows 10 version 1809. If you would like to disable it, you can do so from the Settings application. Here is how you can do that:
1. Open the Settings app. This tutorial shows you all the ways in which you can get access to the Settings app in Windows 10: How to Open Settings in Windows 10
2. From the main Windows Settings menu, click on Search.
3. From the left pane of Search, click on Permission and History.
4. In the right side of Permissions and History, scroll down until you see the toggle beneath where it shows the History heading, and toggle it off. (Click to enlarge the screenshot below.)
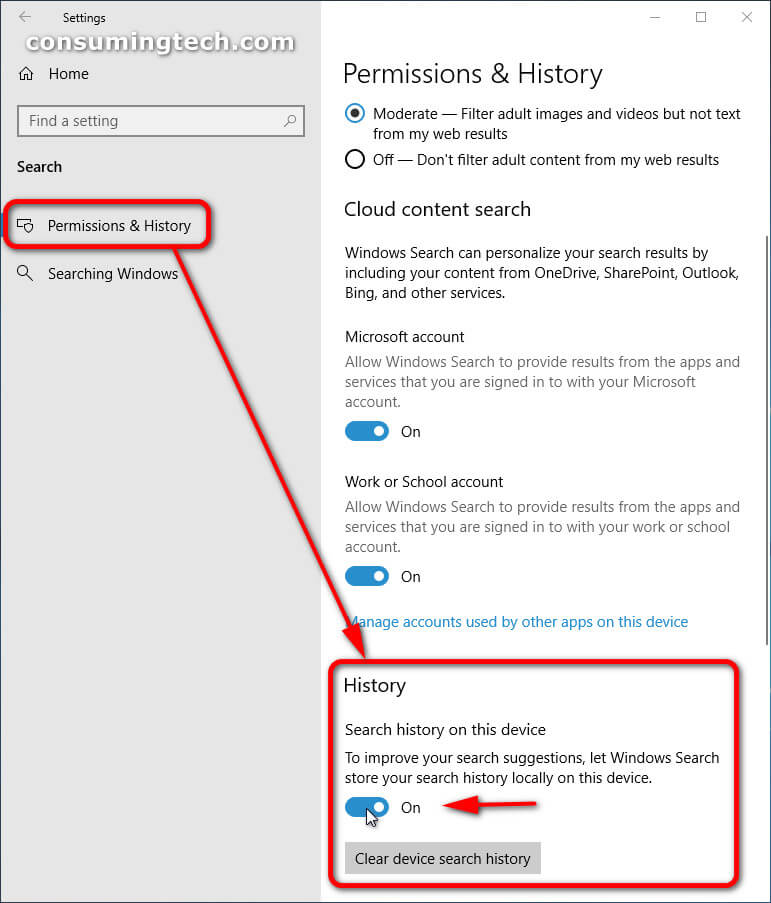
How to Enable Search History via Settings App in Windows 10
The search history is enabled by default in all versions of Windows 10 starting from Windows 10 version 1809. If you have previously disabled it and would like to enable it again, you can do so from the Settings application. Here is how you can do that:
1. Open the Settings app. This tutorial shows you all the ways in which you can get access to the Settings app in Windows 10: How to Open Settings in Windows 10
2. From the main Windows Settings menu, click on Search.
3. From the left pane of Search, click on Permission and History.
4. In the right side of Permissions and History, scroll down until you see the toggle beneath where it shows the History heading, and toggle it on. (Click to enlarge the screenshot below.)
How to Keep Recent Items Enabled by Removing Individual Items from List in Windows 10
Windows 10 also makes it possible to keep the Recent Items via Search enabled (toggled on from the Settings) and for you to just remove an individual app from the list. That way if the only reason for you disabling it was because you did not appreciate some of the apps it was showing, you can delete those and keep the feature enabled. Here is how you can do that:
1. Click in the search field in the taskbar, and then hover over the app or website you want to delete, and then click on the X button to remove the entry. (Click to enlarge the screenshot below.)
That’s all.
Related Tutorials
- How to Turn On/Off Clear Browsing Data When Closing Microsoft Edge
- How to Run PC Compatibility Check for Windows Mixed Reality in Windows 10
- How to Add Website to All Apps in Start Menu in Windows 10
- How to Turn On or Off Presentation Mode in Windows
- How to Save List of Running Processes in Task Manager to File in Windows
- How to Turn Off Folder Previews in Windows 10
- How to Enable/Disable Tab Groups in Microsoft Edge
- How to Automatically Switch to Headset Audio When Using Mixed Reality Portal
- How to Choose Between Automatic or Manual Mixed Reality Visual Quality for Headset Display in Windows 10
- How to Turn On/Off Reading View in Microsoft Edge in Windows 10
- How to Delete/Change Saved Passwords in Microsoft Edge in Windows 10
- How to Reset Windows Mobility Center Default Open Position in Windows 10


