Last Updated on December 26, 2022 by Mat Diekhake
One of the age-old problems that many of us face with devices, and even desktop computers, is not having enough hard drive space to store data. Far too many of us feel like we don’t have as much money as we wish we did when it was time to go shopping for a new device and we often have one choice to make: to buy the device that isn’t anywhere near as nice but comes with plenty of storage, or get that device that looks the part, even though it is going to be a constant struggle to not run out of space to store things on. And of course most people usually will choose the latter because they want the better-looking device.
Microsoft has helped solve the conundrum, at least by a little bit, by offering OneDrive, a cloud-based storage company which they too own, and is available with automatic integration with the operating system. Microsoft has owned OneDrive for a while now, even though it didn’t technically found the company back when it all began, but it wasn’t until Windows 10 that it got the full integration treatment, which makes it much easier to use.
The integration is usually a positive thing: just plug your smartphone into the computer, watch OneDrive direct you to what you need to do to get your pictures uploaded, and after it’s set up once, you even have the option of allowing OneDrive always to upload the pictures from your phone when you connect it to the computer, so you don’t even need to do anything. However, though only a minor annoyance, OneDrive also takes advantage of the integration to help sell itself on your computers as well by automatically starting up when you turn on the computer and log in to your user accounts, even when you aren’t using it. Microsoft probably doesn’t see this as a huge deal because the process itself isn’t going to be one that used up much of the hardware’s resources, so you’ll barely notice any performance difference. They also likely do it because they think it’ll be helpful to you at some point rather than it just being there to remind you to use it. But, at the same time, there is just something about watching that OneDrive icon in the taskbar, sitting there each time you boot up the computer, that just tends to be an annoyance.
If you like to keep your taskbar and system tray clean of applications and programs that you seldom use, you might want to stop that OneDrive application from running at startup, so it no longer appears in the taskbar at all. You’ll still be able to use the OneDrive application if you do disable it at startup; you just visit the website, or when you connect your device to the computer with the USB cable, it’ll still bring OneDrive up on your computer’s display.
How to Stop OneDrive From Running at Startup or Start it Back Up Again
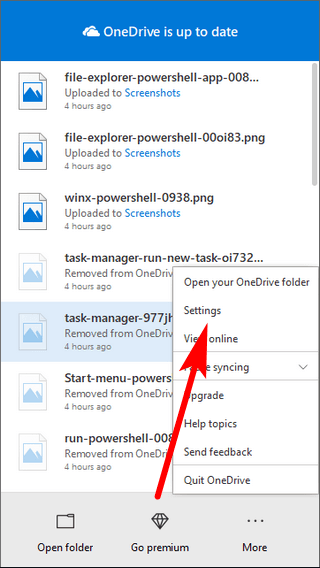
You can stop OneDrive from running and so that it won’t come back the next time you turn on your computer directly from the taskbar. To get started, right-click on the OneDrive icon that is in the taskbar.
Next, click on the Settings link from the OneDrive menu.
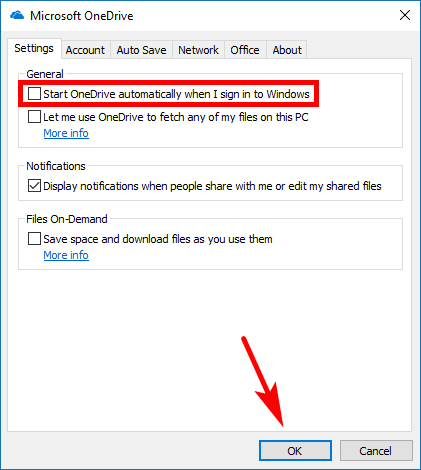
You’ll now have the Microsoft OneDrive Properties dialog box open. Swap it over to the Settings tab first and then look under the General heading or the Start OneDrive automatically when I sign in to Windows checkbox. Deselect it, so there is no longer any mark in it and then click on the OK button at the bottom of the Microsoft OneDrive dialog to apply the changes. It’ll no longer be in the system tray at all when you reboot the computer.
How to Get OneDrive Icon Back in Taskbar in Windows 10 If It’s Been Removed
If you’re using a computer that runs on Windows 10 and the OneDrive icon isn’t there in the system tray of the taskbar, it might be that someone else has already deleted it. If you’re using an older version of Windows 10, it might be possible to right-click on the Show hidden icons arrow and then select Properties from the menu. That should now open you up to the Taskbar and Start Menu Properties dialog box. Once you’re inside the Properties, click on the “Customize” button that is available next to the notification area. Now from the Notifications and Actions area, click on the Select which icons appear in the taskbar. Scroll down the list until you get to the one that says OneDrive and then click on it to turn it on. You’ll now see the OneDrive icon from the system tray.
The problem for those running more recent versions of the Windows 10 operating system is that there is no Taskbar and Start Menu Properties dialog available anymore, so when you right-click on the Show hidden icons arrow, you won’t get the option for clicking on the Properties. To solve it, you need to click on the “Start” button and then scroll down the All Apps list until you get to OneDrive, right-click on it and choose to pin it to the taskbar. Now click on it to open it, and the OneDrive icon will show up in the system tray. Once it signs you in to your OneDrive account, it’ll stay there for the full session, and you’ll be able to use it.
Another way you can do it, according to some users, is to right-click on the OneDrive icon from the list of All Apps again, and then select the Open File location from the menu. When the folder opens, right-click on the OneDrive link and then choose the Open file location again. Now you’ll get the OneDrive application opening and then syncing to your taskbar.
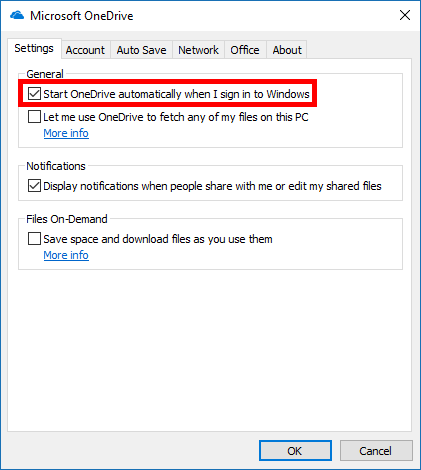
Either way, the OneDrive icon won’t likely continue to stay there after you reboot the computer. Instead, you’ll need to right-click on it and select “Settings” from the menu, just like in the guide above, and then click on the Settings tab and check the box available for Start OneDrive automatically when I sign in to Windows. Once that is done, just click on the OK button at the bottom of the Microsoft OneDrive dialog box and it’ll close and apply the changes.
How to Disable OneDrive and Remove It From File Explorer
The Windows 10 Creators Update has been out for a while now and should be installed on all computers if you’re still accepting automatic software updates. One of the changes that it brought about with it was the chance to remove the OneDrive application the same way you would remove other applications from the computer. This can either be done from the Settings application or the Control Panel. Let’s run through the Settings application first since it garners the most attention from users and seems to be the way Microsoft is heading in the future.
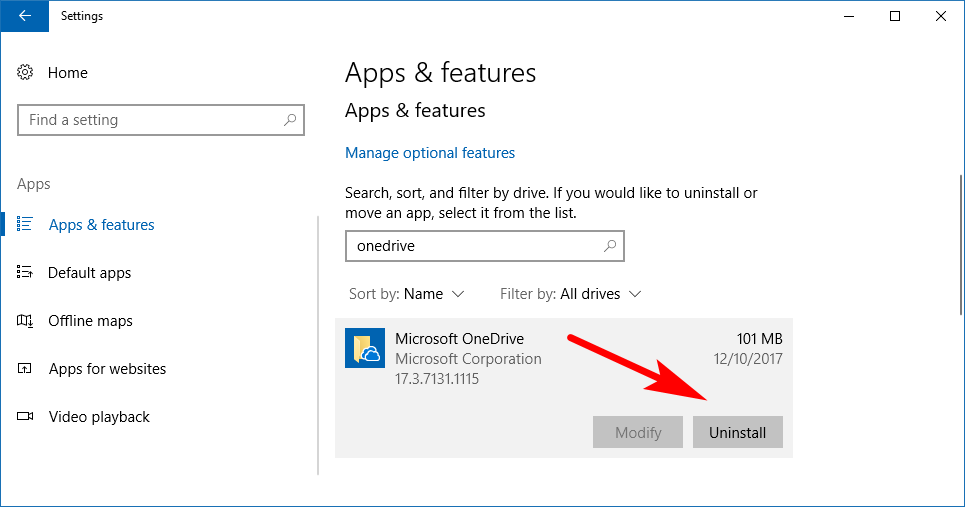
Open the Settings application by navigating to the Start menu > Settings gear icon in the left side pane and then click on the Apps link from the Windows Settings screen. Leave it on Apps and features in the left pane and then use the search box in the right pane to look for the One Drive application. It’ll find it and bring it up for you as long as you spell it correctly and then you can click on it once so that it is highlighted and then the Uninstall button becomes visible directly beneath it, as shown in the picture below.
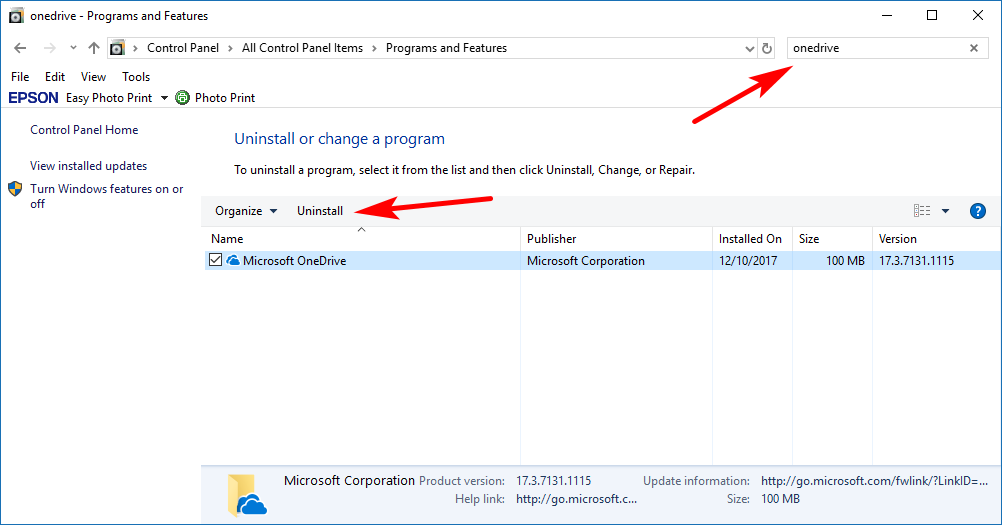
Those of you wanting to remove OneDrive by using the Control Panel instead can open the Control Panel so that it is showing its classic view with the small icons and then click on the Programs and features link from the list of all Control Panel items. Now in the top right corner of the Control Panel window is a search box; click on it and type OneDrive—either two words or one—and then the OneDrive application becomes available from the list of applications. Click on the OneDrive app once so that its checkbox now has a checkmark in it and then click on the Uninstall button directly above where the application is listed, just like it is shown in the picture below.
Removing OneDrive Icon from System Tray/Taskbar
If you want, you can just click and drag the OneDrive icon from its location in the system tray/taskbar region to inside the area where additional icons sit.
You can get access to this extra space by clicking on the small arrow, positioned to the left side of the system tray icons.

Then use your mouse to click on the OneDrive icon and then drag it into where it shows some spare space in your leftovers section.
![]()
Doing this will not disable OneDrive from the computer, but it will remove it from your sight, which is what most people have the problem with. And besides, you might not want to completely disabled anyway . . . OneDrive does make it easier to transfer pictures from your smartphones to your computers.
The OneDrive cloud storage service owned by Microsoft is about as trustworthy as they come, thanks to it being owned by one of the largest corporations in the world—it means that the likelihood of it closing down is significantly less than a smaller company, plus the consequences of corruptions will be higher should they step out of line. There’s no need to remove the OneDrive application from your computer entirely just for the sake of seeing it removed from the taskbar, but if you definitely wanted it gone, you could make that happen from the Settings app or Control Panel as shown in the steps above.
Related Tutorials

January 11, 2019 @ 11:36
Old or bad info. Update this or take it down. Or at a minimum, DATE IT, so that people know it’s only good as of the day it’s published
January 11, 2019 @ 16:58
I’ve just checked and the guide still works.
And where else would you like the date to be other than directly beneath the article title?
When you right-click on the OneDrive icon, it looks a bit different, but you still have the same settings link available from the menu.