Last Updated on July 29, 2022 by Mat Diekhake
Microsoft Edge is a cross-platform web browser developed by Microsoft. It was first released for Windows 10 and Xbox One in 2015, then for Android and iOS in 2017, for macOS in 2019, and as a preview for Linux in October 2020. Edge was initially built with Microsoft’s own proprietary browser engine EdgeHTML and their Chakra JavaScript engine, a version now referred to as Microsoft Edge Legacy.
The Chromium version of Edge, often just referred to as the “new Edge” now, has replaced the Legacy version since March 9, 2021, when it was discontinued for good. This is most certainly for the better as the new Edge is an obvious choice over the Legacy variant. Edge is now a lot like Chrome. That is a good thing because Chrome was the undisputed king of web browser performance. We don’t use Edge as much as the Chrome we have bonded with for so long now but still do use it as a secondary browser and almost daily.
Like all good web browsers, Microsoft Edge comes with a list of available extensions. Microsoft does have a dedicated web page or few with all those extensions for you to see if you wish to view them. The extensions allow for further features to be added to the browser. These features don’t come by default because it wouldn’t make sense to crowd the browser with unnecessary clutter to those who don’t wish for it and extensions will slow down the browser by at least a little bit.
The following tutorial demonstrates how to enable or disable the Microsoft Edge extensions when using a version of the Windows 10 operating system.
How to Enable or Disable Microsoft Edge Extensions Using Group Policy
You can enable and disable Microsoft Edge extensions, aka Edge add-ons, from the Local Group Policy Editor. Here is how you can do that:
Notes:
- The Local Group Policy Editor is only available for Windows 10 Pro, Windows 10 Enterprise, and Windows 10 Education users.
- You can instead download a Windows registry file so the changes are automatically saved on your computer via the registry file itself. This means you will be adding extra files to your computer, which invariably takes up hard drive space. So it is best only to use the Windows registry files if hard drive won’t ever become a problem. Here you can download the files to enable Microsoft Edge extensions and disable Microsoft Edge extensions.
1. Open the Local Group Policy Editor. This tutorial shows you all the different ways in which you can open the Local Group Policy Editor in Windows 10: How to Open Local Group Policy Editor in Windows 10
2. Using the left pane of the Local Group Policy Editor, navigate to the following location:
Computer Configuration > Administrative Templates > Windows Components > Microsoft Edge
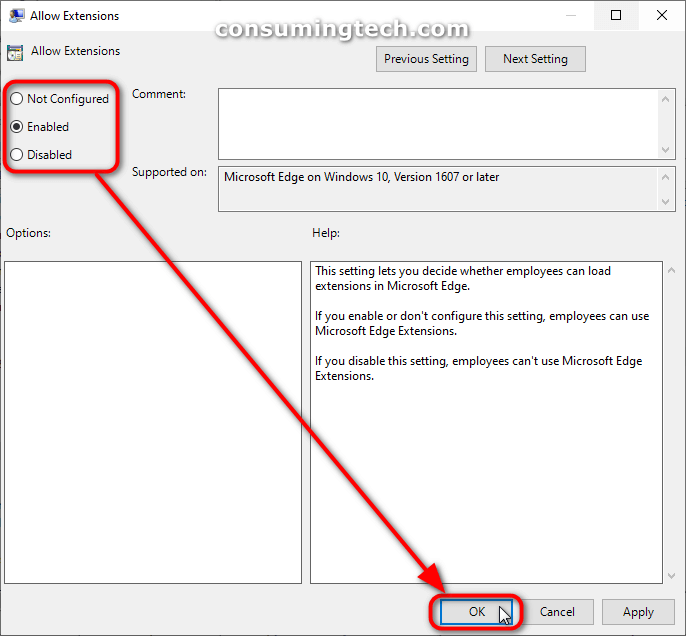
3. With Microsoft Edge expanded, double-click on Allow Extensions in the right side of the same window. (Click to enlarge the screenshot below.)

4. From the Allow Extensions policy window, select either Note Configured (to enable Edge extensions), Enabled (to enable Edge extensions), or Disabled (to disable Edge extensions), and then click on the OK button to save the changes and closet he policy window. (Click to enlarge the screenshot below.)
In conclusion, that is how to enable or disable the Microsoft Edge extensions when using Windows 10.
Related Tutorials
- How to Enable/Disable Tab Groups in Microsoft Edge [Tutorial]
- How to View Microsoft Edge Downloads in Windows 10 [Tutorial]
- How to Turn On/Off Potentially Unwanted App Protection in Microsoft Edge [Tutorial]
- How to Turn On/Off Clear Browsing Data When Closing Microsoft Edge [Tutorial]
- How to Pin Email Folder or Full Email Account to Start Menu in Windows 10 [Tutorial]
- How to Allow/Block Cookies in Microsoft Edge in Windows 10 [Tutorial]
- How to Turn On/Off Reading View in Microsoft Edge in Windows 10 [Tutorial]
- How to Mute and Unmute Tabs Without Right-click in Google Chrome [Tutorial]
- How to Enable/Disable Microsoft Edge Pre-launching in Windows 10 [Tutorial]
- How to Delete/Change Saved Passwords in Microsoft Edge in Windows 10 [Tutorial]