Last Updated on February 25, 2024 by Mathew Diekhake
Each computer has a network location. The network location is the type of network the PC is using with a network adapter.
There are three types of network locations that are available for the Windows 10 users to choose: public network, a private network, and domain network. By default, you are given the public network. This can make your computer sound a bit vulnerable, but it’s actually the public network that comes with the most security thanks to the Windows Firewall.
If you thought the private network would go with the most security, you are not alone—most people do. When you have your network set up as the public option, it means your computer is shared with the world and does not come with protection from the local computer or any other computer. Conversely, the Windows Firewall restrictions are set to a maximum and automatically blocks many applications from working.
The private network is more suited for a home network or office network, and you trust the people who are connecting to the network. The Windows Firewall restrictions are less and allow you to connect to many things by default, so nothing is getting in your way. This includes conventional peripheral devices such as printers and other office equipment that most people use.
The domain network is the least common and is there for when a local computer is a member of the Active Directory domain. The local computer needs to authenticate to a domain controller through a network connection.
There are quite a few ways you can change the network location using a version of the Windows 10 operating system. The most obvious way (and the way we are demonstrating at the beginning of this guide) would be to use the Settings application that comes built-in to Windows 10. The other ways you can do it include using the PowerShell, the Registry Editor, and the Local Security Policy.
Method One: How to Set Network Location to Private or Public from Settings
It’s possible to set the network location to private or public by using the Settings application in Windows 10. Before selecting between the private and public network options, we will run through how you can find out what your current network location settings are so you know what it is set on now and how to confirm your changes have taken effect after you complete the guide.
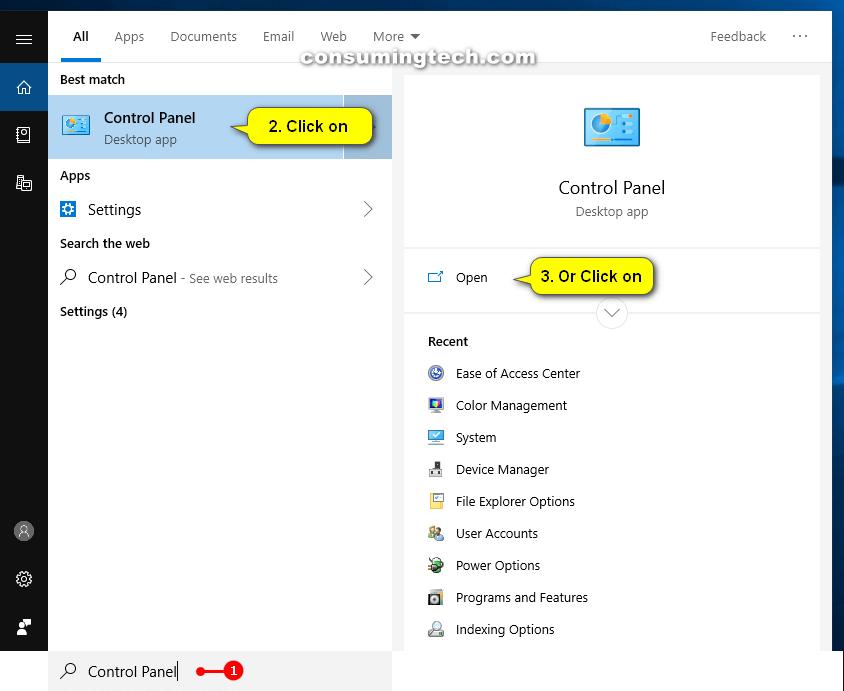
1. Click on the search field available from the Windows 10 taskbar and type Control Panel.

2. Click on the Control Panel desktop application from the Best match section.
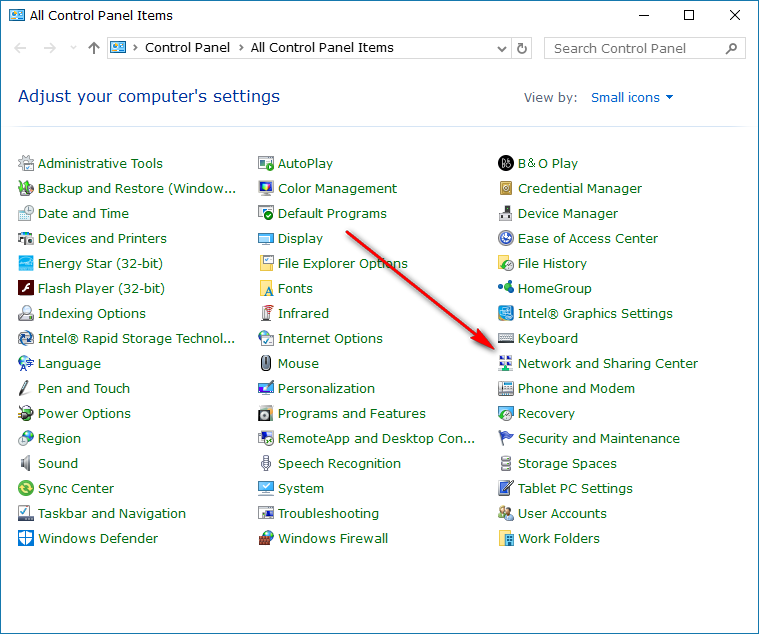
3. Click on the Network and Sharing Center link that is available from the All Control Panel Items menu. (You only get to see this list if you have it set to show small icons that are available from the top right-hand corner of the screen. Just click on the View by drop-down menu and select the small icons option if you don’t have it set to show the smaller icons already.)
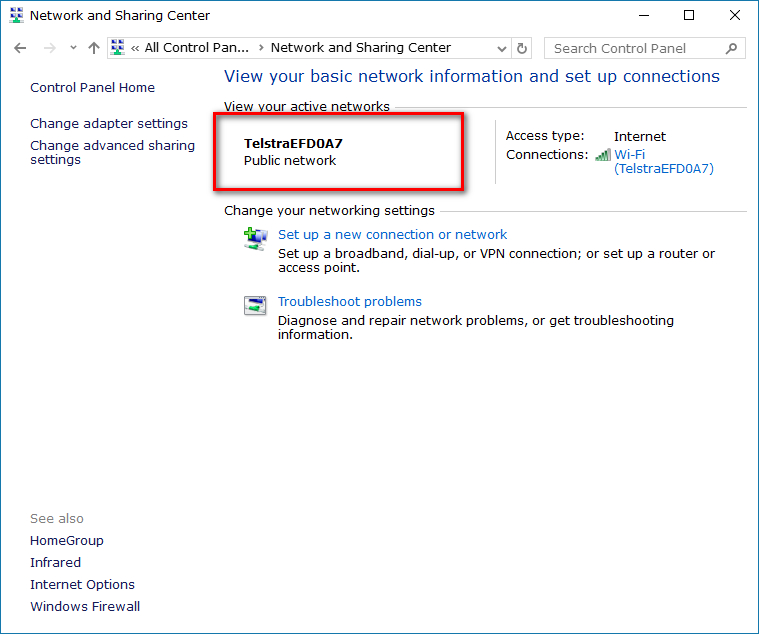
4. You then get to the page that shows your network name and the network location. The network name is bolded and featured above the network location. My network name is TesltraEFD0A7, and my network location is set to be a Public network because I haven’t changed anything from Windows default settings when it comes to network locations.
5. That was how you could identify your network name and the network location. Now it’s time to know how to change the network location so you can choose to have it set to be a private or public network.
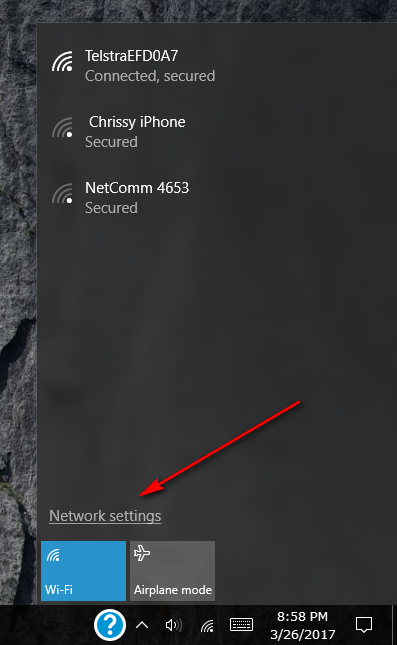
6. Now to begin settings the network location, click on the WiFi icon that is found in the system tray (the right side of the taskbar.)
7. Click on the Network settings option from the menu once it opens up.
8. The next part is where you need to find out if you are using an Ethernet connection or a WiFi connection. Most people will be using a WiFi connection because it’s the wireless of the two options and most households are moving away from using wires because it looks better (less clutter around the home.)
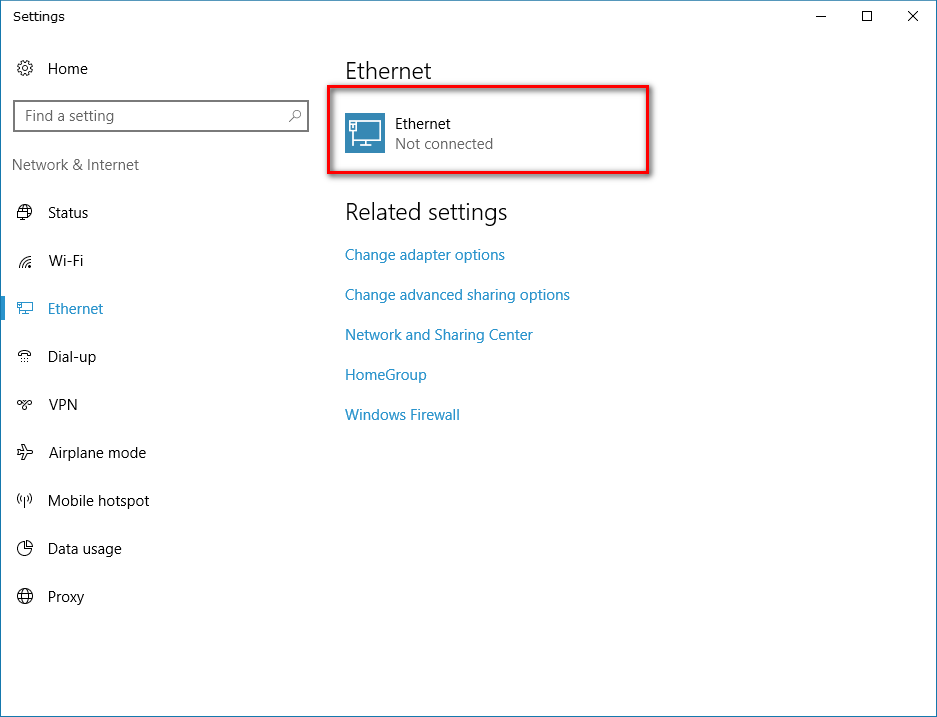
9. Nevertheless, there are still many people using these Ethernet connections in Windows 10. If you are one of them, you need to click on the Ethernet option from the left side pane.
10. Click on the Ethernet connection that you are currently connected to and then skip to the last couple of steps that are available in this guide because those are the screens you are going to be seeing next.
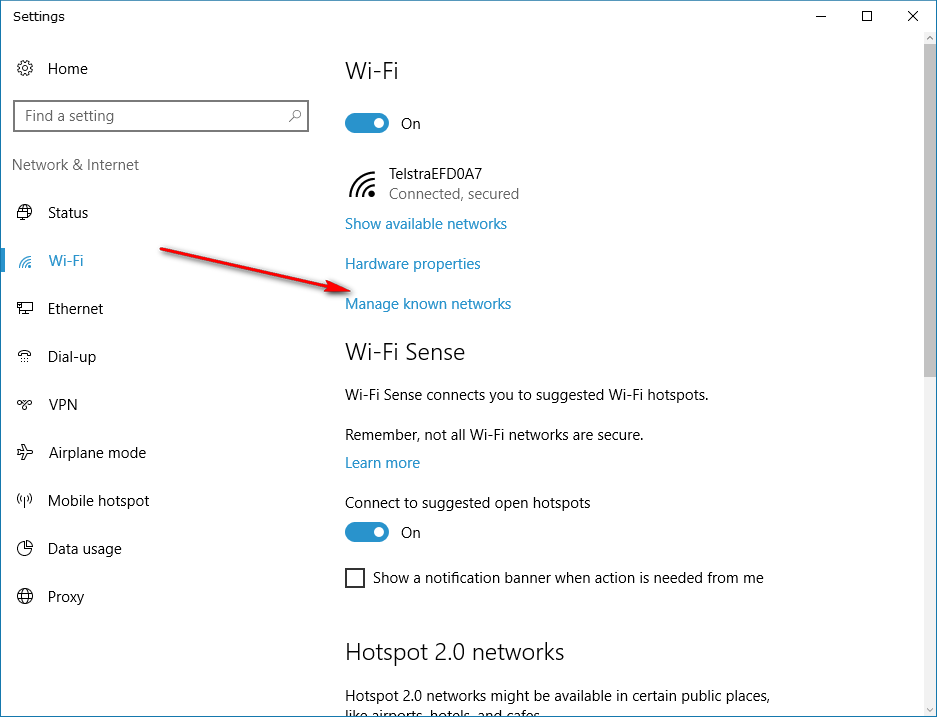
11. For everyone else who is using a WiFi network, your process is a bit different. Click on the WiFi option from the left pane.
12. Click on the Manage known networks under the WiFi heading on the right-hand side of the screen.
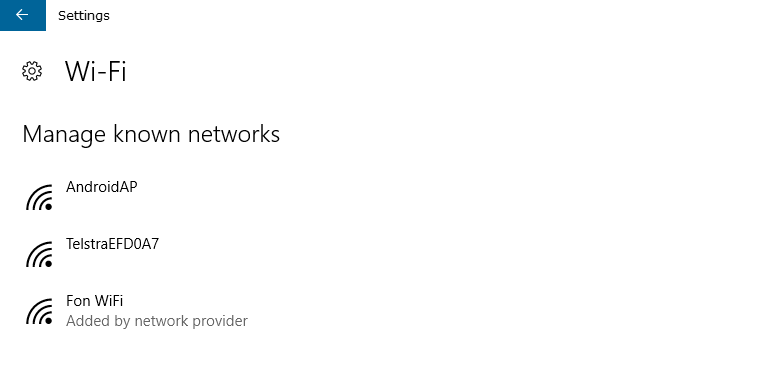
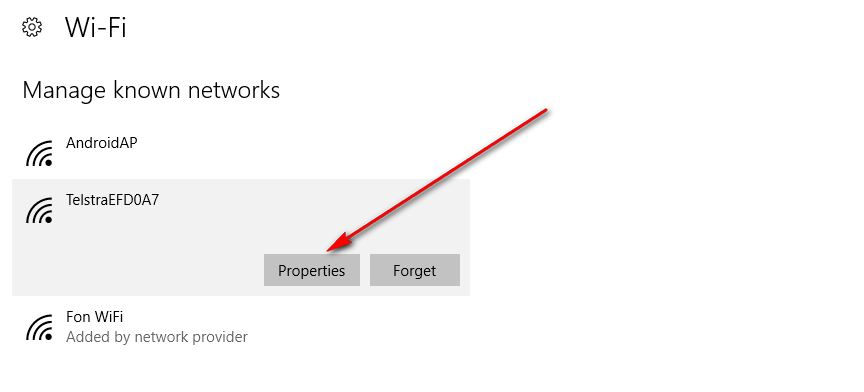
13. You then get a list of the WiFi networks that are in your range. Click on the WIFi network that is the one your house or office is currently using and then you get a new Properties box available.
Click on the Properties box.
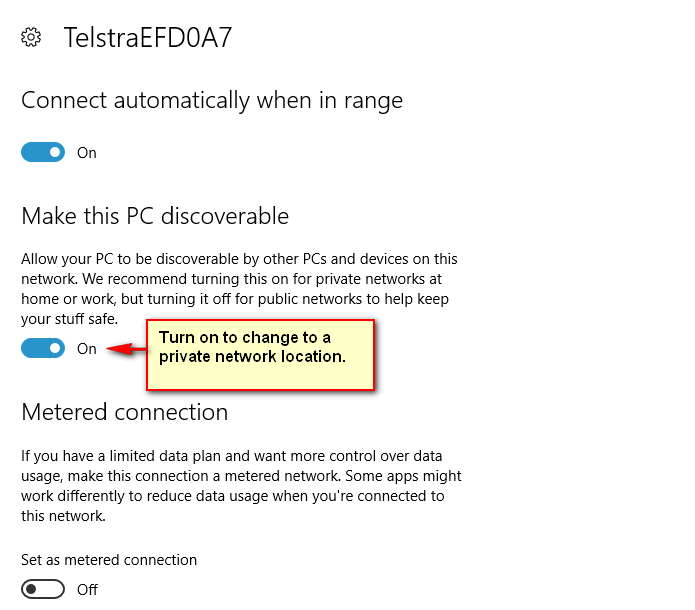
14. If you are going to change it to the public network location, you want to turn this feature off where it says Make this PC discoverable.
15. Those who want to change it over to a private network need to turn on the toggle that is available for the Make this PC discoverable.
Close the Settings application, and you are finished.
You have now set the network location to private or public in your version of the Windows 10 operating system. The same guide works for all versions of the Windows 10 operating system—Home, Pro, and no matter what update you are running.
Method Two: How to Set Network Location to Private or Public from Registry Editor
You can also use the Registry Editor to set network location to private or public in Windows 10 if you want. All versions of the Windows 10 operating system—regardless of if you have the Home, Professional, Enterprise, or Education editions—can use the Registry Editor as long as you are signed in using an administrators account. To open the Registry Editor, type Regedit into the search field from the taskbar at the bottom of the computer’s display and then click on the Regedit Run command that appears in the Best match section at the top of the results menu.
1. You might now be prompted by UAC (User Account Control). If that happens, click on the Yes button to continue.
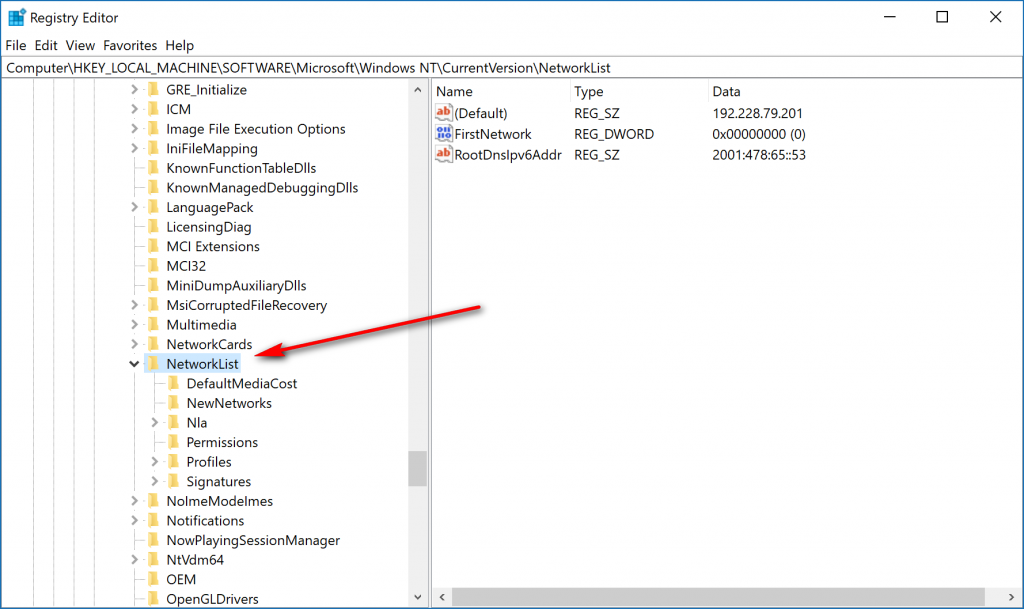
2. Once you have the Registry Editor open, navigate to the following key:
HKEY_LOCAL_MACHINE\SOFTWARE\Microsoft\Windows NT\CurrentVersion\NetworkList
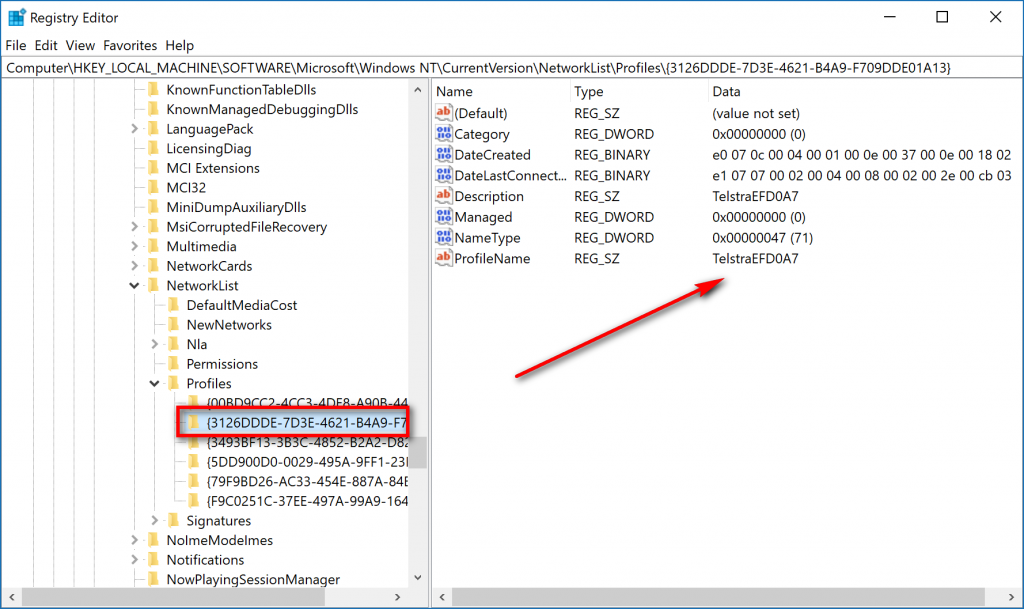
3. Next, double-click the mouse on the Profiles key, and then you’ll see all of the networks that your computer has connected to in the past/is currently connected to as well. Find the network name that is your current network by clicking on each of them and then looking over to the right side pane for the network name that you are familiar with.
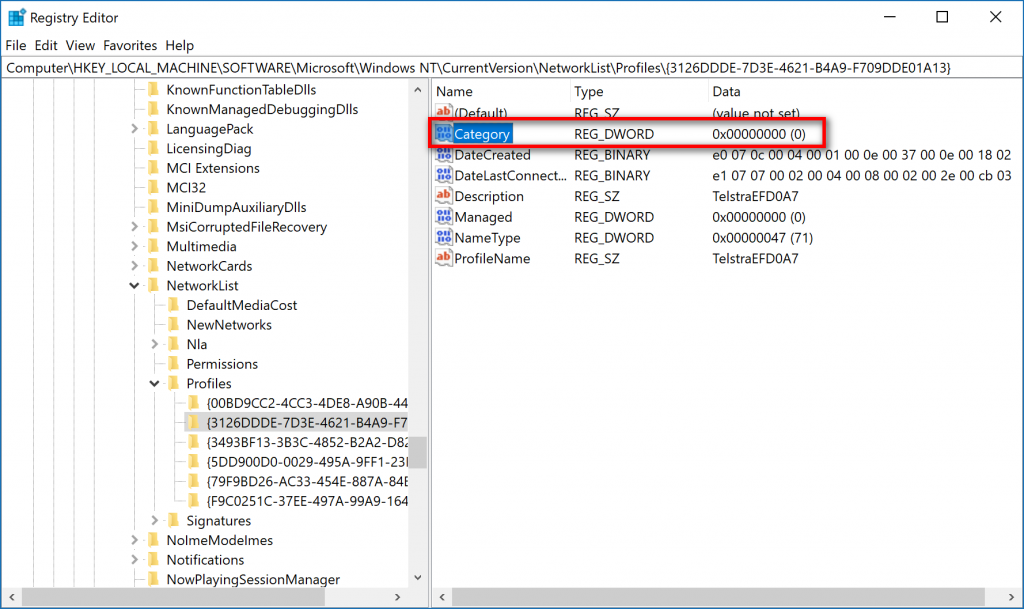
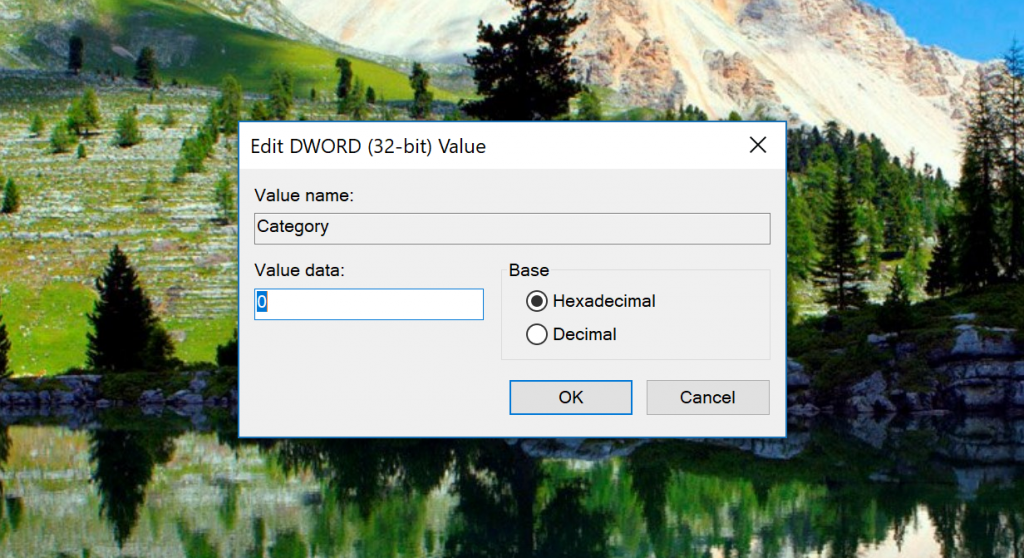
4. From the same right pane, double-click the mouse on the Category entry so you can change the DWORD value.
5. When it comes to choosing what DWORD value you want to enter, 0 means it is set to public, 1 means it is set to Private and 2 means it is set to Domain. Choose the one you want by typing it where it gives the “Value data” field and then click on the OK button to close the DWORD box.
Method Three: How to Set Network Location to Private or Public Local Security Policy
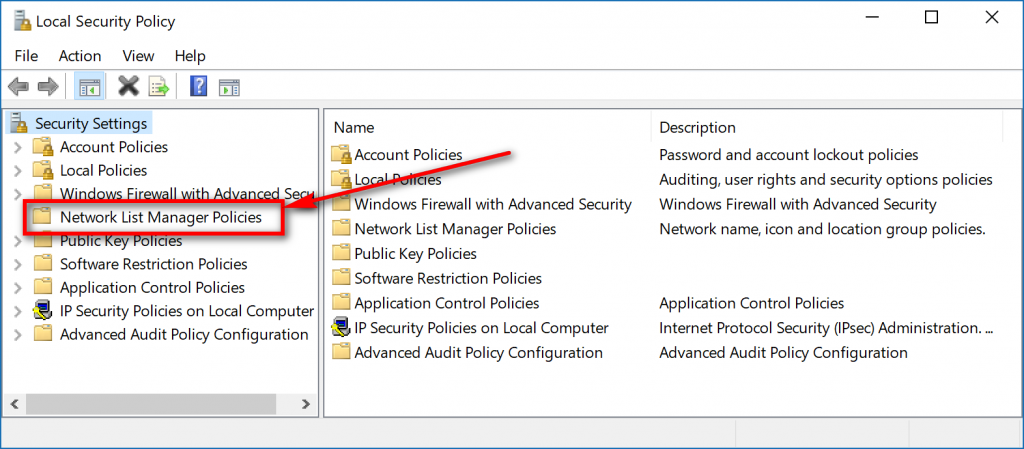
1. The Local Security Policy has an option for setting network location to private or public in Windows 10 as well. Start by opening up the Local Security Policy Editor and then click on where it says Network List Manager Policies in the left side pane.
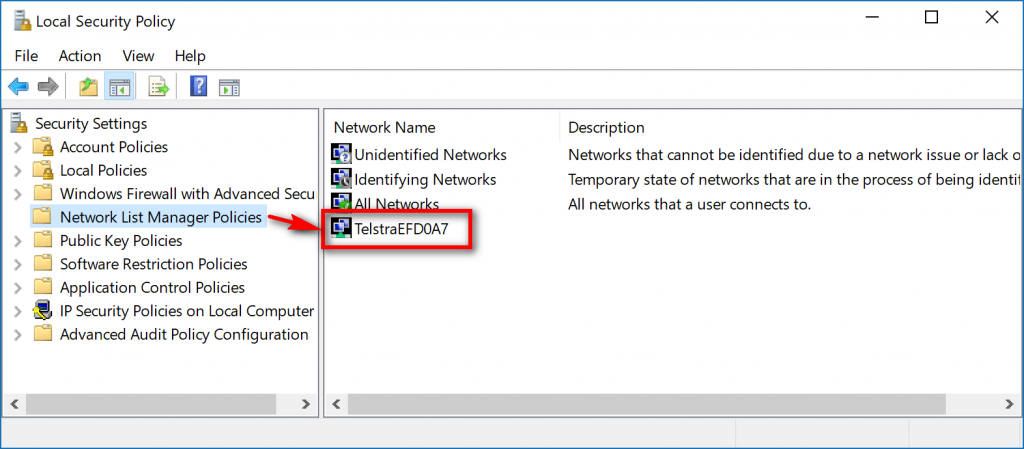
2. Now in the right side pane is the name of the network that you are currently connected to. Double-click on it (or you can right-click on it also if you prefer.)
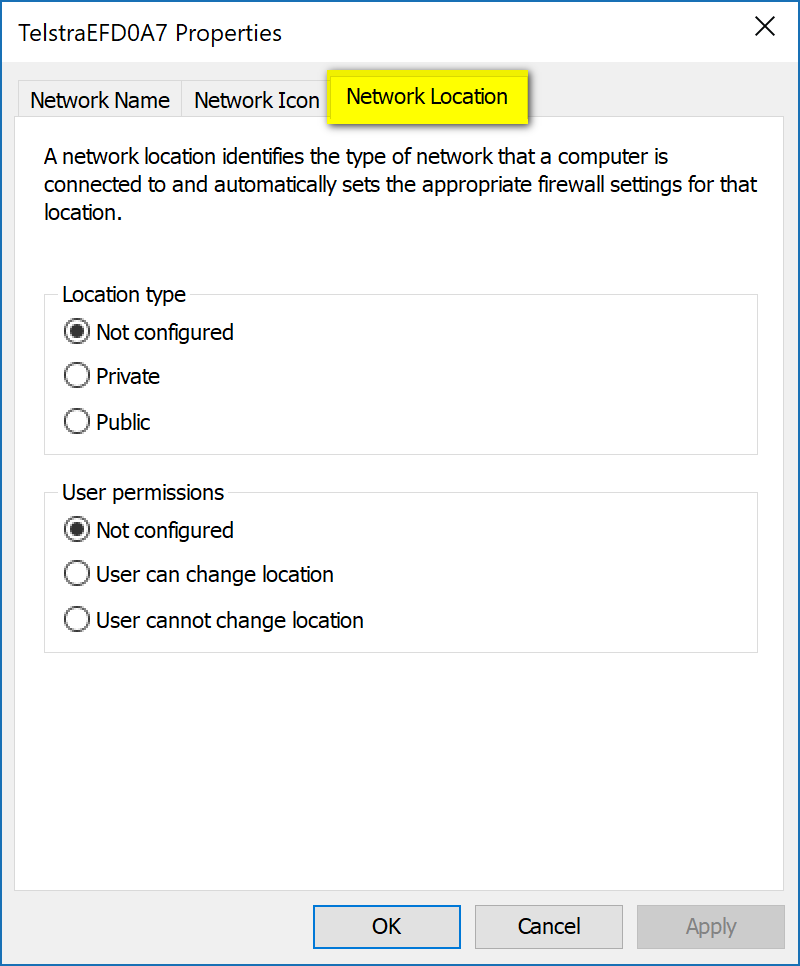
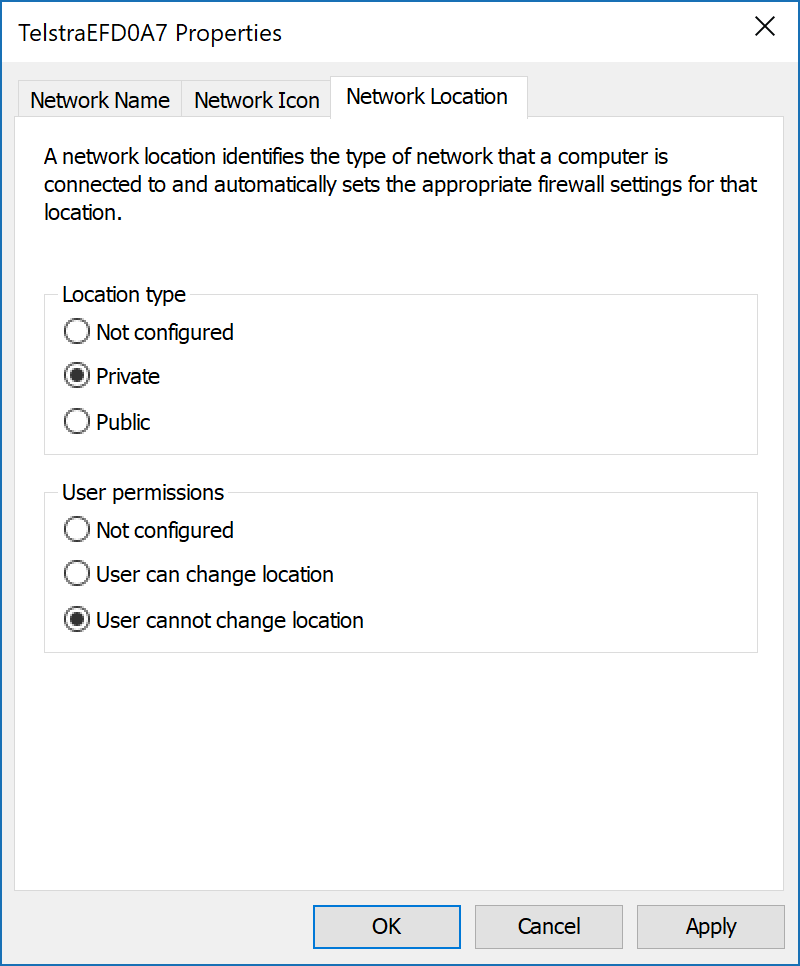
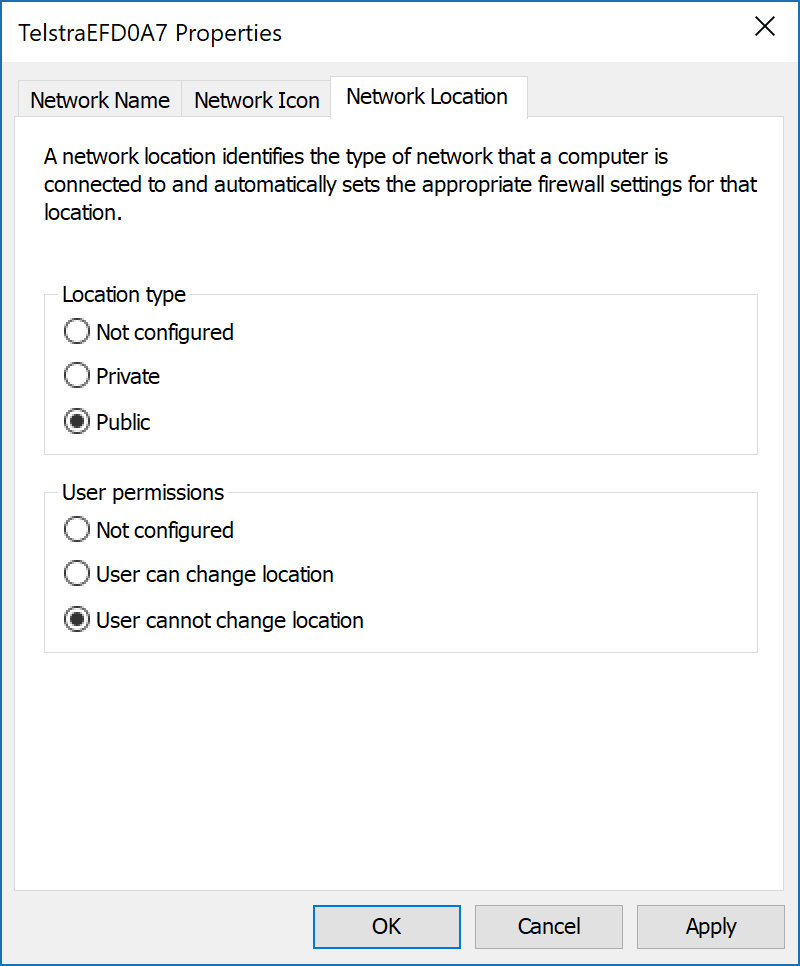
3. Make sure that the Network Location tab is selected at the top of the window, and then look under the Location type heading for your three options that you can choose. The first is Not configured, and it means you can allow for the Private or Public to be enabled with this selected.
4. To make the connection private, move the checkmark to the Private checkbox.
5. Lastly, to make the connection public, checkmark the Public checkbox.
Method Four: How to Set Network Location to Private or Public Windows PowerShell
The Windows PowerShell offers a way for you to set the network location to private or public in Windows 10 also.
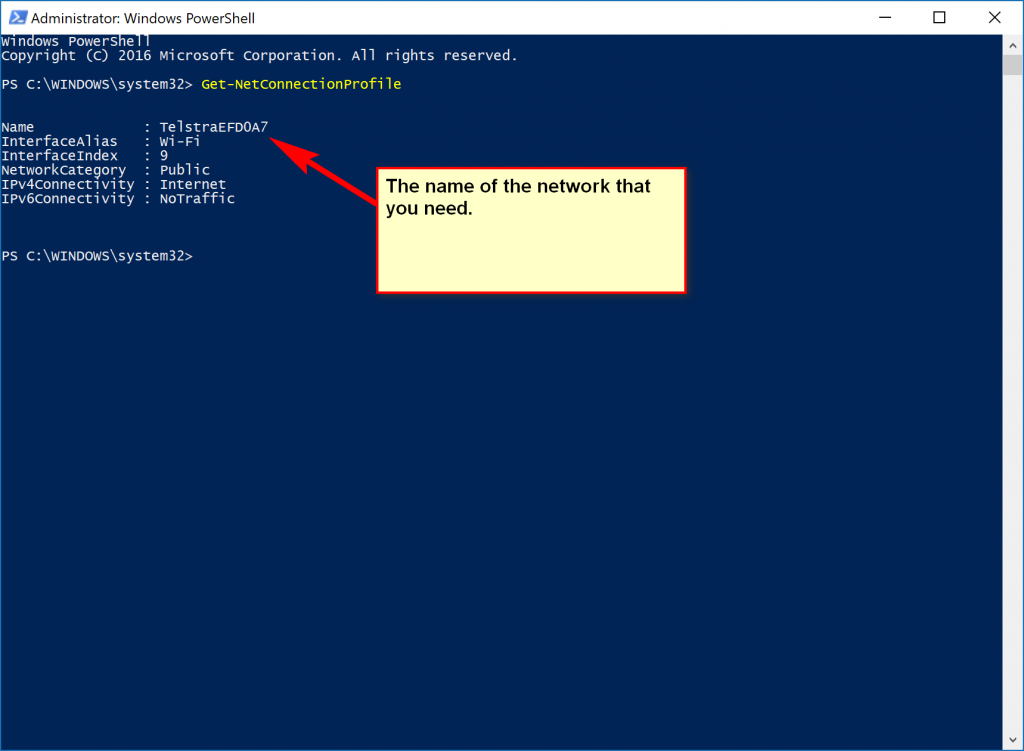
1. Start off by opening up an elevated Windows PowerShell window so you can use it with the administrative permissions.
2. You’ll be prompted by UAC (User Account Control) to allow the application to make changes to your device. Make sure you click on the Yes button and then the elevated PowerShell window opens.
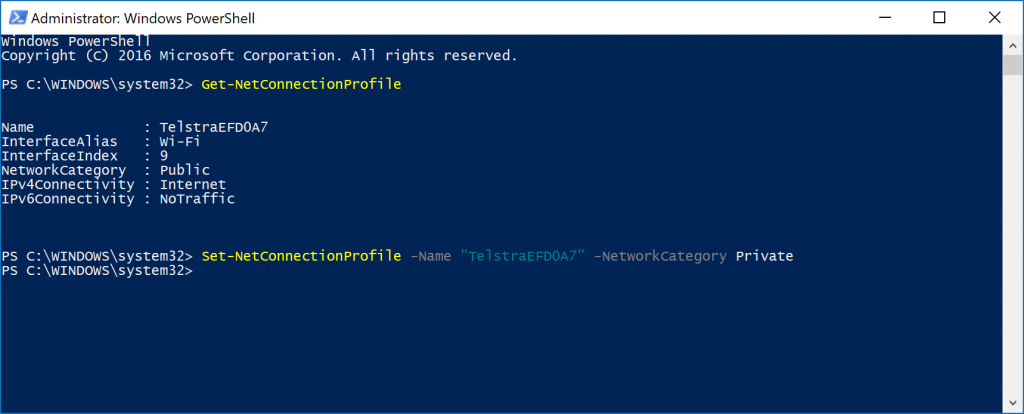
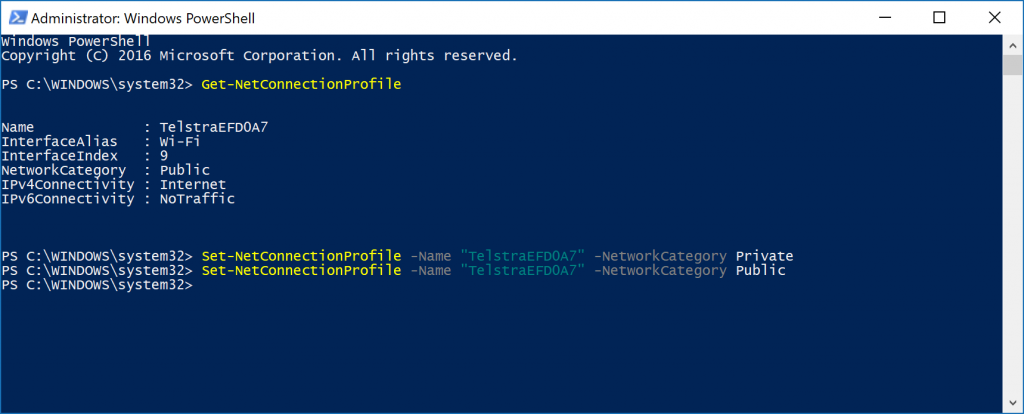
3. Next, enter the following path that includes the name of your network like so: Set-NetConnectionProfile -Name "TelstraEFD0A7" -NetworkCategory Private if you want to make the network location private.
4. Conversely, enter the following path and make sure you substitute my network name for yours: Set-NetConnectionProfile -Name "TelstraEFD0A7" -NetworkCategory Public if you want to set the network location to public.
The term “setting a network location” might be confusing to some, but the way it works is straightforward: if you are just connecting to a network for the first time, Windows might ask you if you want to find other computers, devices or content that are on that network. If you choose yes, then you can connect to devices such as printers and files to help make life easier. By having the network locations turned on, you are preparing the computer for its chance to share files and printers that are on the same network.

