Last Updated on December 26, 2022 by Mathew Diekhake
All Microsoft accounts and local user accounts have a username that goes along for the ride with them. You’ll notice the email that is assigned to the account when you first set it up because that’s pretty obvious when you enter it, but not everyone remembers including a username when they created their accounts.
That is leaving many people wanting to know how to change the name given to the username of the Microsoft or local accounts in Windows 10, so the current name is no longer on the display of the computer when you browse through certain areas.
You can change the account username for the Microsoft accounts and the local user accounts. These are two different things, so it would help if you knew which one you had. The local user account is the type of account that Windows users used to use in older versions of the OS while the Microsoft account idea is still relatively new to Windows. If you are used to signing into your accounts and being able to sync stuff across devices, then it means you are using the Microsoft account. If you don’t have the chance to sync anything across devices, then you are probably using a local user account. Most people who use local user accounts are aware of it though because Microsoft pushes the idea of using a Microsoft account when you first set up the computer so that most people will have Microsoft accounts—and probably many do without even knowing it.
The thing with Microsoft accounts is that they are attached to the Microsoft website, so it’s the website that is hosting your information. If you need to change your name for the Microsoft account, you need to do it from the website which is why you are finding it hard to navigate to the place from the operating system. But the guide below shows you how you can get there from the Settings application that then directs you through to logging into your Microsoft accounts and then changing your name. That way you don’t have to know where to find the right website from a search engine.
Here’s what you need to change the user name of an account when you’re signed into a Microsoft account or a local user account and using a version of the Windows 10 operating system.
How to Change Account Username with Microsoft Account
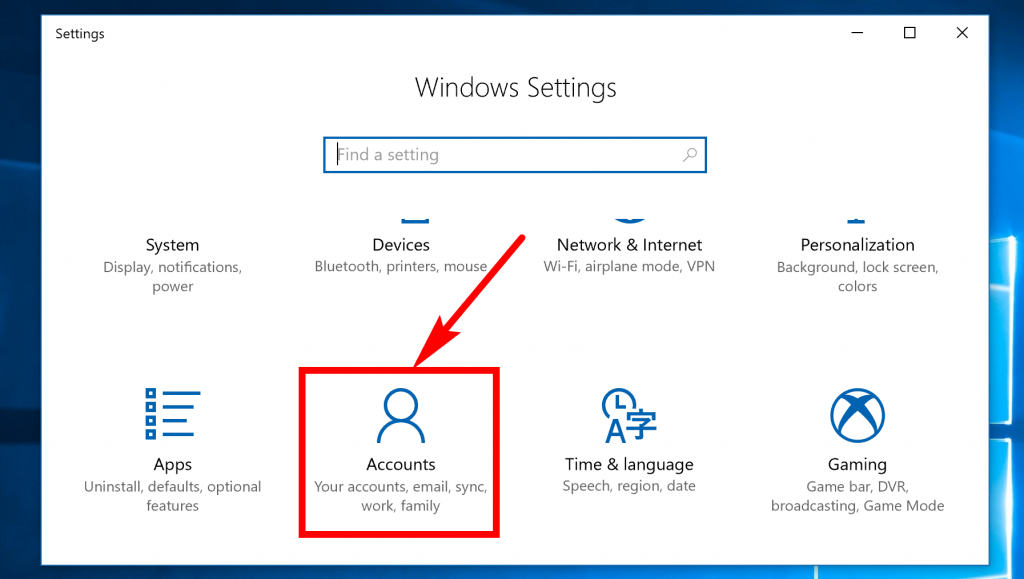
To change the account username using a Microsoft account, navigate to the Start menu > Settings and then click on the “Accounts” link from the Windows Settings window.
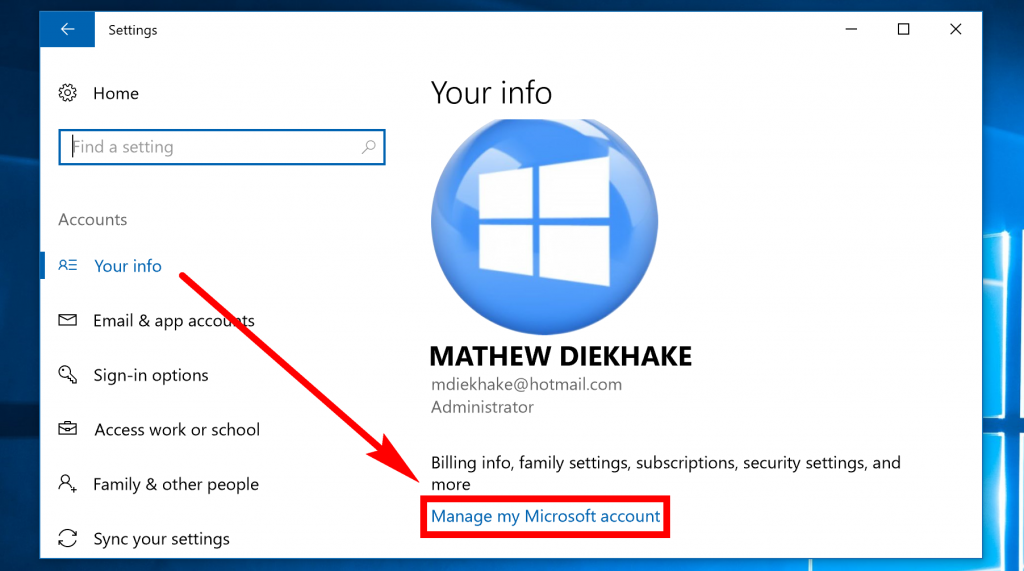
It’ll open up with the “Your info” section already open which is what you want. Now just look in the right side pane for the “Manage my Microsoft account” link and click on it.
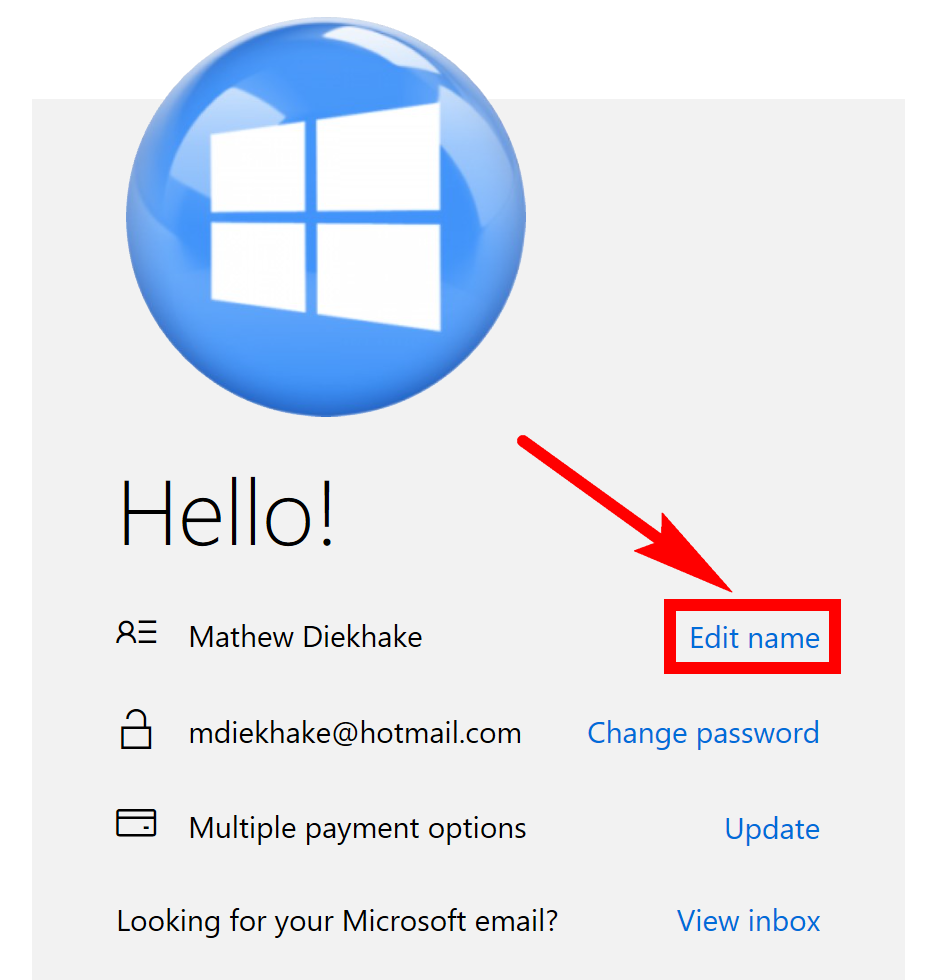
It now opens up your default web browser (which is Microsoft Edge unless you changed it from the Settings.) You’ll need to sign into your account and then look on the left side of the page where it shows you your profile picture and details. To the right of your existing name is an “Edit name” link that you can click. Do that now and then enter the new name that you want to be seen as your name when using Windows 10. Save it and then close the browser window. Your new name will now appear when you reboot the computer.
How to Change Account Username with Local User Account
If the above steps didn’t work for you, then it means you are probably using a local user account and not a Microsoft account. You might see some tips around the web with suggestions that lead to nowhere as well, which is annoying. But we have checked this up, and there is a way that you can do it from the Control panel still working today using the Creators Update (an up to date version of Windows 10.)
To change the local account username in Windows 10, click on the search field in the taskbar at the bottom of the screen and type “User Accounts.” Click on the “User account Control Panel” listing that’s available under the Best match section at the top of the window. It has now opened up the Control for you and given you the quickest route to the User Accounts section. From the User Accounts page, click on the “Manage another account” link. Click on the account name that you want to be renamed. Next, click on the “Change the account name” link. It’ll give you an available field for you to change the existing name and replace it with a new one. The local user account is renamed, and you can close down the Control Panel window.
You might also be interested in:
- How to Reset Password of Local Account or Microsoft Account in Windows 10
- How to Add/Remove PIN From Your Account in Windows 10
- How to Switch User Accounts in Windows 10
- How to Add and Manage New User Accounts in Windows 10
- How to Turn On/Off Sync Settings for Microsoft Account in Windows 10
- How to Change Account Username in Windows 10 When Signed In to Microsoft Account or Local Account
- How to Remove Old User Account Pictures in Windows 10
- How to Change Password of Account in Windows 10
You can subscribe to our RSS, follow us on Twitter or like our Facebook page to keep on consuming more tech.


