Last Updated on July 19, 2022 by Mat Diekhake
If you happen to have searched Google for the Android rooting tools lately, you would have probably come around a tool called WinDroid Toolkit. The said toolkit is a tool that lets you root a number of phones running on the Android mobile operating system.
Not only does the toolkit let you root your Android phone, but it also helps you with unlocking the bootloader on your phone – which is required to be done on most phones that ship with a locked bootloader. Once you have gone through the bootloader process, the toolkit guides you on how you can install a custom recovery on your phone. A custom recovery is a must for some phones for them to be rooted, and the toolkit lets you flash exactly that on your phone.
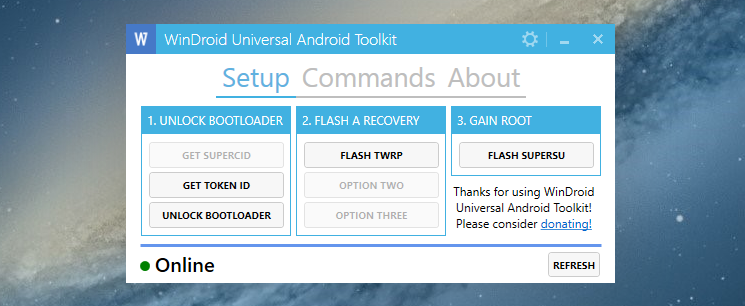
Once you have gone through both bootloader and recovery processes, the last and final option you would see is the root option. Hit it and it will begin to root your phone. Within a few seconds, you should see your phone rooted with SuperSU running on it.
WinDroid Toolkit has been confirmed to be working on a number of devices and if yours is one of those, here’s how to use the toolkit to root your device.
Using WinDroid Toolkit to Root an Android Device
In order to use the toolkit, you must have a computer that runs Windows because the tool is only available for the Windows OS.
- Download WinDroid Toolkit from the XDA Forums to your computer.
- Enable USB debugging on your phone from Menu->Settings->Developer options.
- Plug in your phone to your computer using a suitable USB cable.
- Launch the toolkit by double-clicking on its executable file.
- When the toolkit launches, the first thing you need to do is use all of the options given in the
Unlock Bootloadersection so that your bootloader gets unlocked. - Once you have got your bootloader unlocked, move on to the
Flash a Recoverysection and click on Flash TWRP to flash the TWRP custom recovery on your phone. - Wait for WinDroid to flash TWRP recovery on your phone.
- When the recovery has been successfully flashed, move on to the
Gain Rootsection and click on Flash SuperSU. That should flash the SuperSU ZIP on your phone in order to achieve access to the root. - Wait for it to flash SuperSU on your phone.
- When WinDroid’s done flashing SuperSU, reboot your phone manually.
- Your phone should now be rooted!
And there you go.
So, the WinDroid Toolkit successfully unlocked the bootloader, flashed a custom recovery, and rooted your phone. You can now start to tinker around with your phone using the newly found freedom.
WinDroid has really made rooting a lot of Android phones easier and you should definitely give it a try to see if it works for your phone. If it works, you are lucky as you do not need to go through the hassle of manually issuing commands to unlock bootloader and flash a recovery, as all of those jobs can now be done by just clicking a few options here and there in the tool.
You might also be interested in:
- How To Root An Android Device Using PurpleDrake Method
- How To Install A Custom Recovery On The LG L Bello
- How To Root The LG G4 On Android 6.0 Marshmallow
- How To Root The Motorola Moto X On Android 5.1 Lollipop
- How To Install A Custom Recovery On The Huawei Nexus 6P
Have something to say? You can contribute to this tech article by leaving a comment below.
April 18, 2021 @ 03:19
The”unlock bootloader” button is u clickable, what do I do, and which other tools are available for use