Last Updated on December 26, 2022 by Mat Diekhake
The Windows operating system stores temporary files on the hard drive. There are a few reasons why Windows chooses to do this. The first is that individual Windows apps and programs like Microsoft Word create temporary files so that people who created them can jump in and edit them. Also, certain MS-DOS-based standard applications choose to build temporary files so that they can swap over to the disk to make room for other applications. Lastly, printing from Windows and Windows-based applications with the spooler enabled will always create temporary files on the hard disk of the computer. The Windows operating system then spools the job to print the item as a temporary file and then sends that information over to the printer that is connected to the computer to complete the printing job as a background application.
Most people who use computers don’t understand the need for having temporary files. Instead, they notice that temporary files are something that can be deleted to make more room on the hard disk when memory is running low. Tools like CCleaner that were brought out into the mainstream to help people delete unneeded files made people aware of temporary files. Now, in Windows 10, there isn’t as much need to have a tool on your computer like CCleaner. It’s possible to delete things like temporary files to create that extra hard drive space directly from the Settings app.
It’s always a wise option to choose to delete the temporary files. For starters, you’ll likely never need them again for anything, and they remain the most convenient way to create more space on the computer quickly.
This is what you need to delete the temporary files safely, so you free up that hard disk space without causing any problems when you’re using a version of the Windows 10 operating system.
How to Safely Delete Temporary Files in Windows 10
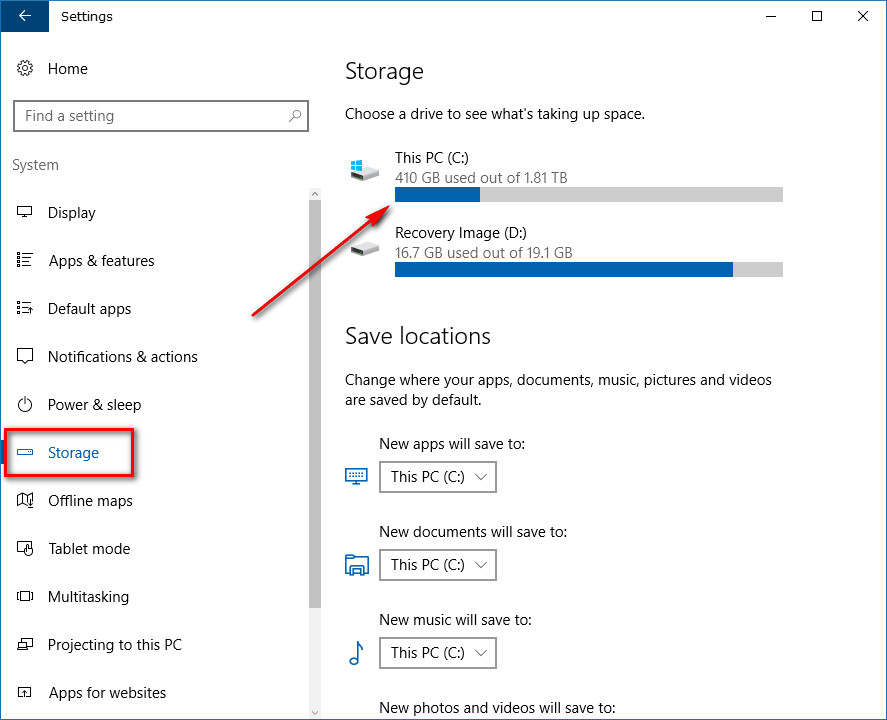
Open up the Settings app by navigating to the Start menu > Settings gear icon in the left pane and then click or tap on the “System” option from the Windows Settings menu. Once you’ve done that, look for the “Storage” option in the left pane and click or tap on it. You’ll then to get to see the “This PC” that shows the C: drive and how much of it is used. You can click this C: drive to expand it. Do that now.
Give it a while to load correctly and display all of the information. You can see how the storage is currently being used on the computer. The top option gives you the overall storage that is being used and how much if remaining on your computer. The rest of the list gives you a more specific breakdown of what exactly using up that space.
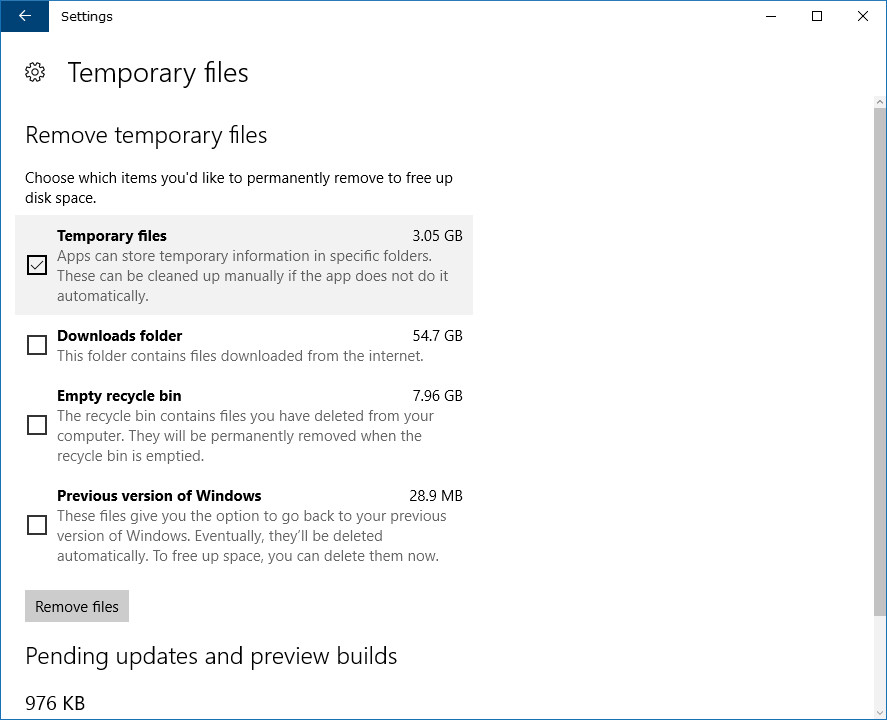
If you scroll down the page, you’ll be able to see where it shows you the “Temporary files.” Click or tap on it to expand it.
Four main areas show up on this page, and the first is the Temporary files. It won’t have a checkmark in the box by default, so you need to click or tap in that box if you want to delete the temporary files. While you are here, you might also want to check out the other options on the page. The Downloads folder is not something you want to empty, or you might lose important things that are in the downloads folder. However, if you are confident that there is nothing in the recycle bin that you need any more, that might be another option you want to check the box, so it is going o be deleted at the same time as your temporary files.
When you have made your selections, click or tap on the “Remove files” button that is available underneath the four options.
Next time you visit the temporary files area in the Settings app, it should show up that there are no files there until you create some more. These temporary files can build up quickly if you are a regular user of the computer, so you might want to continue doing the clean up about once a month or so. Also, you can check out how much space your computer now has after doing the cleanup by heading to the Start menu > File Explorer and looking under the “Devices and drives” section.
You might also be interested in:
- How to Turn On/Off the Windows Welcome Experience in Windows 10
- How to Change Email Name in Windows 10 Mail
- How to Change Folder Icon in Windows 10
- How to Change Power Plan Settings in Windows 10
You can subscribe to our RSS, follow us on Twitter or like our Facebook page to keep on consuming more tech.


