Last Updated on December 26, 2022 by Mathew Diekhake
Viruses have always been a chief concern for Microsoft and their Windows operating system. It has always been more prone to picking up a virus in comparison to its competition, like Mac operating systems, because more people use Windows machines, and therefore, the people creating the viruses find Windows more appealing to run viruses.
Go back several Windows versions, and there was no built-in antivirus. The one that Microsoft had on offer (Windows Defender) wasn’t all that great either. It still noticeably trailed behind the benchmark handful that people were using, as it transitioned from spyware to antivirus people could rely on for malware protection.
Nowadays there are still plenty of people choosing to pay for antivirus. Not everyone agrees that Windows Defender offers malware protection that performs as well as other third-party brands. You can find both paid and free versions from third-party software. However, the Windows Defender antivirus has a growing user base. Most people only use it and don’t worry about using another antivirus when they buy a computer that is running on a version of the Windows 10 operating system.
For the most part, you shouldn’t ever have any issues with Windows Defender. Ours runs in the background silent each time our computer is turned on, and we never have to ponder antivirus performance. However, there will be some people who a) want to make sure that their Windows Defender app is working and b) how to update it manually if its automatic updates aren’t timely enough.
The following tutorial demonstrates how to manually update Windows Defender when you’re using a version of the Windows 10 operating system.
How to Manually Update Windows Defender in Windows 10
Here is how you can manually update the Windows Defender antivirus in Windows 10:
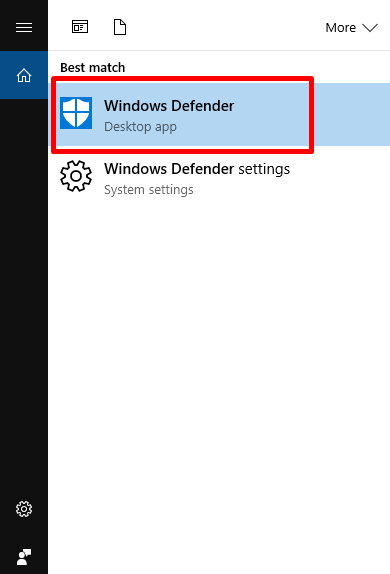
1. Type Windows Defender into the Search Windows box available from the taskbar, and click on the Windows Defender app when it becomes available at the top of the menu.
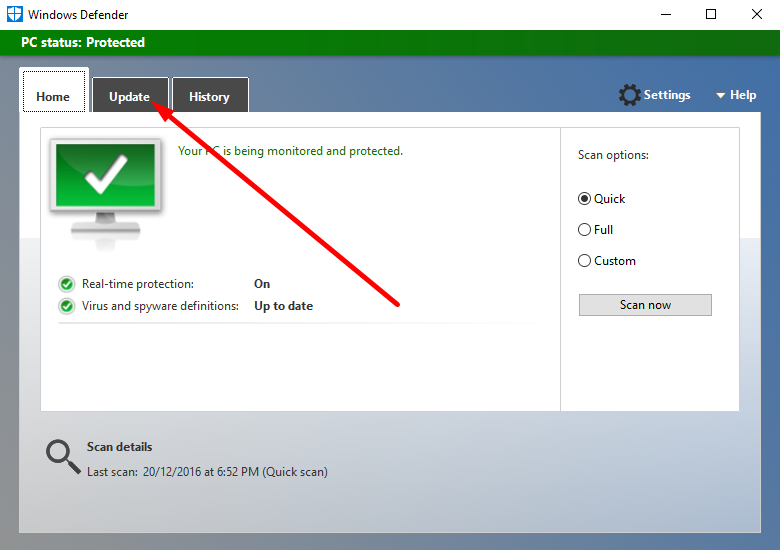
2. You then get your Windows Defender dashboard on the computer screen. Click on the Update tab that is available at the top of the page.
3. You then get to see when the definitions were created last on your computer. If there is no a definition created in the past 24 hours, then you should consider updating manually. If yours is like mine and you can see, there has been a definition set up within the past 24 hours then yours doesn’t need updating. That’s a good indication of understanding how your Windows Defender is working on your computer.
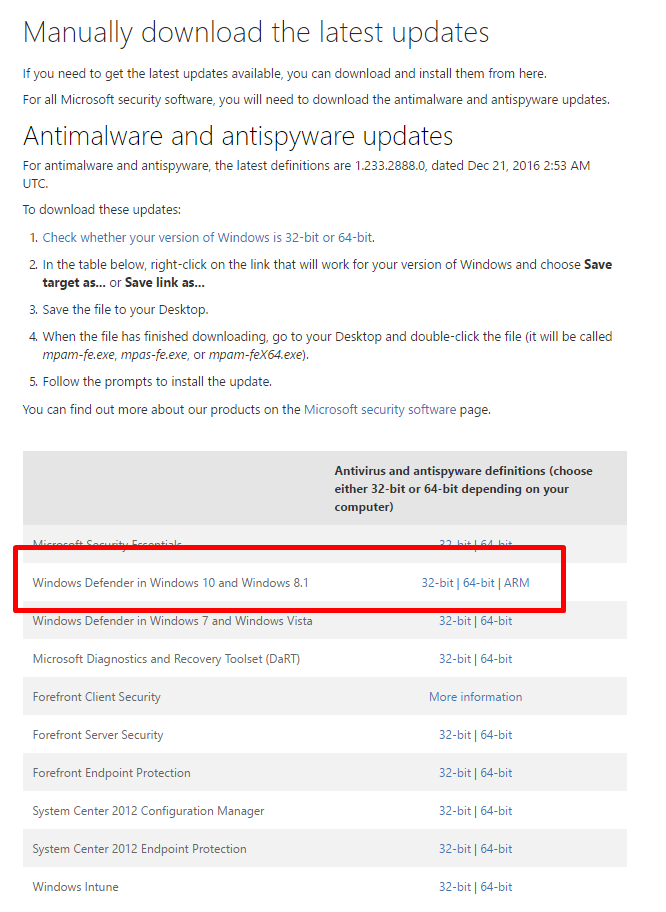
4. Visit the download page and then scroll down until you get to the part where it shows you the Manually download the latest updates heading to find out how to get yours. You can see the link that is available for people with the Windows 10 operating system where it says “Windows Defender in Windows 10 and 8.1.”
5. You need to find out if your version is a 32-bit or 64-bit version of the Windows 10 operating system. You can follow the link available through to the Microsoft page that goes into great details about how finding out the difference is done. But just for a rule of thumb: almost all computers that are relatively new are running on the 64-bit architecture and the 32-bit architecture is typically for older computers only because it’s less powerful and older technology that we are apparently moving away from as we head into the future of computing systems.
That is all that is required to manually update Windows Defender when using a version of the Windows 10 operating system on your computer. The same guide should work across all devices, including desktops, laptops of any kind and the Microsoft Surface range of tablets and books too.
This article was last updated on may 3, 2019.
Related Tutorials
- How to Check the Installation Date of Apps and Programs in Windows 10
- How to View the Recently Installed Apps and Programs in Windows 10
- How to Automatically Hide the Taskbar in Tablet Mode in Windows 10
- How to Enter the Tablet Mode in Windows 10
- Differences Between Windows 10 Home and Windows 10 Professional


