Last Updated on December 26, 2022 by Mathew Diekhake
Windows 10 gives you the chance to choose between and change power plans at any time with ease.
There are three existing power plans that you can choose from directly from the current options Windows 10 has on offer. The default option that you get is set to “balanced,” and it offers what Microsoft thinks would make a good blend of hardware performance and power efficiency. The remaining two settings provide a way to either favor the power efficiency or maximize the performance. If none of those three options sound appealing to you, Windows 10 also offers the chance to change all three power plans so you can customize your choices to get a desired result.
Windows 10 offers several ways to get to the Power Options menu. Most people who have followed Windows operating systems for a while will probably already be familiar with how to get there from the Control Panel, and might even like the fact that it still is available to use today. The Windows 10 Settings application also offers a way for you to change the screen and sleep settings, too.
The different power plans that come with Windows 10 are some of the most practical features for everyday Windows users. They allow you to customize the power options to suit your lifestyle better. These options are put into plans so you can just select the full plans that you want without having to change numerous things to get different power options. It’s possible to create the plans because each option generally has some relevance to another alternative. For example, if you don’t care about energy consumption at all, you’ll likely be interested in having the best quality display working. Or if you prefer to save power, you’ll be willing to allow the computer to sleep at a quicker time.
If you are using a version of Windows 10 that was out before the Creators Update, Windows 10 shows two preferred plans from the Additional power settings menu.The first option is for the “Balanced” system which offers a good mix of usability and power saving. In other words, it won’t put itself to sleep or hibernate too quickly, but you can expect those features to be turned on and ready to work when you step away from the computer for an extended period. The other option is the “Power saver; ” it turns off the display the quickest (after just five minutes) and puts the computer to sleep the fastest (after 15 minutes) to preserve the battery of a laptop or electricity of a desktop as much as possible.
If you click or tap on the little arrow to the right of where it says “Show additional plans” beneath those two, you’ll get one more option called “High performance.” The high-performance power plan is there for those who are happy to keep the computer’s display on for a full 15 minutes and never have the computer be put to sleep at all.
How to Change Power Plan Settings in Windows 10
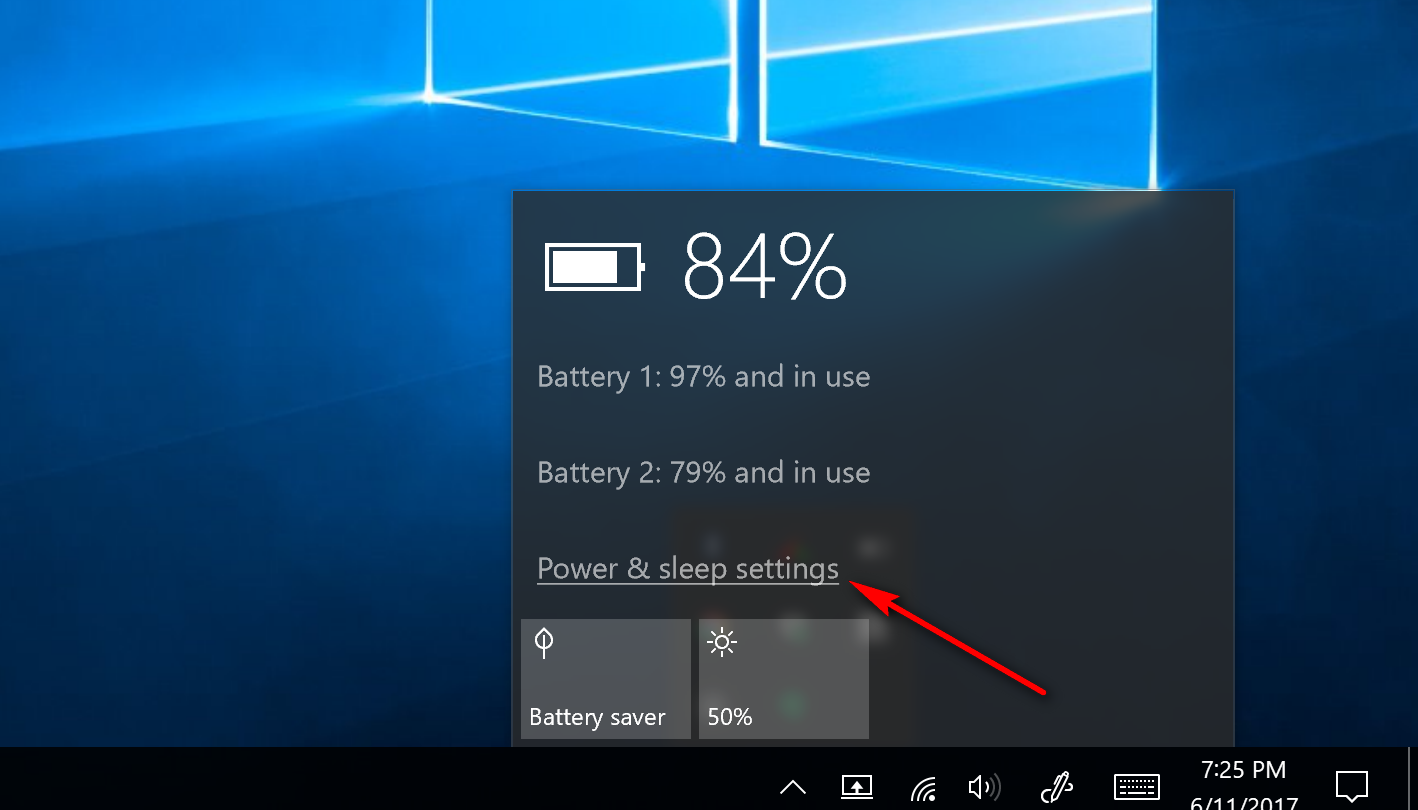
Anyone using a laptop running on Windows 10 has different power options compared to people with desktop PCs. The reason being that laptop users have a battery, and desktop computer users do not. Laptops users have a battery icon available from the system tray that gives them quick access to the battery settings and statistics. If you do have a laptop and want to use it, you’ll likely need to click on the arrow positioned on the far left side of the system tray and then click on the battery icon from within that are that shows more icons. Windows only shows a few icons from the system tray by default due to a lack of room, and they don’t prioritize the battery icon enough for it to be on display without having to click the arrow. The same area also gives you access to the “Power and sleep settings” that directs you through to the Settings app.
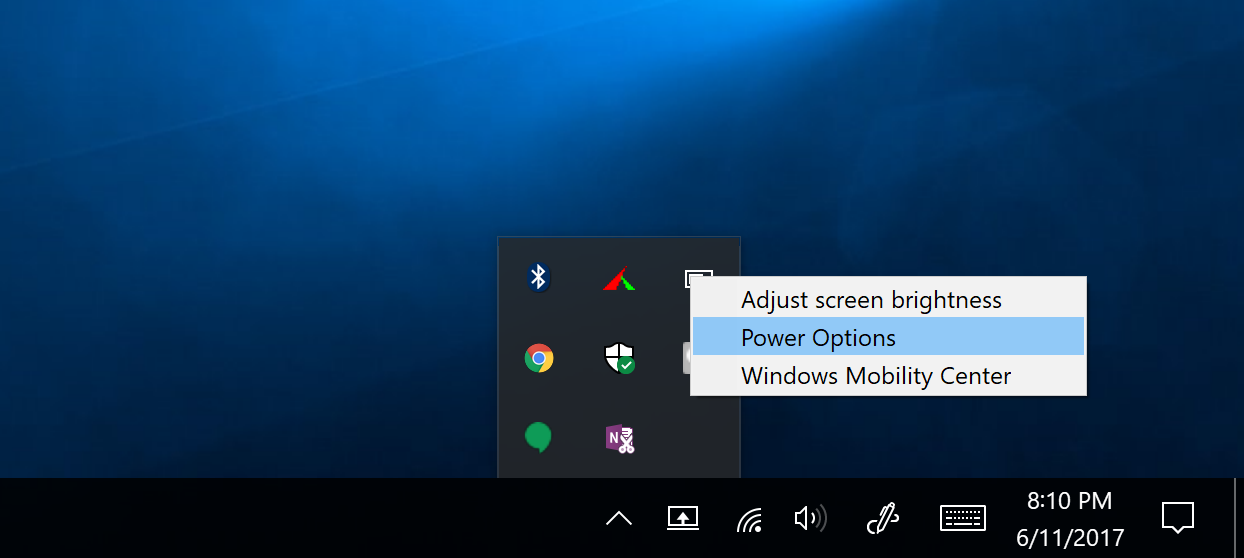
Another thing you can do from the same battery icon in the system tray is right-click on it instead of the traditional left-click. When you do that, you’ll get a “Power Options” link from the menu that you can click on that takes you through to the Power options in the Settings app.
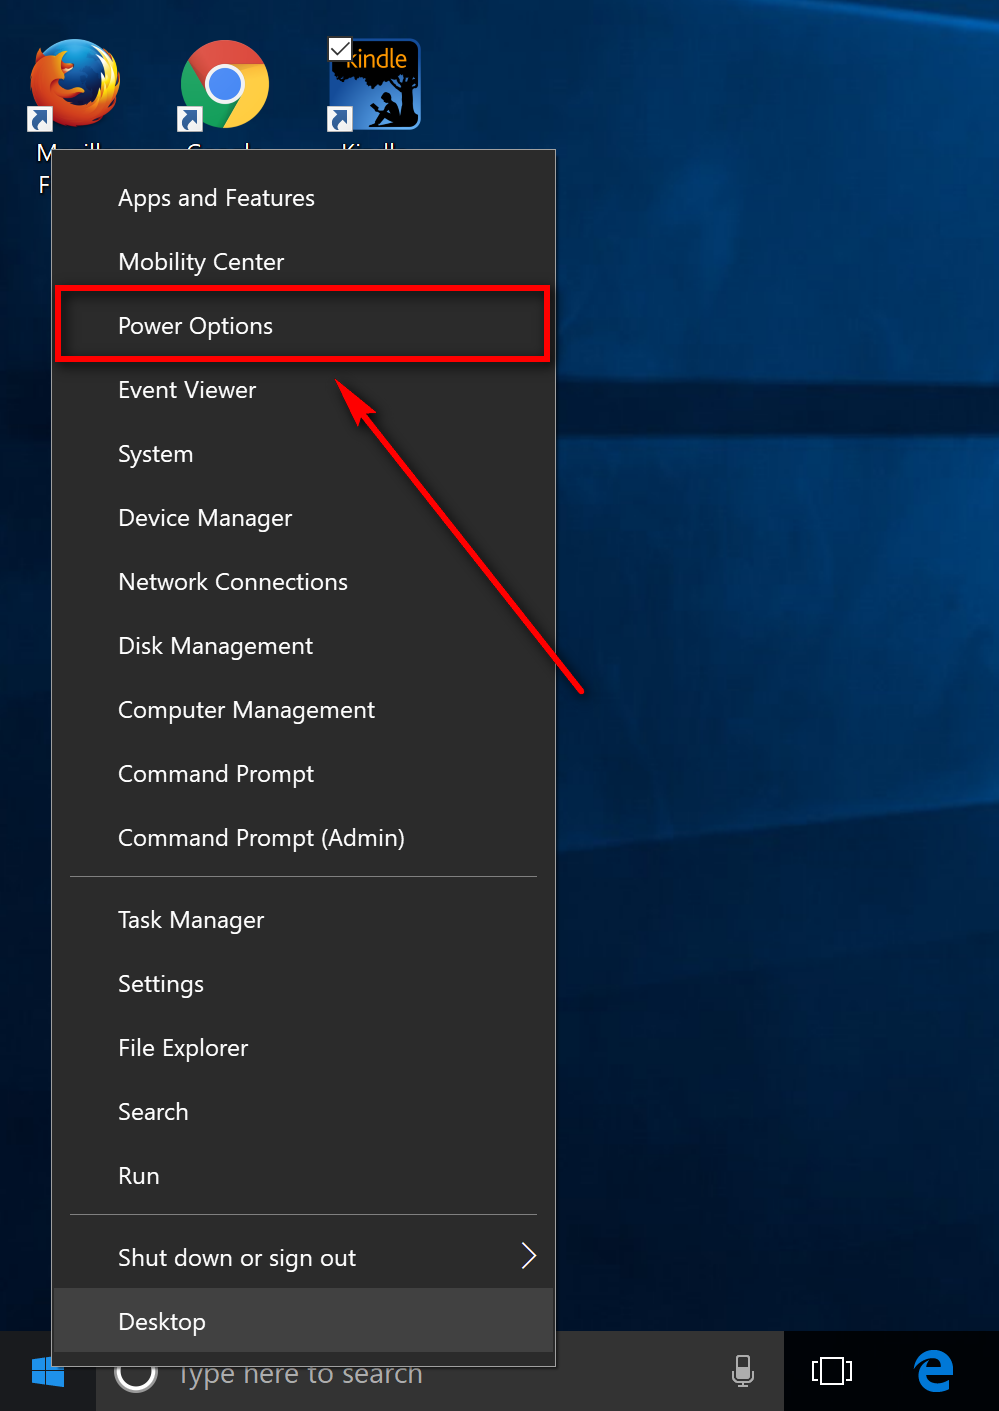
Another quick way to get access to the Power Options is by right-clicking on the Start button from the far left side of the taskbar. You can also bring up the same menu by pressing the Windows logo + X keys, otherwise known as the Quick Links menu.
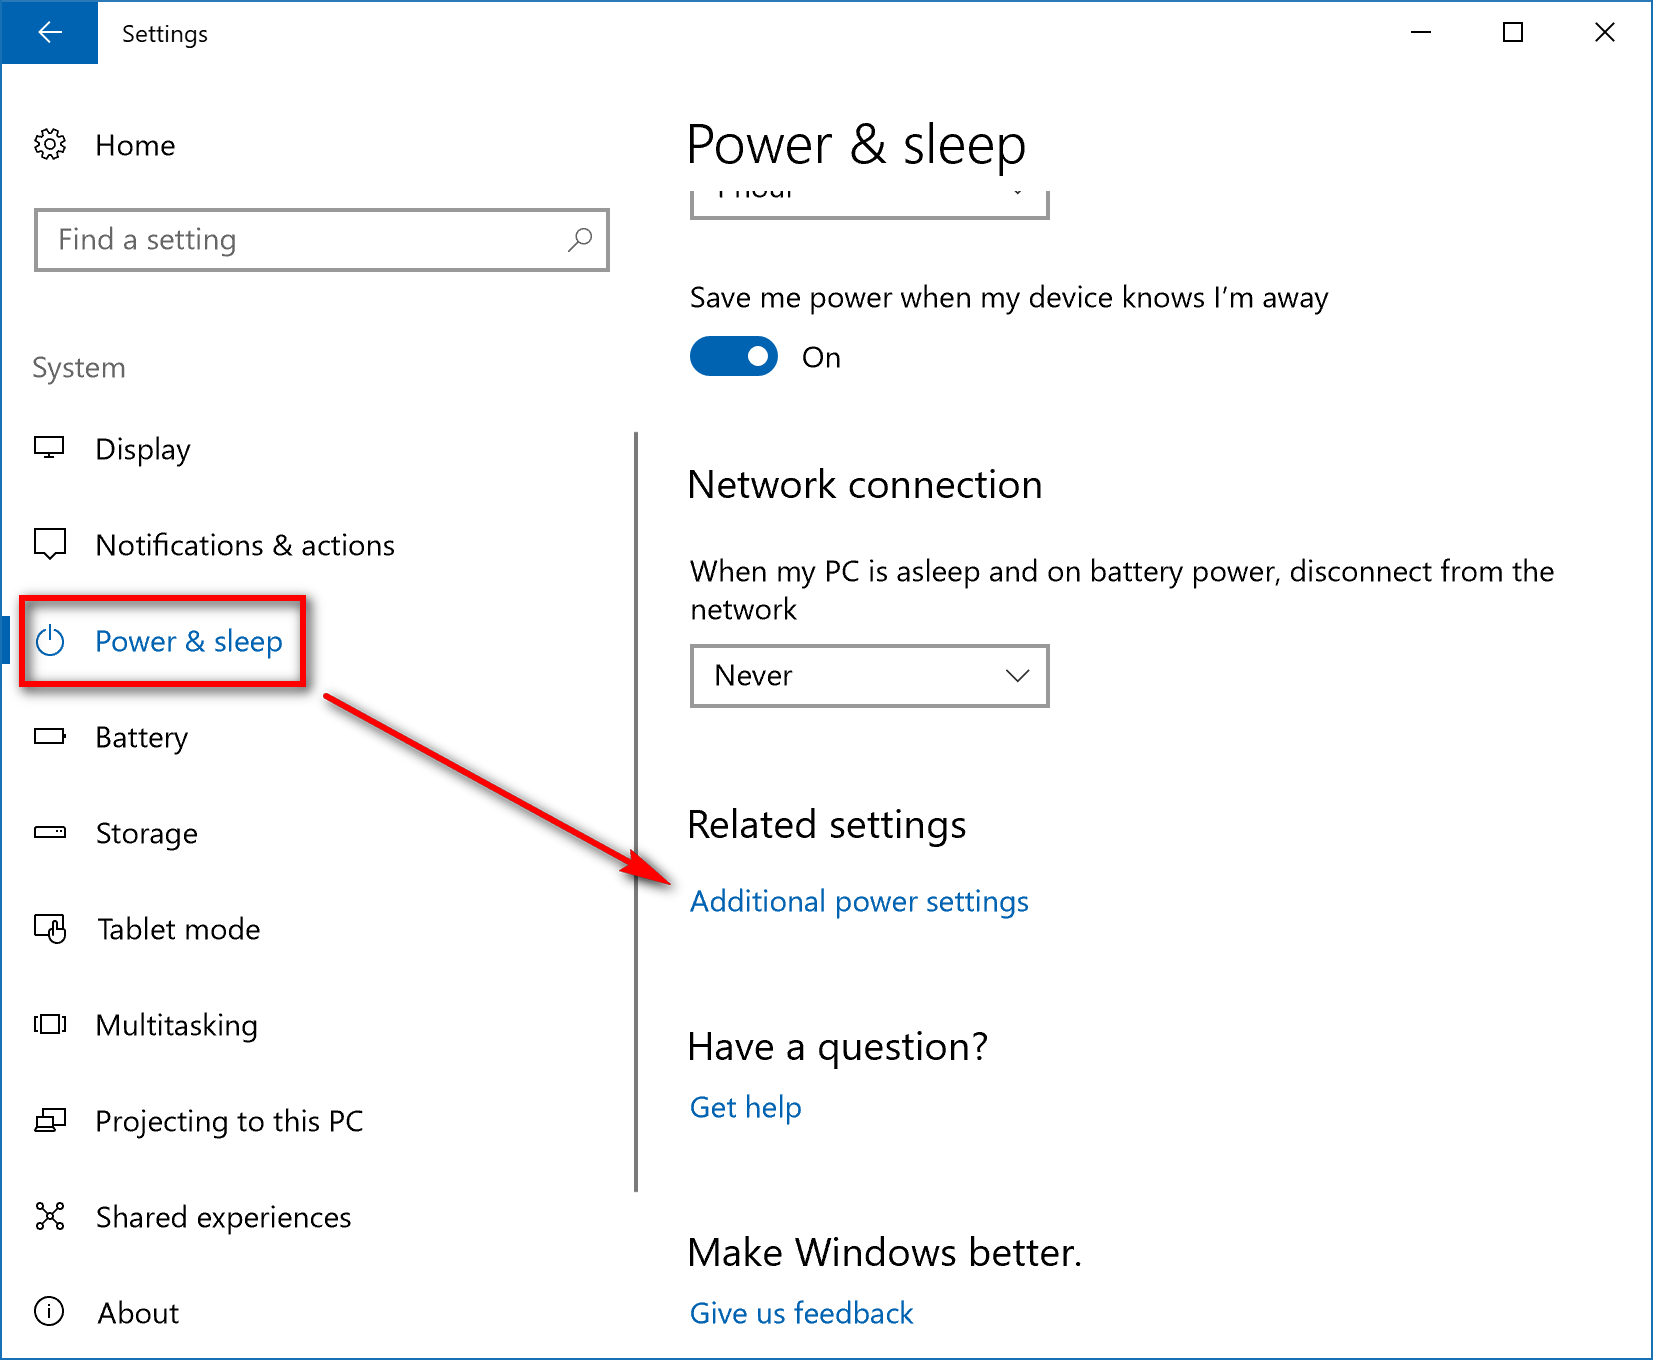
If you prefer navigating directly to the Settings app to get to the Power Options, you can do that also. Head to the Start menu > Settings gear icon > System > Power and sleep and then click on the “Additional power settings” from the Related settings heading.
You’ll see three options for you to choose from on this page that is all existing power plans. The default setting in Windows 10 is set to the “Balanced” option which offers a good balance between saving energy and optimizing user experience. There’s also the Power saver and High-performance options if you prefer them over the balanced.
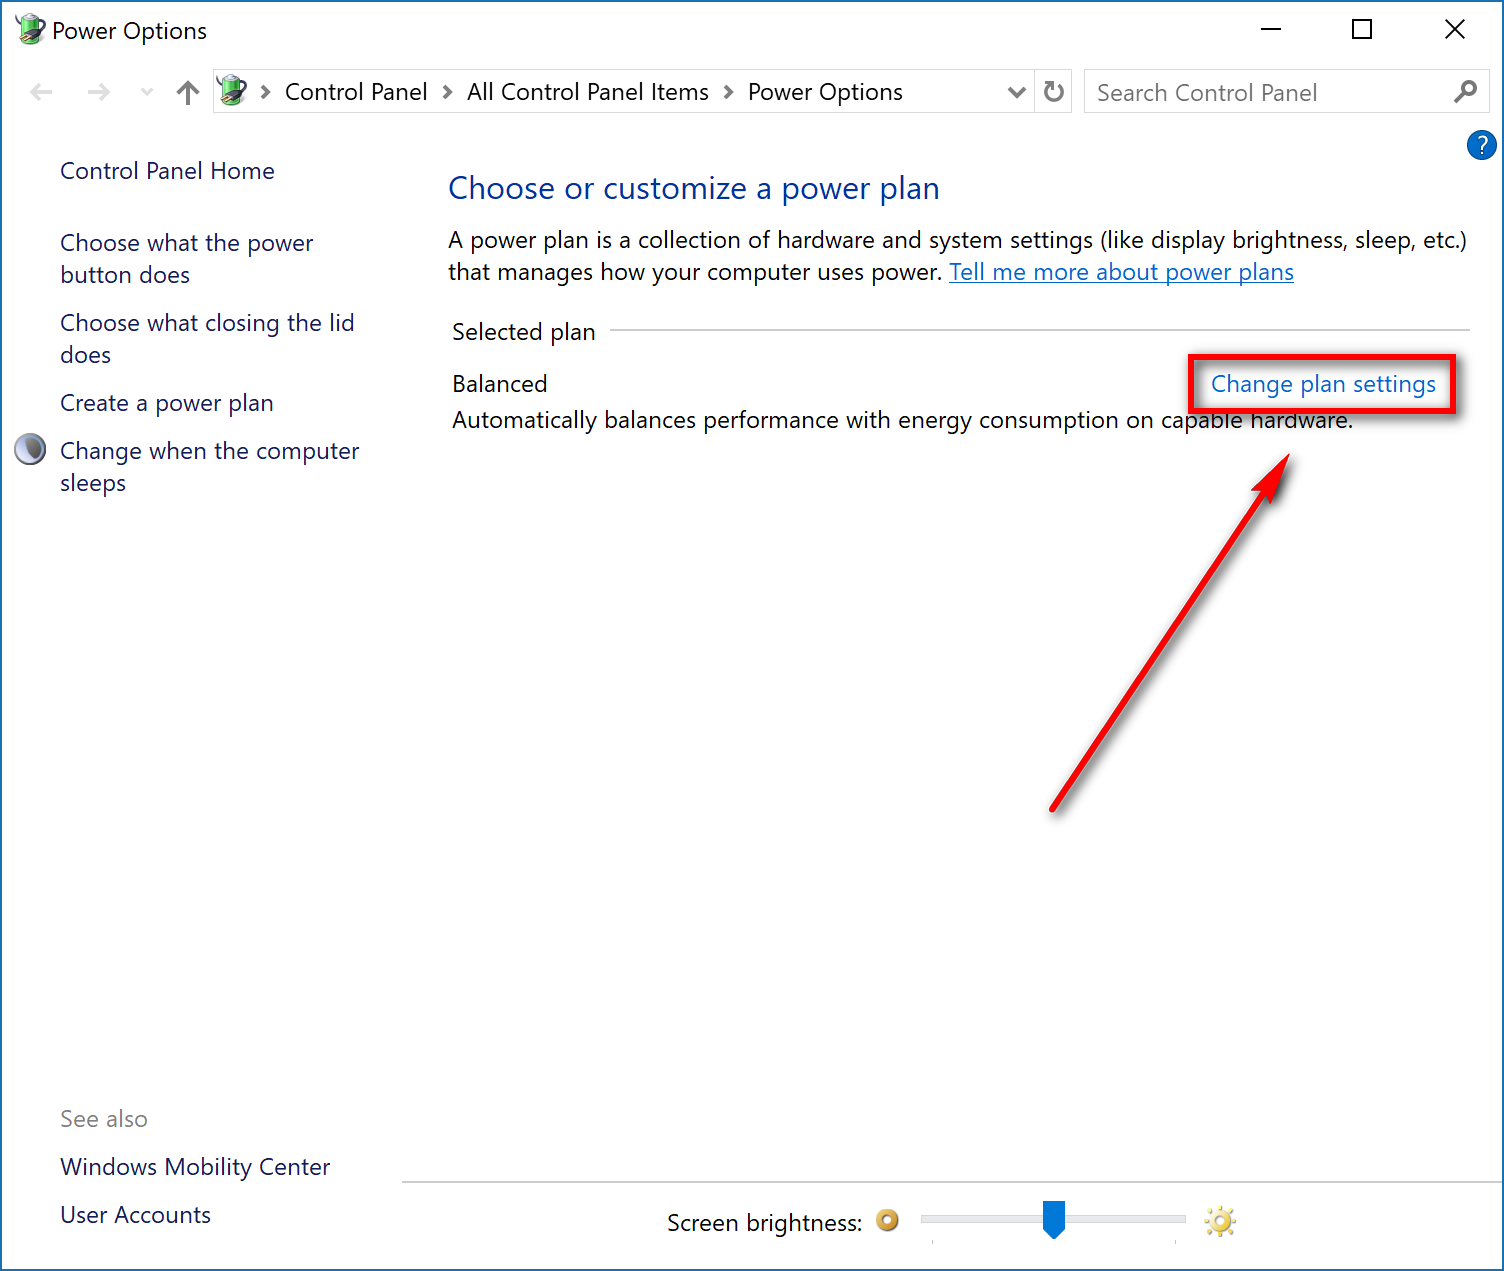
Sometimes laptops running Windows 10 don’t offer the same three options on the page and instead show the same picture as below. You’ll find a Windows Surface Book running on the Creators Update opening up to the following window. When that happens, you can click on the “Change plan settings” from the right side.
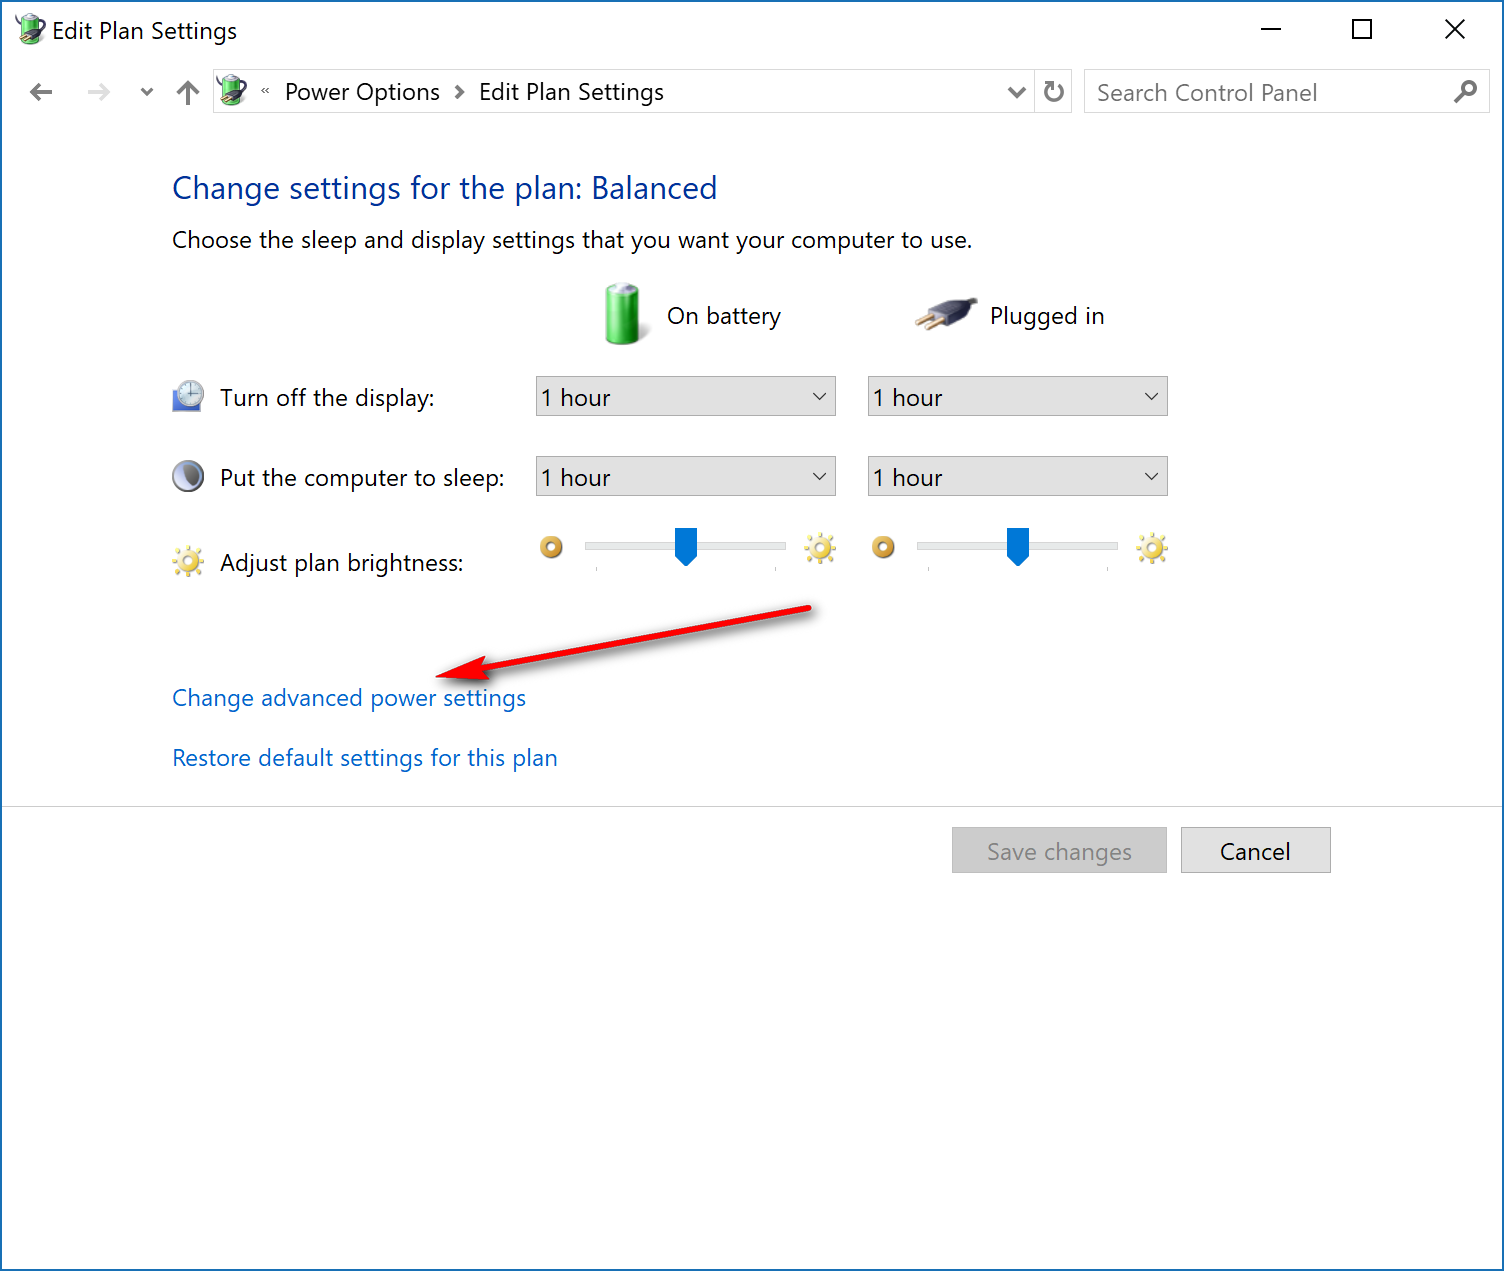
It then gives you the chance to choose manually how long you want to keep the computer’s display on for and how long you want the computer to wait before it is put to sleep. Beneath all of that is another link that says “Change advanced power settings” that you can click on to get more advanced settings to choose from.
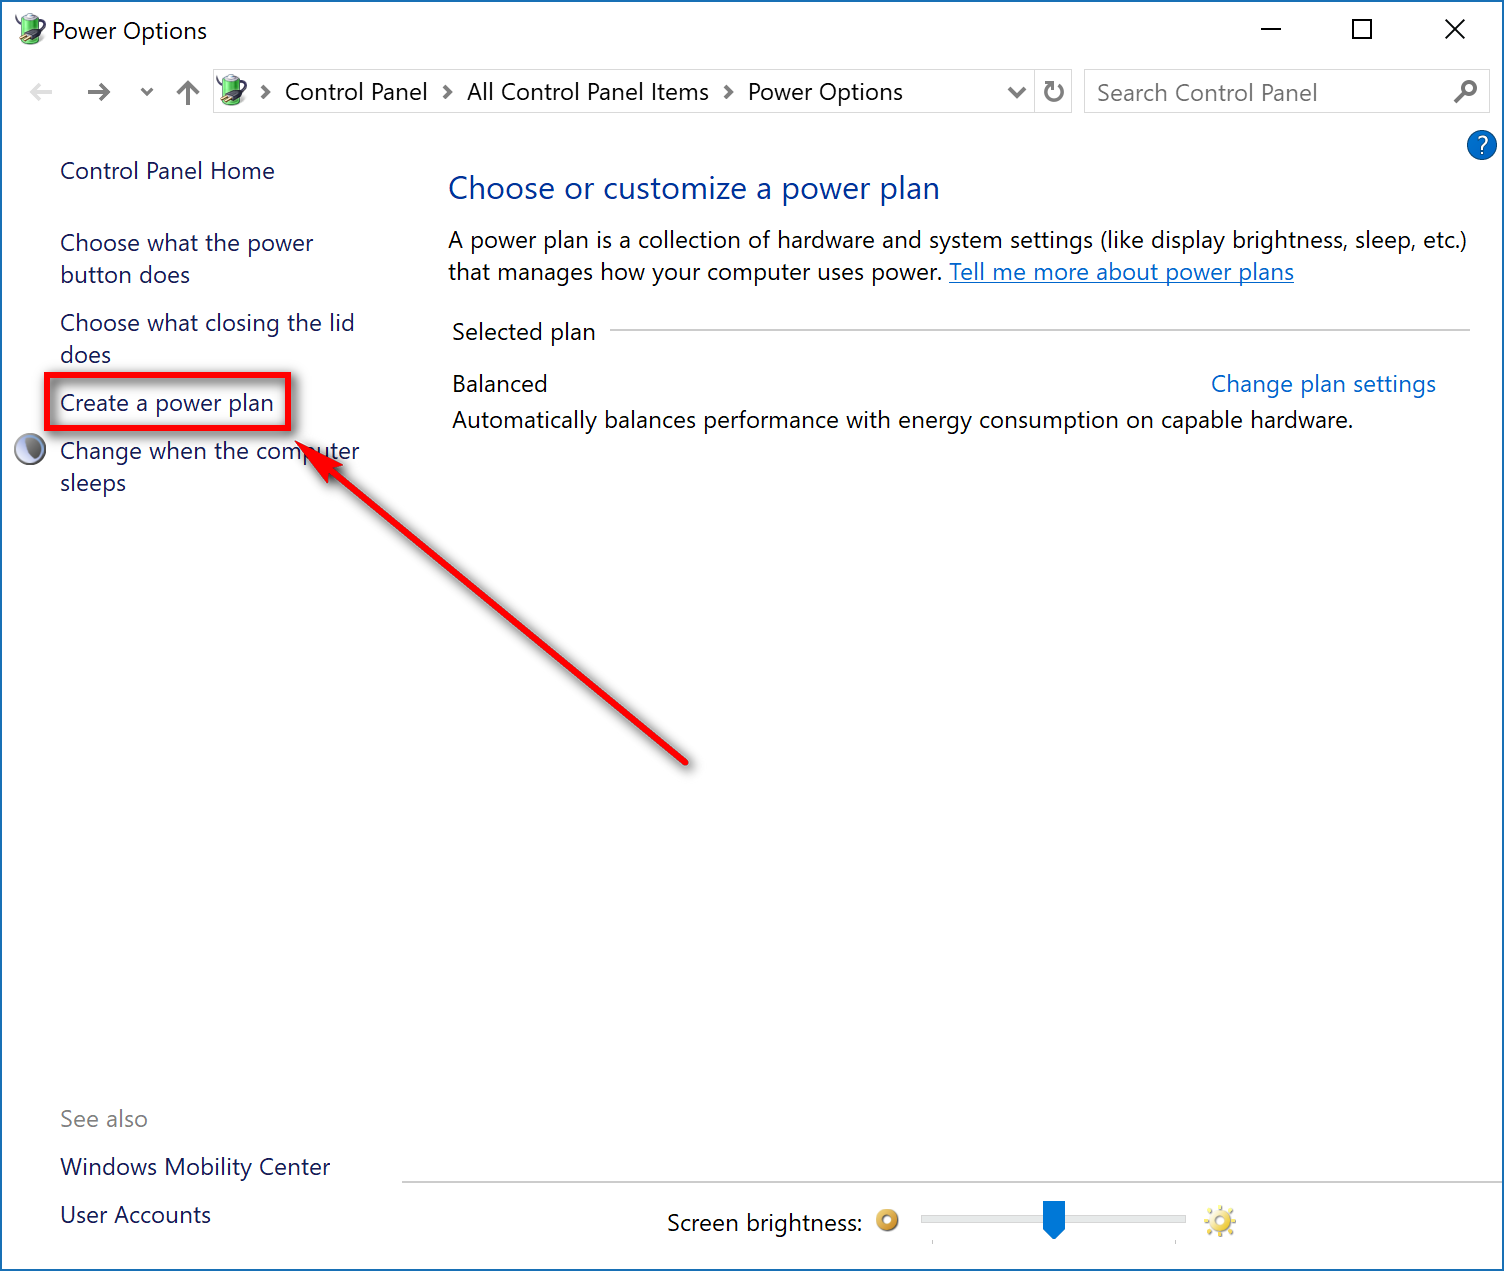
If you look in the left pane, there is also a link that says “Create a power plan” that you can click on if you don’t like any of the existing power plans available and would prefer creating your own by using the available options.
The Windows operating system always keeps things at a happy medium for everyone, so nobody hates what they get. It’s the same thing with the power options that you have turned on for you by default. It’s always best to go into the power options and set them to what suits your life better instead of leaving them as they are now which was designed to try to meet the needs of all people using Windows around the world.
You might also be interested in:
- How to Delete a Note from Microsoft OneNote
- How to Turn Off Hard Disk After Idle in Windows 10
- WhatsApp For Windows Desktop Keyboard Shortcuts
You can subscribe to our RSS, follow us on Twitter or like our Facebook page to keep on consuming more tech.

