Last Updated on July 29, 2022 by Mat Diekhake
The following tutorial demonstrates how to uninstall — and then reinstall if you like — the Internet Explorer 11 web browser from the Windows 10 operating system.
Although Microsoft had developed a newer web browser, Internet Explorer was still available to use in Windows 10 when users made the upgrade; and in fact, IE 11 is still available to be opened today if you were to search for it from the search box in the taskbar.
IE being available is important for some people because many had gotten to know it over the years and still enjoyed using it. At some point those people will have to make the switch over to a newer browser such as Microsoft Edge however because the development of IE 11 has stopped, i.e., the IE browser has been discontinued. This will eventually lead to incompatibility problems as you always need to update a browser so that it works with the newer software that is attempting to be shown on it. There’s also the chance it will become a security risk as well.
But for the time being, there’s nothing wrong with using IE 11. Due to its popularity, it’s not uncommon for Windows users to open it up and check it out or use it as a second or third browser for some tasks they wish to be separated from their main daily browser. And there are some advantages to IE 11: websites tend to appear closer up when viewing from laptops than some alternatives, no toolbars are taking up unnecessary screen real estate, and it has tabs beneath the address bar which is unique to modern browsers for no particular reason.
How to Uninstall Internet Explorer 11 via Windows Features
You can use Windows Features to uninstall and install the Internet Explorer browser from the computer. Here is how to do that:
1. Open the Control Panel app. Here are all the different ways in which you can open the Control Panel in Windows 10: How to Open Control Panel in Windows 10 [Tutorial]
2. Open the Windows Features dialog. Here are all the different ways in which you can open the Windows Features dialog: How to Turn on/off Windows Features in Windows 10 [Tutorial]
3. Scroll down and then click on the Internet Explorer 11 checkbox to uncheck it, and then click on the OK button at the bottom of the Windows Features dialog window.
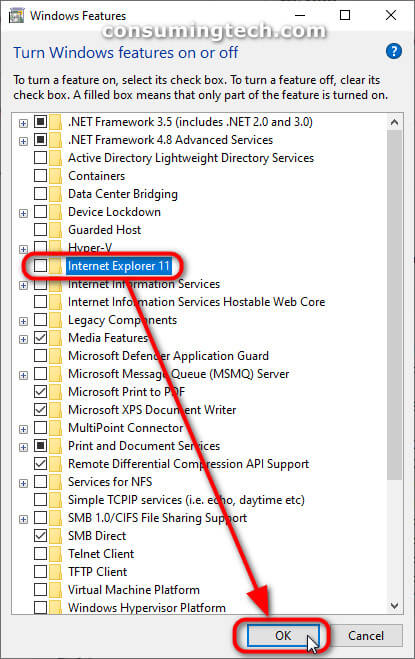
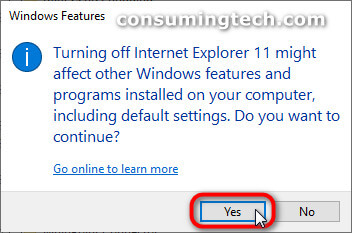
4. After clicking OK, you will get a message from Windows Features letting you know that “Turning off Internet Explorer 11 might affect other Windows features and programs installed on your computer, including default settings.” Click on the Yes button to proceed with the uninstallation of the IE 11 browser.
5. To install the Internet Explorer browser again at a later date, open the same Windows Features window as above, scroll down to the Internet Explorer 11 listing again, and this time check the box and click on the OK button to confirm you want to reinstall the IE 11 browser again.

How to Uninstall Internet Explorer 11 in Windows PowerShell
You can uninstall and install the Internet Explorer browser by using Windows PowerShell commands instead of navigating around the eprating system. Here is how to do that:
1. Type the following command into the PowerShell window and then press the Enter key on the keyboard to execute it:
Disable-WindowsOptionalFeature –FeatureName "Internet-Explorer-Optional-amd64" -Online
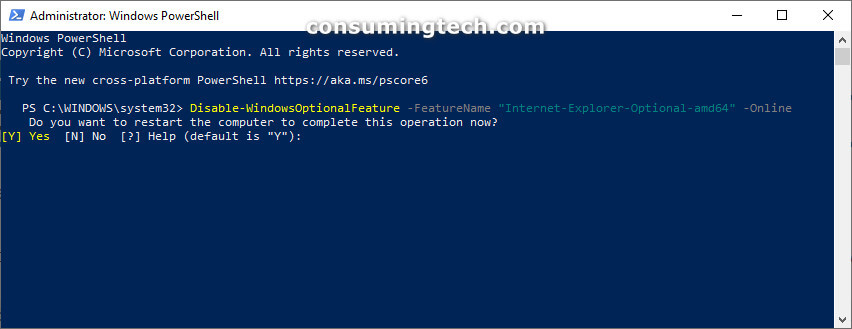
2. Once Windows has finished successfully executing the command, PowerShell will let you know it needs to restart the computer for the uninstallation to be completed. Type Y and then press Enter to confirm this process and then wait for the computer to restart.
How to Install Internet Explorer 11 in Windows PowerShell
You can uninstall and install the Internet Explorer browser by using Windows PowerShell commands instead of navigating around the eprating system. Here is how to do that:
1. Type the following command into the PowerShell window and then press the Enter key on the keyboard to execute it:
Enable-WindowsOptionalFeature –FeatureName "Internet-Explorer-Optional-amd64" -All -Online
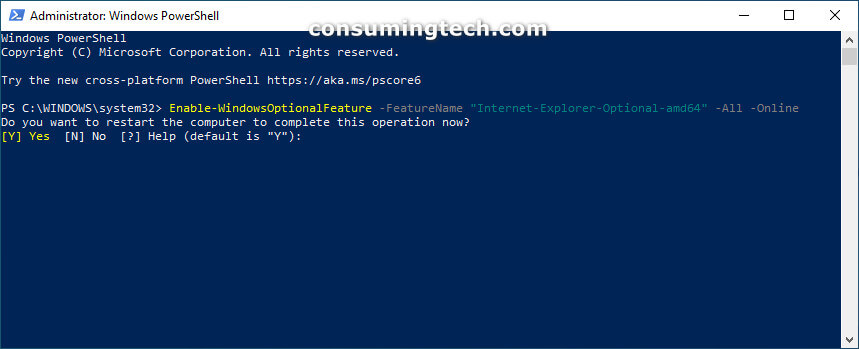
2. Once Windows has finished successfully executing the command, PowerShell will let you know it needs to restart the computer for the uninstallation to be completed. Type Y and then press Enter to confirm this process and then wait for the computer to restart.
(This article was last updated on September 27, 2021.)
Related Tutorials
- How to View Microsoft Edge Downloads in Windows 10 [Tutorial]
- How to Allow/Block Cookies in Microsoft Edge in Windows 10 [Tutorial]
- How to Turn on/off Potentially Unwanted App Protection in Microsoft Edge [Tutorial]
- How to Turn on/off Clear Browsing Data When Closing Microsoft Edge [Tutorial]
- How to Enable/Disable Microsoft Edge Pre-launching in Windows 10 [Tutorial]
- How to Delete/Change Saved Passwords in Microsoft Edge in Windows 10 [Tutorial]
- How to Enable/Disable Extensions in Microsoft Edge [Tutorial]
- How to Pin Email Folder or Full Email Account to Start Menu in Windows 10 [Tutorial]
- How to Turn on/off Reading View in Microsoft Edge in Windows 10 [Tutorial]
- How to Enable/Disable Tab Groups in Microsoft Edge [Tutorial]