The release of Windows 8 Consumer Preview in February saw a multitude of changes when it was released to the public in its Beta form. It seems that its release which was almost three years after its predecessor Windows 7, has given the team at Microsoft ample time to revamp Windows completely. And basic functions that have become part of everyday life for Windows users, are not as they were before.
One of the more noticeable changes rears its head when you make a mistake and need to turn off your PC and restart it in Safe Mode. This task was as easy as holding down F8 as you turn on your PC, allowing you to make the necessary changes to fix the issue in a basic Windows server screen. This is no longer the case, now you must enable Safe Mode in Windows 8, and we have the guide to show you how.

How To Start Windows 8 In Safe Mode
Step 1. You need to bring up the Charms menu, to do this just hover your cursor over the far left or right corners of the screen.
Step 2. From the Charms menu select ‘Search.’
Step 3. Enter ‘cmd’ into the search box. When the command prompt icon appears, right-click on it and select ‘Run as Administrator.’
Step 4. The command prompt will open, then you need to enter the following:
bcdedit /enum /v
Press ‘Enter.’
Step 5. A list of your systems information will appear as above. Your looking for ‘Windows BootLoader,’ when you have located this you should find the section with the following description: ‘Windows 8 Consumer Preview’. You will also need to highlight and copy everything under ‘identifiers’ as marked above in yellow.

Note: This includes copying the { } and all in between.
Step 6. Next, you will need to type the following into the command prompt changing the {youridentifierstring} to that which you have just copied (Remember to press ‘Enter’at the end of each line):
bcdedit /copy {youridentifierstring} /d “Windows Developer Preview (Safe Mode)”
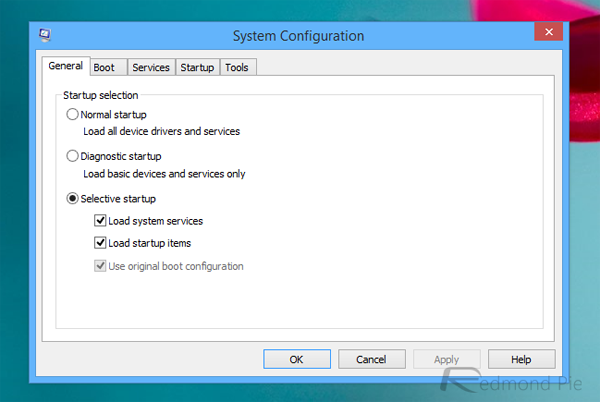
Step 7. You will need to reopen the Charms menu and search for MSConfig from the Apps category. The MSConfig program will open. You will need to click on the ‘Boot Tab.’

Step 8. Select ‘Windows Developer Preview (Safe Mode).’
Step 9. Then Select ‘Safe Boot.’
Step 10. Change the Boot Settings to ‘Permanent.’ Then click ‘OK’ then ‘Yes.’
When you restart your PC, you will be given the option to boot into either Safe or Normal Mode.
You might also be interested in:
- How To Burn Windows 8 ISO Image File To A DVD
- How To Add Google Calendar To Windows 8/8.1 Calendar App
- How To Continually Show All Users On Login Screen In Windows 8
- How To Disable AutoRun And AutoPlay In Windows 8
- How To Disable Spell Check/Auto-Correct On PC And Surface/All Windows Tablets In Windows 8
Have something to say? You can contribute to this tech article by leaving a comment below.