Last Updated on February 25, 2024 by Mathew Diekhake
I have used the Windows Mobility Center as a Control Panel item on my laptop and would like to enable the same feature so that I can use it on my desktop as well. That way I can still get access to my volume, screen brightness, power options to Wi‐Fi, and Bluetooth settings on my desktop, even though they’re features that are more relevant to laptop usage. Resolution:
The Windows Mobility Center is a feature found within the Windows operating system that gives you quick access to some of the most commonly used features. The name “Windows Mobility Center” alluded to these features being undeniably the most common for mobile devices. For that reason, you won’t find it available for desktops unless you have enabled it, or the computer is connected to UPS.
Though you will use many of the same individual features from desktop, it is the option to save your preferences within the Windows Mobile Center via the Presentation Settings and Sync Settings that make it truly unique. For example, if you were to need to give a Microsoft PowerPoint presentation, you could set your preferences for all features found within the Windows Mobility Center and quickly enable them when needed.
To get the Windows Mobility Center enabled in Windows 10 is not as simple as heading to the Settings app unfortunately; instead, you will need to head into the registry and make a tweak.
The following tutorial demonstrates how to enable the Windows Mobility Center on a desktop computer that is running on Windows 10.
How to Enable Windows Mobility Center on a Desktop Windows PC
You will not find a setting to enable the Windows Mobility Center from the Settings app, Control Panel, or any of the other convenient locations in the Windows 10 operating system; instead, you need to make a registry tweak by using the registry editor application.
1. Open the Registry Editor. See this tutorial is read all the different ways you can open the Registry Editor application: How to Open and Use Registry Editor in Windows 10
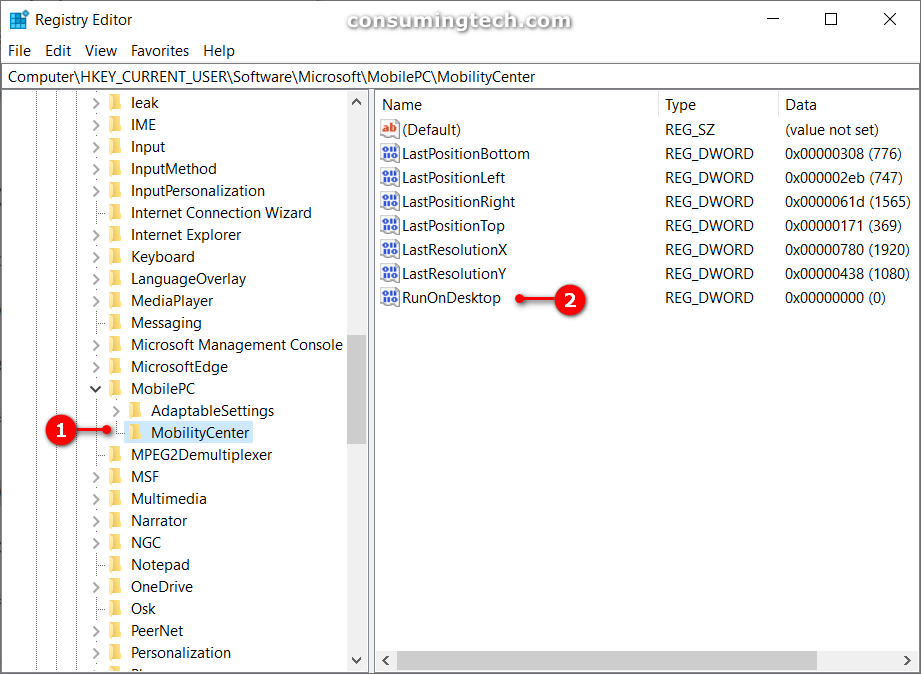
2. Navigate to the following path within the Registry Editor application:
HKEY_CURRENT_USER\Software\Microsoft\MobilePC\MobilityCenter
3. Right-click on a spare bit of space in the right pane and then select New > DWORD (32 bit) Value from the menu.
4. Name the new DWORD RunOnDesktop and then double-click on it to change its value data.
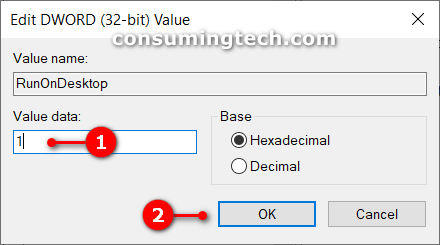
5. In the Edit DWORD (32-bit) Value dialog, change the Value data to 1 and then click on the OK button to save the changes.
You can now close the Registry Editor app and continue using your computer if you like.
That’s all.
Related Tutorials
- Reset Windows Mobility Center Default Open Position in Windows 10
- How to Open Windows Mobility Center in Windows 10
- How to Enable/Disable Windows Subsystem for Linux in Windows 10
- How to Use Office Apps to Sync Office Files with OneDrive in Windows 10
- How to Install Media Feature Pack for N Editions of Windows 10
- How to Create Custom Font with Microsoft Font Maker App in Windows 10
- How to Make Cortana Understand Your Voice Easier for ‘Hey Cortana’ in Windows 10
- How to Install Active Directory Users and Computers in Windows 10
- How to Install Windows Subsystem for Linux (WSL) Distros in Windows 10
- How to Remove Programs from ‘Open with’ in Context Menu in Windows
- How to Enable/Disable Cortana on Lock Screen in Windows 10
- How to Turn On/Off Developer Mode in Windows 10


